Showing posts with label Tutorial. Show all posts

Wednesday, October 14, 2020

The Splendor of Fall Card Recipe

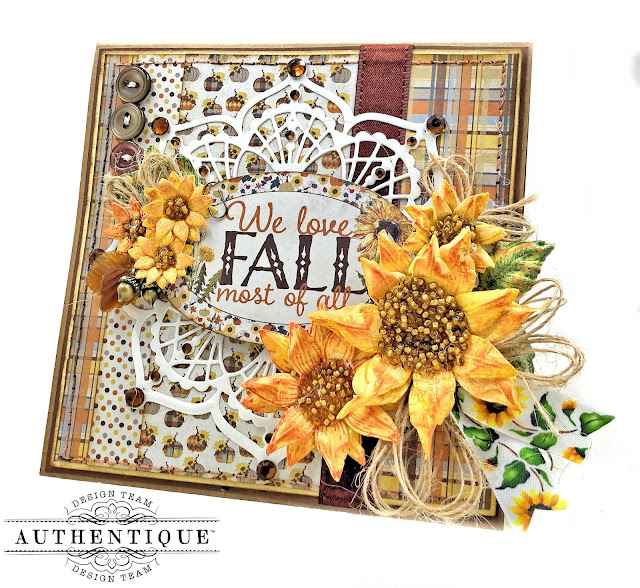
Really Reasonable Ribbon Fall Card Recipe by Kathy Clement

Hello, Friends!  Today I have a recipe for a pair  of "twin" fall cards that use ribbon...but not bows!

Fall Cards with Really Reasonable Ribbon by Kathy Clement

Ribbon doesn't always have to be tied into a bow.  For these cards, I created an elegant border with 5/8" Cappuccino Satin with a Grosgrain Edge Ribbon.  Attach the ribbon with 1/2" Scor-Tape.  Leave the ends slightly longer than the card panel.  Then wrap the ends around to the back side of the card for a neat and tidy finish.

No room for a bulky bow?  Fold a 4" piece of ribbon in half.  Cut fishtails on the ends.  Then tuck beneath a floral arrangement to add a touch of color and texture.  This Sunflower Satin Ribbon is a match made in heaven for these Splendor papers. Add a touch of rustic charm with  loopy Burlap String Bows.

Sunflowers and Really Reasonable Ribbon by Kathy Clement

The great thing about having card "recipe" is that you can use it as a template for cards made with any of your favorite paper collections and ribbons.  Here's the recipe for this card design.

All the papers for this card come from the Splendor 6x6 Paper Bundle.

  • First, create a 5 1/2" square top fold card base from one sheet of 8 1/2" x 11" kraft cardstock.
  • Next cut a 5 1/8" square of the fall plaid pattern. Save the off cut of this panel.
  • Cut a 5 1/4" square of yellow cardstock and a 5 3/8" square of brown cardstock.
  • Then cut a 2 1/2" x 5 1/8" panel of the fall pumpkins.
  • Now layer the cut papers on the cardstock mats as follows:
    • First put down the fall plaid paper panel.
    • Next layer in the offcut from the fall plaid paper about 3/4" from the left hand edge.
    • Then add the fall pumpkin layer.
    • Now stitch the panels to the cardstock mats on your sewing machine.

TIP: Steer clear of a sticky situation by placing your adhesive in the center of each panel and away from the sides.  This way, your sewing machine needle will not get gummed up and your thread will not break.

  • Now you are ready to wrap the card panel with your Scor-Tape and Ribbon.
  • Die cut two Doily Rounds from cream cardstock and adhere in the center of the card.
  • Then punch out the oval sentiment from the Cardstock Elements sheet.  Back with two layers of dimensionals and adhere in the center of the doily.
  • Add flowers, rhinestones, ribbons and vintage buttons to finish the card design.

TIP: You can use handmade flowers, or pre-made flowers.  Both are gorgeous. Find a tutorial for making these sunflowers HERE.

Fall Cards with Really Reasonable Ribbon Interior by Kathy Clement

Now we will finish the inside of the card.  It's easy, peasy!

  • First, cut (2) 5 3/8" panels of designer paper and adhere to the top and bottom of the card.
  • Next, create a pocket with the rectangular die cut sentiment from the Elements sheet. Just place your adhesive on the sides and bottom.
  • Create a belly band with a 1 3/4" x 5 3/8" strip of the pumpkin pattern.  Adhere just the top and bottom edges to the fall check.
  • Mat a 3x4 journal card on a 3 1/4" x 8 1/2" panel of cardstock.  Score in half and fold to make a little notecard to tuck inside the belly band.

Sunflower Card with Really Reaonable Ribbon by Kathy Clement

This "Twin" card is made in exactly the same way as the first card.  Just change out your patterned This"Twin" card is made in exactly the same way as the first card.  Just change out your patterned papers and sentiment.  Here's a look at the details.


Now that you know how to put these cards together, it will be quick and easy to make more!  

Wishing you all a joyful and creative day!

Cheerio,

kathy

SUPPLY LIST


Friday, September 20, 2019

Pretty Kanzashi Hair Clip

Hello there ribbon lovers.  Bonnie here again today and I'm sharing another fun Kanzashi creation using ribbon and accessories from Really Reasonable Ribbon.

This would be great as a hair accessory for an adult by adding a French Clip or other clip of your choice.  It would also make a nice pin for a jacket or bag by adding a Pin Back.

I added a pretty gingham Covered Button from Really Reasonable Ribbon to the center of the flower to finish it off.

This Kanzashi Creation was made with all 1-1/2" Solid Grosgrain Ribbons and 1-1/2" Gingham Ribbon using the petal variations in the videos below.  While it looks very large in the photo, it only measures a little more than 3" at the widest point.  It's the perfect size for an understated hair clip.

Kanzashi Ribbon Flower Petal #1
To view this video on YouTube, please click HERE.


Kanzashi Ribbon Flower Petal #1 Folding Variation
To view this video on YouTube, please click HERE.


I encourage you to give Kanzashi a try.  I bet you'll be hooked!


Thanks so much for stopping by today.  As always, I would love to have you swing by my Make Time to Craft blog as well and follow me over there.  Happy crafting!


Friday, August 30, 2019

Swingin' By Triple Easel Card

Hello, Friends!  I thought I'd just swing on by today with a super cute and cheery triple easel card.


With fall peeping around the corner, the squirrels in my back yard have been hustling and bustling around stocking their pantries with acorns.  This inspired me to create a super cute triple easel card with bright cheery, colors.


I found the perfect playmate for this card in 1/2"  Orange, Fuchsia and Lavender Checkered Ribbon. 


This ribbon ties the most beautiful bows!  Loopy burlap string bows match the kraft cardstock base, and lend a nice, woodsy feel to the ribbon cluster. 


My hand made flowers are died to match the ribbon, but you can find some great Wild Orchard Crafts Flowers in the RRR Shop.


I used burlap string a second time to tie these cute miniature acorns on the sentiment panel.  It's just amazing how a little bit of ribbon or fiber can make an embellishment come to life.

This was my first attempt at making a triple easel card.  After a little trial and error, I came up with a method that worked well for me.  So I created a little video tutorial to share with you here today.  This is just for building the triple easel card base, not for adding the card layers or embellishments.  I hope you enjoy!


Thanks so much for stopping by! 

Cheerio,
kathy

Monday, December 24, 2018

Meowy Christmas!

Hello, Friends!  Happy Christmas Eve Day!  I hope your presents are all wrapped, the cookies are all baked, the Christmas cards are all posted and you are sipping on an eggnog and nibbling on a cookie right about now.  If so, you are way ahead of me!  A while back on my blog, I shared an adorable "Santa Paws" Dog Themed Card Folio Tutorial using Kiwi Shimmer Satin and  Moss/Cream Plaid Ribbon


I had such fun creating this, that I thought I really should give equal time to all the cat lovers out there.  So I whipped up this "Meowy Christmas" kitty themed card folio for you today.  You can follow the same YouTube tutorial for making this project.

This card is adorned with one of my favorite holiday ribbons: Vintage Christmas Plaid.  To add a bit of Christmas sparkle and shine to the bow cluster, I tucked in some Gold Metallic String


Here's a peek at the inside of this festive feline folio. 


There's a fun flap/pocket combo.

As well as a sweet accordion style folio insert.  You can learn how to create this insert HERE

I wish you all a festive, restful, peaceful and joyful Christmas Eve!  And I hope Santa Paws tucks some sweet new crafting goodies under the tree just for you!

Thanks for stopping by!
Cheerio,
kathy

Thursday, April 27, 2017

Altering Seam Binding Ribbon with Distress Oxide Inks

Hello, Ribbon Lovers!  You all know how much I love to use Distress Inks to create custom seam binding ribbon on my cards and projects.  Well, I caved in and bought the new Distress Oxide Inks recently, and I was curious to see if they would do a good job of creating custom ribbon.  After an afternoon of inky goodness, I'm happy to report that I love the results!

I started with a standard sized manila tag, then added Distress Oxide Ink in Broken China, Faded Jeans, Fossilized Amber and Wilted Violet to build my base layer.  One thing I've learned about working with Distress Oxides is that the  more water you spritz onto the ink, the better it seems to look.  For this background, I used the standard "smoosh onto your craft sheet, spritz with water, swipe and tap" method, but I only worked with one color at a time.  I also heat dried each layer before proceeding to the next.


After dressing the tag up with some rub ons and texture paste, I spritzed it with Dylusions White Linen Spray.  These cute paper dolls from Tim Holtz are colored with the DO Inks and added to the party along with a chipboard frame that I painted with Picket Fence Distress Paint. 


To alter my seam binding ribbon, I smooshed Fossilized Amber DO Ink onto my craft sheet.  Then I spritzed it with water until little beadlets formed.  Next, I tapped about a yard of white seam binding into that inky puddle. The DO Ink gives the ribbon a heavier body than standard Distress Ink, and it holds the lovely crinkles even better. 

 After drying the Fossilized Amber, I created a smaller puddle of Wilted Violet Ink and just tapped the ribbon in here and there to add some purple highlights. Then I dried the ribbon with my heat tool again. Next, a visit to the Zutter-Bow-it-All Tool where I tied a shabbylicious bow. WOC  Cream Cherry Blossoms and Sweetheart Blossoms were the perfect finishing touch. 

So, if you were curious, now you know: Distress Oxide Inks are great for altering seam binding ribbon!

Thanks for stopping by!
Cheerio,
kathy


Wednesday, July 6, 2016

Be Someone's Sunshine! Memo Pad Tutorial

Hello, Ribbon Lovers!  I just love my first post here each month, because I get to share a project made with the fabby new Ribbon Club Assortment.  The July Collection is as bright and fun as a pot of petunias!  Take a look:


I fell in love with the Geranium Pink Taffeta Ribbon and decided it was a good match for some Simple Stories Sunshine & Happiness paper that I had in my stash.  And since I am the forgetful sort, I decided it would be a good idea to create a little to-do list notepad for myself.


I just wrapped the notebook with the Geranium Pink Taffeta and tied a simple square knot.  Easy peasy!  And I added a loopy bow made with Ivory Natural Burlap String beneath my pretty pink posey. 


I had a few snips of Geranium Pink Lattice Print Satin leftover from another project, so I cut some banner flags and tucked them beneath the focal.


The inside has a slash pocket and a little memo pad.  I  made one of these fun notebooks with a bee theme a few weeks back, and you all asked me for a tutorial...and because I love my Ribbon Peeps, I put together this Snapguide tutorial so you can make one of your own.  You'll find it below this post. 


Check out How to Make a Decorative Notebook With Chipboard by Kathy Clement on Snapguide.
 If you have kids home from school who are bored, bored, bored...this is a great project to make together.  Even little people have fun decorating the cover after the book is built.  So be someone's sunshine today, and pull out your crafty stash!

Thanks for stopping by!  Now go get your craft on!

Cheerio,
kathy

Monday, November 16, 2015

Santa Claus is Coming to Town

Hello, Ribbon Lovers!  I'm not trying to rush the season or anything, but here we are past the half way point in November, and Christmas is creeping up on us. It's definitely time for this gal to get busy with Christmas projects!  How about you?   I had an idea for an interactive Christmas frame the other day...and it involves a pocket, and custom dyed seam binding. Wanna take a peek?

I picked up this pretty white frame at a yard sale earlier this year, and have been saving it for just the right project.  I sat down the other day and had a blast building all kinds of layers, fussy cutting retro images, altering chipboard and all sorts of messy fun.

The cloth pocket in this frame really opens, and I thought how awesome would it be to tuck a tiny gift inside each day during the month of December?  It could be a movie ticket, an individually wrapped chocolate, a cocoa pouch, tea bag, a note...any little bitty treat to add a sense of excitement and anticipation to the month of December.

My little bottle brush tree was too green for this assemblage, so I painted it white and then added clusters of sparkly gold bead and berry clusters (out of stock at the moment, but Bonnie will replenish as soon as she can) to the tree base along with deep red gypsophila blossoms. I just love seeing the giant Christmas trees in the mall....you know, the ones that are banked with poinsettias.  That's the look I was going for here.

When it came time to make the bow, I decided to custom color some white seam binding. In case you've never done this,  I put together a quick step out tutorial for you.
Cut a 1 yard length of white seam binding, and crumple it up a little.
Choose two colors of Distress Markers to color the seam binding.  I used Pine Needles and Festive Berries to go along with my Christmas theme.
I used the broad nib on the marker and drew a green line on the bottom of the ribbon, then used the Festive Berries to make a red line on the opposite side, leaving a wide white strip down the middle.
Lightly spritz the marker with water and let the colors wick for a minute.  Then dry with a heat gun.  Don't crumple the ribbon until the ink is nearly dry, or the colors will bleed into one another and you will lose the striped effect.
Use your Zutter Bow-it-All tool to tie a multi loop bow and then top it with red, green and gold jingle bells to make everything fun and festive.

Seam binding is a wonderful item to have in your ribbon stash, because in just a few seconds, you can customize it to work with any project.  And, it's very easy to tie into a fancy bow.  Bonnie sells it in 100 yard spools for just $15.99.  That's a whole lot of ribbony goodness for not a lot of money!

Hope you enjoyed this little tutorial.  If so, let me know in the comment section below, and I'll try to throw more of these your way in coming posts.

Thanks for stopping by!

Cheerio,
kathy

Thursday, January 29, 2015

Double Tag/Pocket Valentine's Day Tutorial

Hello Ribbon Friends!!
Heather here and today I am going to show you how to create a simple double pocket and tags card.

I printed out a sheet of my tiny hearts digital paper, then put the piece back into my printer so I could print another one of the papers onto the back.  Now I have a pattern on both sides of the paper.
 I like to keep things simple so my paper is a standard sheet that measures 8.5 inches by 11.5 inches.
Simply cut off a piece that is 2.5 inches off the right side.  This will leave you with a 6 inch piece on the left.
Next you are going to score the larger piece in half both vertically and horizontally.  Please refer to photo below.  I also cut my smaller sheet into two pieces.  One tag will be 6 inches long the other will be 5 inches long.
 I have a cut starting on the horizontal score line starting on the right side of my paper and ending at the Vertical center score line (please refer to photo below).  Then I have added a bead of glue to the lower right edge....you can see it in the photo below. I have folded the lower right corner in leaving about an inch of the paper left before you reach the center score line.  Glue that down.  
Next I have folded the upper left corner over to the vertical center score line.  I have also added more glue to hold down the corner, and also to hold our pockets in place.  I have folded my lower right section on the vertical score line to the left.
You will notice in the photo below that my pockets are not quite completely glued down.  So I added some more glue to the edge of the pockets and glued them down.  Remember to stay close to the edge with your bead of glue or your tags won't fit inside.  I have also started to cut off the corners on my tags.  I cut one side first, then flip the tag, so I can cut the other side of the other tag...so they look the same.  
Once everything is dry, you will find that you may have to trim across the top of your card and the right of your card (the opening), so it all lines up really nice.  You will see the the hearts on the front are upside down...so when using your own paper...check to see what kind of patterns you have...because you wouldn't want upside down writing...  The hearts don't bother me...because I am going to cover up the front with other goodies anyways :0)  I have added Pink Crochet lace along my folded pocket's edges.  I put the tags in so you could see how they will look.
I went ahead and started adding some images from a few of my digital collage sheets.  I used the Tombow Foam Tabs  to elevate some of my images.  I added a bead of glue to the center of both pieces of pink crochet lace, and added a piece of Red Micro Gingham.  I used my Bow it All tool and Red Seam binding to create a double bow that I placed above my bingo card.  I also added a piece of the Gingham across the bottom of the front of card, under the Cherub, Valentine's Day Ticket and tiny  conversation hearts images.
I used 3 of the small  Deep Ivory Mulberry Roses.   I did simple tags, just layering some of my Valentine's Day Images on top of each other.  So Hearts and Cupid, more chocolate tickets, more conversation hearts images, and conversation hearts words, and medium heart images.
I kept my tag tops simple too in that I used the same red seam binding and tied a simple double knot.  Again I used my Bow it all tool to create a tiny red seam binding bow.
Here are the tags and close up of the front...with Glitter added of course.


I hope you have a wonderful day and have fun trying out one of these double pocket cards!
Thank you for visiting us at Really Reasonable Ribbon today!!
Hugs!!
Heather