Wednesday, April 30, 2014

I Like You "A Watt" Card


Hello guys! Nicole here and today is my last post for Really Reasonable Ribbon. *sigh* It has been such a fun journey to be designing along with those awesome ladies in the team and Bonnie. I want to thank her for giving me such a wonderful job for the past few months! I thought my last project should truly reflect who I am 100%.  So here is another Clear and Simple Card (CAS) for you. 


This is a one layer card using 2 step stamp. I stamped the image right onto the cardstock and dressed it up with the Lemon Baker's Twine. I love how clean the card is and how it directs the focus right to the main image with the twine. 

Want a quick tip for making a perfect bow with baker's twine? 1) Make sure that the twine itself is not twisted when tying the bow. This will help you to create a perfect, full circle shaped bow. 2) If you want the trims to flow nicely, add a bit of multi-medium glue to the trim and rub with your fingers. Create the shape you want the trims to be and they will try in that shape. Than you have a perfectly shaped bow!! 

I hope you've enjoyed seeing my project here in RRR. Thank you so much for all the love you've shown and hope you have much more fun with new & returning design team members!!

Hugs,
Nicole


Tuesday, April 29, 2014

See You Soon Jumbo Tag


RRR 4291407

Hello, Friends! Today is sort of a bittersweet day for me. This is my last post as a design team member for Really Reasonable Ribbon. While I have greatly enjoyed the past 6 months working with Bonnie and the rest of the team, my freelance business is headed for a very busy season and I realized that I will not be able to meet those deadlines if I maintain my current DT work load. Since I am DT Leader at Crafty Secrets, and am doing creative writing for Heartfelt Creations, that left me with just one team that I could leave. So today I have a special See You Soon jumbo tag as my farewell post for RRR.

RRR 4291401

I broke out some of my favorite ribbons and embellishments for this special tag. I layered Blue Topaz Satin Swiss Dot ribbon over my trusty 1.5" wide Natural Jute Ribbon and topped it off with a piece of dainty Rachel white crochet lace. This created a good foundation for my tag.

RRR 4291402

The digital stamp I used is from Crafty Secrets and is called See You Soon. I layered this over a digital landscape scene from their Creating with Vintage Typography CD. The Bingo card and little birdie also come from that CD. Here's a look at some of the details:

RRR 4291403

I think the combo of jute ribbon, satin ribbon and crochet lace makes for great texture. I also added one of my favorite little WOC Sweetheart Blossoms and a couple WOC leaves with the button. Of course, I secured those ribbons with Scor-Tape. The G45 metal staples was painted with Antique Linen Distress Paint to match the shabby chic feel of this tag.

RRR 4291404

Foam tabs let me add lots of dimension to the focal image. I also embossed, shaped and painted a metal butterfly from G45 and added Prima charms to the body.

RRR 4291406

And by now you know I love me some banners!

RRR 4291405

More gorgeous ribbon and flowers at the top of the tag. I added some Stitched Sheer Satin in Ombre Blue along with another sweetheart blossom and a crochet lace bow.

RRR 4291408

You get a feel of the dimension of the tag in this photo.

RRR 4291409

And that's really it for me this time, friends! I want to thank Bonnie for a wonderful experience and all the great DT ladies at Really Reasonable Ribbon, too. I will miss all the chatter and camaraderie...but notice that the caption on this card doesn't say "good-bye." It says "See You Soon!' And I hope that I will be back from time to time to share my love for Really Reasonable Ribbon with all of you. Thanks for all the great comments and support. I hope that those of you who have enjoyed my work on the RRR blog will come and visit me at Kathy by Design so we can stay in touch. Being a designer for Really Reasonable Ribbon this past 6 months has made me happy right down to the tips of my crafty little fingers.

Cheerio,

kathy

Monday, April 28, 2014

The Gnomies by Jenn Cochran

I gnome that this is going up late but I was hangin' with my gnomies last night and thought that today was the 27th instead of the 28th!!!!  bwhahahaha  Just kidding!  But I really did think it was the 27th today!  Jenn here from Jax Bean Stalks.  Hope everyone had a nice weekend!

Today I have this fun Gnome card with some fabulous stitched grosgrain from Really Reasonable Ribbon!


Hope you all have a great week!  


Sunday, April 27, 2014

Glamour Tag

Hello Peeps!!
Heather here and I have a tag that I would like to share with you today!  

I used some fabulous ribbon, trim, buttons and roses from 
I also used some Tombow Foam Tabs to elevate my Gecko Galz image, banner piece and stars.  I also added a few Deep Ivory Mulberry Roses and Pastel Buttons!!
I tied off the top of my tag with the Salmon Seam Binding.  You can see where I used the Juliet Lace to tuck in under my pastel buttons both on the star and in the upper right of the tag.  I love the metal gray swiss dots!  
I layered my Rose Silky Crush, Edna Lace and metal gray ribbon under my focal image, which was raised with the Tombow Fix it foam tabs.  
I just love all the tiny pastel buttons that I placed across the bottom of the tag with the Juliet lace!  I used my fine tip applicator and applied some dries clear glue, then added both Just Peachy and Gingerbread Art Glitters!
One last look at my tag.
I don't know about you...but I am lovin' the new RRR Blog!  I can add X-Large photos now..without the images covering up the sidebar!!  Woot!! Woot!!
This is my last official post here at Really Reasonable Ribbon.  I have enjoyed being on the team!!  I just decided that I would like to have a little more time to spend in my garden and get some things finished around my house this summer.  I will of course continue to use RRR goodies...Bonnie has the best ribbons, trims, buttons....everything..and Great Customer Service!!
I do hope to do a couple of posts here through out the summer so no good-byes for me....more of a see you later...alligator!!
Hugs!!
Enjoy your Summer!!
Heather

Saturday, April 26, 2014

Faith Banner

Hello everyone, Cheryl here with a Pennant Banner called "Faith" made for Really Reasonable Ribbon using the Beautiful Seam BindingsLaceMini Pom Pom TrimLeavesSweetheart Blossom Flowers and Buttons that can be found at the RRR Store.

These are super fun and easy to make.  I made this one to hang in my Craft Room!
I bought the pennant shaped banner at the warehouse sale, and then glued the pieces to card stock, and cut to give a pink border to these. Then I added Really Reasonable Ribbon's Mini Pom Pom Trim in white to all of them. After that I punched out the scalloped circles and circles for the lettering and added those to each pennant. I used the Seam Binding and ruched it up and created little bows for the flowers and buttons. 

The lace I used I placed on a couple of the pennants, and also used it on the I pennant behind the scalloped circle by looping it. I also used some Pink and Moss Green Leaves on 2 of the pennants to create vines. You can see this in the photo above.
The Letters I used are Thickers, and I used the foam Grey, and a Pink.
Supplies Used:
Really Reasonable Ribbons/Moss Green Leaves, and Pink Leaves
Really Reasonable Ribbon/ Seam Binding in Charcoal, and Vivid Pink
Really Reasonable Ribbon/Gabrielle Off White Lace
Really Reasonable Ribbon/Mini Pom Pom Trim
Really Reasonable Ribbon/Sweetheart Flowers
Really Reasonable Ribbon/Buttons


Thank you all for looking and hope you enjoyed today's Post!
Have a lovely weekend!
hugs to all,
Cheryl

Friday, April 25, 2014

Mother's Day Scarf Pin Tutorial

 
Hey there Paper Peeps! It's Ginny here and I'm just dropping in to share a fun and easy tutorial to whip up some great little flower, lace, and burlap scarf pins. These make great little gifts for Mother's Day too! Make up a bunch of these cuties to have on hand and you'll be ready with a thoughtful handmade gift whenever you need one. Did I mention they're easy????


Isn't that shabbylicious??? I think it would be pretty cute on a hat too!!!
Okay...let's get started:
I have 9 artificial fabric flowers....nothing to write home about....but I like the size and shape. I used my blending tool and Victorian Velvet Distress Ink to give them some color. Next I added some Liquid Pearls in Bisque to the outer edges. While it was still wet...I sprinkled on Martha Stewart fine clear glitter.  You can also add a little Walnut or Gathered Twig Ink to antique it like I did in the finished pin.  You will also need some flower stamens....these I found in the cake decorating section. I layered three flowers and added three stamens to the center of each.
Cut a circle from chipboard or other stiff backing material. I used an antique file folder since they are very thick and sturdy.  Pierce a hole in the center. Trim Burlap from the wired edge and cut a scalloped shape on one side. Pinch pleat and hot glue the burlap around making sure to cover the outside edge of the circle. Add a layer of Crocheted Lace trim next pinch pleating the same as you did with the burlap. This took 2 layers of each for the size of circle and flowers I chose....you may like more or less layers.
Begin pulling the stamens from the flowers through the center hole of the chipboard circle. You'll want to add all three flowers before you secure the stamens on the back.
I just squished the stamens into slightly cooled hot glue....still hurt : (  You could also use a wet adhesive like E 6000 if you're squeamish about burning yourself. Add the pin back now. I found them at the big box craft store...very inexpensive for a fairly large package. These came with an adhesive strip....but I don't trust that adhesive....so I added hot glue before securing it to the pin.


Once you have everything secured....give the burlap a little haircut to remove any stray stringy bits and be sure to check for glue strings before gifting it to someone special : )
 Okay I hope I've inspired you to create lot's of these to give to brighten someones day! I'm wishing you a happy and productive day with lots of time to be creative : ) G


Thursday, April 24, 2014

April Showers Bring May Flowers


Good morning ribbon fans!  Today I have another card to share with you, using lots of pretty ribbon and trim from Really Reasonable Ribbon.  
 
I just love to use ribbon and lace to embellish my cards, and Really Reasonable Ribbon has the best!  


One thing I love to do is layer ribbons and since it is one of my biggest craft room staples, I always have plenty to play with!  For this card, I layered Chloe Natural Crochet Lace1.5" Champagne NettingDiamond Satin Mineral IceIvory Wrinkled Ribbon and Spring Flowers Grosgrain Ribbon.


To make the pretty layered bow, I used my Bow it All Tool from Zutter to make a triple loop bow from Diamond Satin Mineral Ice then layered a slightly smaller bow made with
Dots Organza Light Pink.
 
 
I finished off my card using a variety of Wild Orchid flowers.


Thanks for stopping by and don't forget to pop back tomorrow for more inspiration!

Wednesday, April 23, 2014

Hand stitched just for you!


Hope you had a lovely Easter...we did!   I have a new creation for you made for Really Reasonable Ribbon.   Mother's Day isn't far off ...and everything you do for Mom should be special.  Including the package!  I found these larger pillow boxes and decided to deck them out with some fab goodies and trims.  I have a step by step here of my process.  
                        
1) I started with my box and covered it in my chosen papers and wrapped my box in natural burlap with wire in red as my base ribbon. 
2) I then prepared my sewing tag and wound it with cherry baker's twine and tied it around the 1.5 light blue crochet lace to keep it secure. 
3) I hot glued that right to the base of my first bow and added my 5/8 light blue crochet lace to the bottom edge of my papers. 
4)  From here, grab more of your cherry twine and wrap it around your spool a bunch and hot glue the spool to the middle of your crochet bow...add your mini "just for you" tag and your sweet wild orchid sweetheart blossoms nestled in the middle. 
5)  Almost done...add your diecut gingham square and red banner piece layering on each other on your tag and top with a fun vintage style button. 
 
 Done, done, and done!  The paper I used is from an Etsy store and the sweet sewing hand stitched tag is a Crafty Secrets  digital image. 
 Perfect to add some of Mom's fave candy or a fun jewelry piece for her. I think any Mom would feel a little extra special with a gift like this!   
Hope you enjoy!  
Hugs, cherry
 

Tuesday, April 22, 2014

April Ribbon Club Assortment from RRR

Really RR April 21 05
 
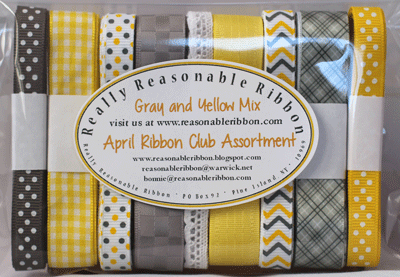
Hello, all you fabulous ribbon loving people! Today's cards are all sunshine, ribbon and flowers thanks to the totally inspiring Really Reasonable Ribbon April Ribbon Club Assortment. Take a peeky at these sumptuous ribbons:

Monthly Ribbon Club, Domestic

This is the perfect Spring ribbon collection. It makes me think of bright sunshiny days and April showers and blooming flowers. And that served as the inspiration for this card made with Graphic 45 A Place in time and French Country.

Really RR April 21 02
 

Really RR April 21 04


I think most of us are more than ready to get out and dig in the dirt, as opposed to digging in the snow!


Really RR April 21 06

I used Distress Embossing powder to add "dirt" to Modern Priscilla's tools.

Really RR April 21 07

This combo of Yellow and Gray Confetti Dots Ribbon layered with 5/8" Plaid Yellow Ribbon on top of 1.5" Natural Jute Ribbon just sings of Spring!


Really RR April 21 09

Here's a peeky at the inside.


Really RR April 21 01

and the matching envelope.
This second card uses more of the April Ribbon Club Assortment combined with Graphic 45 French Country.

Reasonable Ribbon April 29 01


Reasonable Ribbon April 29 02


Reasonable Ribbon April 29 03


Reasonable Ribbon April 29 04 

Look at this fabulous 5/8" Satin Crosshatch Ribbon in Light Silver. This ribbon is so silky and easy to use. Especially when you tie it with my favorite ribbon tool: the Bow it All. I've topped it with a sunny button and a couple of stick pins.

Reasonable Ribbon April 29 05

I created a tag pocket and dressed it up with Metal Gray Swiss Dots Grosgrain and a teensy bit of green hemp.

Reasonable Ribbon April 29 08

And here's the inside of this fun card with more of that fabby Metal Gray Swiss Dot ribbon.
Thanks for stopping in today. I hope you were inspired to get your craft on with these gorgeous ribbons! Creating with the April Ribbon Club Assortment makes me happy right down to the tips of my crafty little fingers!

Cheerio,

kathy