
Several people requested a tutorial on how to make the loopy petal flowers I showed on my March Blog Hop projects. I saw this idea a while back over at Cosmo Cricket using their glubers, although any large glue dot will work. I originally used one ribbon for the entire flower, but if you hop over to my MakeTime2Craft blog, you'll see that it's also fun to use several different ribbons on each flower.

For the card above I used a 1" glue dot and only did two rounds of loops instead of 3 to get the smaller flower. I also used purchased leaves on this one.
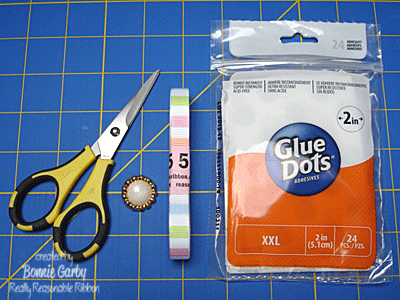
Loopy Ribbon Flower Tutorial
· 2" Glubers or Glue Dots XXL
· Scissors
· 2-3 yards of 3/8" Really Reasonable Ribbon - I used Pastel Multi-Stripe Grosgrain for the tutorial
· button or something to cover center

2. Then you want to make a loop and bring the ribbon back to adhere again. You want to just catch the ribbon to the right of the first piece. The glue dots are super sticky, so you don't need much ribbon to touch in order for it to stay put.


4. Once you meet your first loop back at the beginning, extend the ribbon down about another 3/16" so you are ready to start the next inner row. Then keep working around the same as the first row.

5. Once you get all the way around again, you will do the same thing for the final inner ring.

6. At the very end, clip the ribbon and press it firmly on the little patch of adhesive left in the center of the flower.

7. Take the button or flower center of your choice and adhere it with your choice of adhesives. I used a pop-up glue dot, but anything will work.

I decided I would like to add a couple of leaves to my flower this time, so I created some with grosgrain. Leaves are optional, but I think it gives it a nice touch.
Leaves - Tutorial
Supplies needed:
1-1/2" wide Grosgrain Ribbon
1/8" Scor-Tape (or sewing machine)
Scissors
Bone Folder
1. Cut a piece of 1-1/2" grosgrain approximately 4" long. Take a 2" piece of 1/8" Scor-Tape and adhere to the ribbon beginning at the middle and angling out to the edge.

2. Fold the ribbon in half and use your bone folder to make sure the tape is really adhered. Alternately, you could sew a little dart with your sewing machine. (I just didn't feel like getting it our for such a small project.)

3. Round the end of the ribbon in a leaf-like shape. No need to draw a line - I just did that to show you what I meant.

4. Now you have a nice looking leaf. I also took a lighter and sealed the cuts I made so there will be no fraying. Just lightly run the lighter quickly along the edge, or you can use a product like fray-check.

5. Then I just trimmed the bottom of the leaf on an angle so it's ready to adhere to your flower.

You can pull back the adhesive cover a bit on the back of the flower and attach the leaves where you want them.
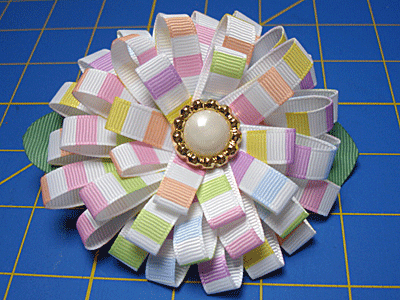
This flower is a great addition to a card, but you could also use it for a fun pin - I think it would look great on a jeans jacket! It's also great to add to a tote bag or a fancy wrapped gift.
For more information and an additional project, stop by my blog. Thanks so much for stopping by today!
~ Bonnie ~


That would make a great Easter hair bow!!!
ReplyDeleteJulie
www.scraphappypapercrafter.com
Way cool! Thanks!
ReplyDeleteLOVE your flower and your card is gorgeous, Bonnie!!!
ReplyDeleteWow thats brilliant:)x
ReplyDeleteThis is beautiful!!!
ReplyDeleteLove the size of this wonderful flower
Thanks for sharing
Beautiful flower! Thanks for the step by step!
ReplyDeleteWhat a beautiful card. I just love that flower.
ReplyDeleteGreat idea :)
ReplyDelete