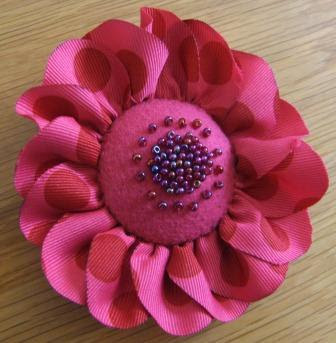
I made this ribbon flower brooch
using a combination of ideas from different sources, but it's quite easy really and certainly has the "wow" factor when worn on a black or white T-shirt, coat, jacket, turtleneck sweater, scarf, or even pinned onto a tote or purse.
Start off with these supplies (1 1/2" grosgrain ribbon, felt/fabric scrap, seed beads, DIY covered button kit, brooch pin back, BBQ/fire lighter), plus needle and thread, scissors, tweezers and a suitable glue of your choice (for fabric and metal).
 The ribbon I used here is one of the RRR 1.5" Big Random Dots Grosgrain ribbons, which come in a variety of wonderful color combinations in the RRR shop. First remove the thin wire edging from the edges of the ribbon (just grab the tiny end that will be peeking out and pull gently). Cut a 2" x 1 1/2" petal template from a piece of scrap card and round off the edges as shown in the pic at right.
Lay the template onto the ribbon and cut out 16 petals. (You can experiment using more or fewer petals and adjust the instructions accordingly for a simpler or more ruffled look.) Light your BBQ lighter (or candle or cigarette lighter) and holding a petal with tweezers, carefully run the flame around the curved edge of the petal to singe and seal the frayed cut rounded edge. (Here's a similar tutorial that will give you an idea of the method used to seal the edges. Experiment on a few scraps first to guage the distance you need to hold the ribbon from the flame to just seal the edge, not burn it! Believe me, this is the voice of experience speaking!) Repeat for all the petals. Sew a running stitch along the base of each petal, overlapping half a petal each time, until you have used all 16 petals. Gently pull the thread to gather the petals together and knot the thread at the end to keep the gathers from slipping.
Onto a co-ordinating or contrasting piece of felt or fabric, trace a 2" circle and then cut out at least another 1/2" around this mark to allow extra fabric/felt to tuck in when you cover your DIY covered button. Either use the fabric/felt circle as it is, or sew beads onto it as I have done. Remove the wire loop inside the button back and cover the button blank as per the instructions on the DIY covered button kit packaging. Glue the pin/brooch back onto the middle of the metal button back.
 Now gather the petals carefully into a circle that will be the same size as the outer edge of the covered button, and sew onto the edge of the button on the wrong side. It should now look more or less like this on the back (hopefully more rather than less!):
And, voila, turn it over and admire your handiwork!
I get lots of comments when I wear this brooch, and I'm sure you will too if you decide to make one. It's a bit "in your face" and big and cheerful, so feel free to downsize to narrower ribbon, smaller petals and a smaller sized covered button if you need to. Have fun!


Thank you for sharing this, I will for sure make one!! http://pennykitz.blogspot.com
ReplyDeleteHi! Tilly, Well I think your brooch is gorgeous, I wont tackle the task as it took me 3 hours to thread the last needle, but I think its gorgeous.You could have all sorts of colours for different outfits. Really lovely
ReplyDeleteLuv CHRISSYxx
it is really gorcieus!
ReplyDeleteOhhhhh, soooo meeee!!! I LOVE this and will probably try it tomorrow!! Soooo cute!!!!
ReplyDeleteHugs,
Teri
This is fabby Tilly! ;)
ReplyDelete