Showing posts with label Score-Tape. Show all posts

Monday, October 25, 2021

Sweet Tea with Really Reasonable Ribbon

Hello everyone and happy Monday to you all! Today's Tea cup was designed for Really Reasonable Ribbon and for a class I'm doing for my doll club meeting in November, that I'm hosting. I thought this would be a fun project for the ladies to all do.
 
My tea cup was cut using a die and matt board to give it some strength.  I used Scor-tape to hold it together. I then glued all the design papers to each matt board using Scor-tape and a little liquid glue. I had bought a huge pack of this design paper at our local warehouse sale.  It cost me 1.00 for like 25 sheets - super awesome deal. The die I used is an Old Sizzix die. I added Really Reasonable Ribbon's Gabrielle Lace.  My flowers were done using my Glass Flower techniques found HERE on my blog. I have a few different ones, hope you enjoy! I then hot glued the pearls to the centers of all my flowers. I added some feathers and some branches for some embellishing on my cup. The ribbon bow was added on to hang the tag. I forgot to stamp a sentiment on my tag, oops!

Really Reasonable ribbon Supplies:
other supplies , liquid glue, hot glue, pearls, distress ink, feathers, punches, and dies.

Thank you so much for looking and hope you love my post for today!
Hugs,
Cheryl

Friday, January 24, 2020

Love You Tons Birthday Card


Hello everyone.  Cheryl here today with this sweet darling card I made for my Grandson's 2nd birthday, using ribbon and supplies from Really Reasonable Ribbon.  I love the delicate stitched satin ribbon as it makes perfect bows!

On my card I chose to use the Silver Delicate Stitched Satin Ribbon from November Ribbon Club Assortment and the ribbon can be found here.  Bonnie carries so many beautiful colors in the Delicate Stitched Satin at the Really Reasonable Ribbon Store. Next I did all my layering using some darling Pebbles Design Paper called Special Delivery. The sweet elephants and stamps are from My Makers Movements and they are so cute.  I just had to use them on his card. For the Happy Birthday I chose to use a rub on, I haven't used those in a while so it came out a little wonky....hehehehe.  Next I added some white dots using a gel pen, and then added a little heart button. The layers of my card were put together using the Scotch Advance Tape refill and then the white foam tabs for 3-D effect. I added the top to the base using Scor-Tape. I also did the inside of my card to coordinate with the outside. Love when I think to do that ahead of time, otherwise I normally just add white cardstock to the inside.


Really Reasonable Ribbon Supplies:
 Delicate Stitched Silver Satin Ribbon
Scotch Advance Tape Refill
Foam Tabs
Scor-Tape

other supplies used:
Love you Tons stamps and coordinating dies from MyMakersMovement
White Gel pen
Heart Button
Pebbles design paper
Rub on (Happy Birthday)
Hot glue (for bow)
Club Scrap Black Ink
Mini Misti for stamping
Hope you enjoyed my post today! Thank you so much for stopping by!
Have a lovely day,
Hugs to all
Cheryl

Wednesday, October 9, 2019

All Hallow's Eve Mini Album Page


Hello everyone.  Today I have another page for the mini album I've been working on. This one is the All Hallow's Eve page designed for Really Reasonable Ribbon, and will be for Halloween photos. On this page I wanted to use the beautiful ribbons from the September Ribbon Club Assortment as they are all so pretty!

So for this page I used black card stock for the base, and made it so it's open on both sides for easy attachment to the album. Next I created the flaps and pockets using Graphic45 design papers. I kept the decorations  pretty simple for this page. I did add beautiful ribbons from the Septembers Ribbon Club, some covered buttons, bats, and a candy. I love making these pages to be interactive and have lots of room for photos and journaling. Hope you enjoy my post, as I've also included a little video showing how the page opens.


Really Reasonable Ribbon Supplies used:
Scor-Tape
Tape refill scotch
Delicate Stitched Satin tangerine
Swiss dots black
diamond satin grape

Thank you for stopping by and have  a lovely day!
Hugs to all,
Cheryl

Wednesday, May 30, 2018

Splendid Seam Binding

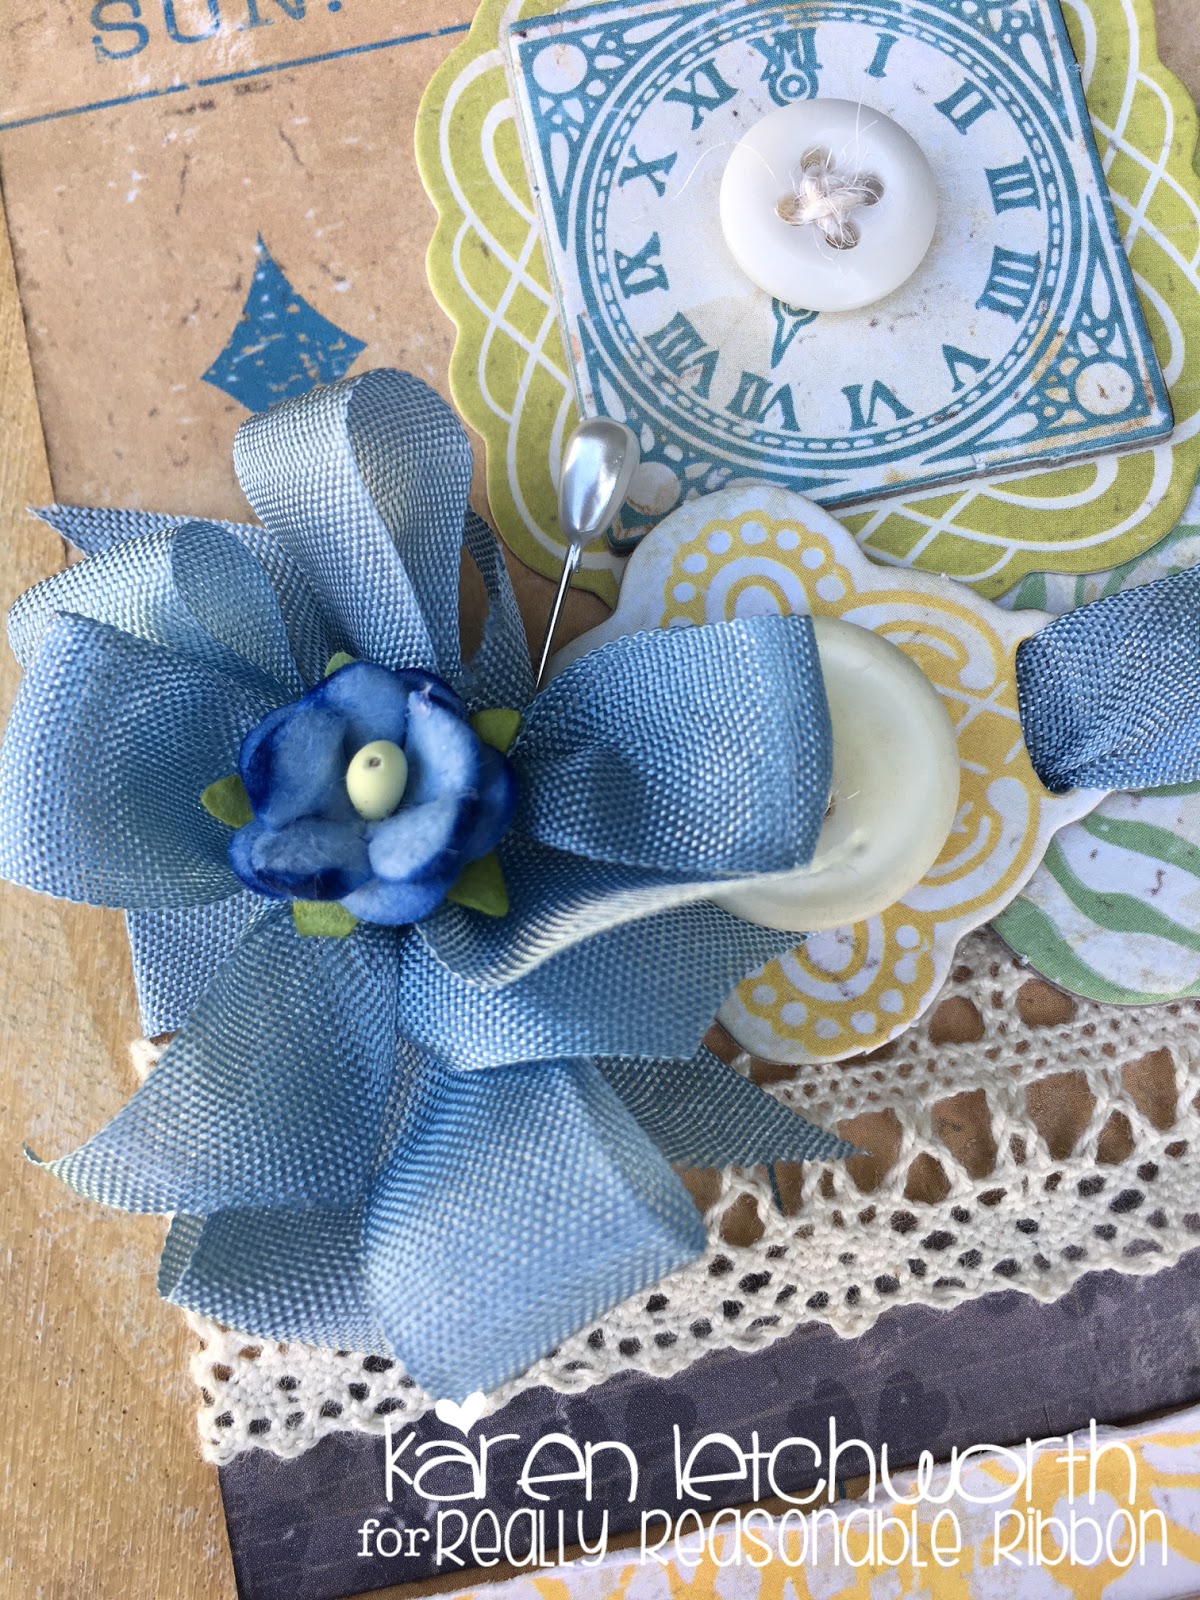
Hey there to all our fellow ribbon-loving and coffee-loving friends!  It's Karen Letchworth posting today, and I'd like to share a couple of cards that incorporate two of my favorite things.....coffee and ribbons!   I just can't get enough of either, and while there's never a problem finding my coffee (at home or my local coffee shop) ...... Really Reasonable Ribbon is the best place to find ribbons!
Today I'm sharing two cards with you.  Both were made using a Crate Paper line called Restorations.  It's a very old line that I love, and I scored big time on EBay recently and picked up a bunch of it.  For this first card, I used three different patterned papers on my background that I attached together using an amazing Adhesive called Scor-Tape, which comes in several different widths.  Once I had my base together, I attached some chipboard pieces and stickers from this line, again by using Scor-Tape.  I also added three buttons that have Ivory Burlap String tied in their centers.
I also ran a piece of Natural Crochet Lace across the bottom of my card, and a piece of Danish Blue Seam Binding above that.  I also used the Danish Blue Seam Binding to make that lovely bow.  Really Reasonable Ribbon carries 24 vibrant colors of Seam Binding, it costs just 30 cents per yard, and it ties so easily into the most gorgeous bows!  The finishing touches on this card are the stick pin, and the lovely Blue Sweetheart Blossom I placed in the center of my bow.
My second card celebrates my love for coffee along with my love of ribbon, and it uses all the same patterned papers, chipboard and border stickers as the first card.  Again, I attached my patterned papers together using Scor-Tape.  Then, I did some machine stitching, and added a lovely bow using Noble Peacock Seam Binding topped with a Pink Sweetheart Blossom.
The "coffee" sentiment is a die-cut, and I used two doily die-cuts at the top of my card (the larger from Cheery Lynn Designs and the smaller from Papertrey Ink).  I added a Prima ticket from my stash.  That's about it.  I hope you'll stop by Really Reasonable Ribbon to check out all the amazing trims,  Seam Binding, the fabulous Mulberry Flowers, and SO much more!

Thanks so much for stopping by.  Have an amazing day!

Karen

P.S.  Please visit my blog My Cup Runneth Over for further info regarding my inspiration for these cards.

Tuesday, November 14, 2017

Merry Christmas

Hello Crafty Friends and Tuesday to you all!
Today's card was created for Really Reasonable Ribbon. using the Country Holiday Ribbon , Delicate Stitched Satin Ribbon from this months Ribbon Collection. I have to say I LOVE LOVE LOVE all the ribbons in this months assortment, but then again I love every months assortment so that is an easy one :) I chose the blue as it goes perfectly with my card for today.

Stamps and design paper are all from the Scandinavian Holiday set from Club scrap. I did stamp the deer, Merry Christmas and snowflakes from the stamp set. Next the design paper was cut from the 12 x 12 sheet of design paper. Back blue card stock was stamped using a blue ink and snowflake stamp. I added some embellishments and beautiful Really Reasonable Ribbon in a Delicate Stitch blue ribbon.
I love how simple this card turned out, and normally I love a lot of layers and such, but for this one I tried to keep it simple, and for me this is simple, kinda clean and simple....hehehehee

Really Reasonable Ribbon Supplies:
Delicate Stitched Ribbon
Covered Buttons
Rhinestones
Foam Tabs
Foam Tabs thin
Scor-Tape

Other Supplies used:
Blue thread for sewing
hot glue gun
Brown ink
White Gel pen
Design Paper From The Scandinavian Holiday Collection
Red Card stock
Scandinavian Holiday Jumbo unmounted rubber stamps


Thank you so much for looking and have a lovely day!
Hugs to all,
Cheryl

Tuesday, October 3, 2017

Welcome Baby Treat Bags & Diaper Cake!

Hello everyone and Happy Tuesday!
Today I wanted to share these darling Welcome Baby Treat bags & Diaper Cake that I created for a special baby shower I did this past weekend for my son and his girlfriend who are due to have our grandson this December 25th. I used Really Reasonable Ribbon to create both the Diaper Cake, and I made 32 of these treat bags and had a lot of fun creating them.  They have candy bars inside them. Fun little treats.

So for the bags I used what I had.  Thank God I had 36 of these..hehehehe, I then used dies to cut out the fancy label and the Cheery Lynn Pierced stacker die. I then used SU! punches for the scallop circle and the circle. The little stamped sentiment is an old SU! stamp.

To layer each of the die cuts, I used Really Reasonable Ribbons Thin Foam Tabs. Then to close the flap on the top I used Scor-Tape in the 1", as it made it easy to do 32 of these. The big brown bow was done with Really Reasonable Ribbons Brown Satin Ribbon, and next I used what I had left of the sweet Baby Hands Blue Grosgrain Ribbon.  For the centers of the bows I used brad buttons that I had a ton of in my stash.

Really Reasonable Ribbon Supplies Used:
Thin Foam Tabs white
Scor-Tape 1" to close the flap
Double Faced Satin Ribbon
Baby Hands blue grosgrain ribbon
polka Dots 1 1/2"

This is one of the diaper cakes I made for the shower, it uses the Really Reasonable Ribbon Brown Satin Double-faced Satin as well. I also used the Baby Blue and Brown Polka Dot Grosgrain and used the solid sides of those by just flipping the ribbon over and using the backside, as I needed it to be solid for this cake.

I hope you enjoy my post for today, as I really had so much fun planning this fun shower. I will share a couple of other photo's in my post here for you all! Hugs!
Here are the Proud Momma and Daddy to be! So exciting! You can see the bags and the diaper cake to the right side :)


Thank you so much for looking and have a lovely day!
hugs to all,
Cheryl

Monday, September 4, 2017

Happy HALLOWEEN Card!

Hello everyone, and Happy Labor Day to you all!

Today I have a sweet little card I created for Really Reasonable Ribbon using the beautiful Brown Satin, and the sweet little Itsy Bitsy Spider Grosgrain Ribbon from the RRR Store.  I love the Halloween ribbon you will find here under the holiday ribbons, it's absolutely darling, and these spiders are the cutest spookiest little guys you have ever seen...hehehe coming from the gal who hates spiders......hehehehehehe.  Oh my!

Anyways for my card today I chose to use a card base I had previously cut using the cricut machine. I have some of these set aside so I can use them. I then added a Cheery Lynn doily cut using the design paper from Tricks and Treats pebbles stack. The flowers are also a design paper polka dots cut out using Cheery Lynn Designs Tea Rose Small strip die. I did use the Glass Flower Technique and it can be found here on my blog under Tutorials. I have several videos on this using different techniques on the flowers then doing the glass technique, super fun!

The little tag is also from the same paper collection.

Really Reasonable Ribbon Supplies used:

Thank you so much for stopping by and have a lovely day!

Hugs to all,
Cheryl

Thursday, August 3, 2017

Childhood Memories Layout

Hello everyone, and Happy Thursday to all!
Today I'm sharing a super sweet layout I made for Really Reasonable Ribbon using the beautiful Ribbon, Embellishments, and Scor-Tape they carry in their shop. Love how this sweet layout of my 3 kids turned out. This one photo was taken back in 1997 when they were all little, and I love how it goes perfectly with the design paper too!

I really enjoyed creating this layout for my post today. It was fun trying the different design papers and getting everything laid out. I love the colors/prints I chose to use on this one. All the flowers and dies are from Cheery Lynn Designs, and all the centers of the flowers are embellishments from RRR. I will list them right below.

Really Reasonable Ribbon Supplies Used:

It's so much fun to add the photos to layouts that we create, sometimes I don't add photos, as I'm not sure what ones I want, or I haven't printed them yet, however this one was set aside for this collection of paper and it brought back so many wonderful memories of this time when they were young  I miss those days. Now they are all grown and have their own lives.

I ran the gingham ribbon down the center of my one banner layer in kinda the middle of the page, then added a bow. Next I chose to use the red polka dot satin and made another bow to scrunch in the center of my black gingham bow.

Flowers were cut using the coordinating design paper from the Mother Goose collection. I added the embellishments to all the flowers, and also distressed them using ink.  My one covered button was distressed in yellow, as I didn't have a yellow one to use.
Thank you for stopping by, and have a lovely day!
Hugs to all,
Cheryl

Monday, July 24, 2017

Vintage Botany Card

 Hello everyone, and Happy Monday to you all! Today's card was created for Really Reasonable Ribbon using their beautiful satins. This one is the Satin with Grosgrain Edge, and it's absolutely gorgeous! I love how easy the bows come together using this ribbon. To see all the Satins please visit the Really Reasonable Ribbon Store here.

To create this card here, I chose to use the new Vintage Botany collection from Club Scrap. So design paper, stamps, and stencils are all from one collection. I knew Really Reasonable Ribbon would have the perfect ribbon to go with this kit, so I chose the satin with grosgrain edge, and it's perfect. RRR also has some other beautiful satins and taffetas that match perfectly. LOVE this!!

Next I colored my image with Copic markers R85 & RV11 for the flowers, then for the greenery I chose YG03 & G99 they worked perfectly! For the center of the big flower I used some Stickles in the color of fruit punch. I have had my Stickles for about 9 1/2 years, and they still work perfectly.

I added sewing with my machine, in a light pink, and then added gel dots in white.

My layers are popped with RRR Foam Squares and the layers were glued together before sewing using a small piece of Scor-Tape, both of these can be found at Really Reasonable Ribbon under adhesives

I hope you enjoyed my post for today, as I enjoyed creating this card to share with you all! Please leave a comment letting me know what you think :)

Hugs to all,
Cheryl

Wednesday, June 14, 2017

Splendid Sweetheart Blossom Card

 Hello everyone, and Happy Wednesday to all! Today's card as created for Really Reasonable Ribbon using the Beautiful Delicate Satin Stitched Ribbon and beautiful flowers. The ribbon I chose came in this month's beautiful Ribbon Club Assortment from RRR and I absolutely LOVE all the ribbons in this months collection.

I started with using some design papers from Authentique Splendid collection. It's an old one, and lately I've been pulling out old 6 x 6 paper pads and trying to use them :)  I LOVE the color combo I chose for this card, and the design paper too. RRR matches perfectly to this collection!

Flowers are the Sweetheart Blossoms, and Apple Blossom, and branches are from a Martha Stewart Punch.

I did use Scor-Tape to put all my layers together, and to pop up I used Foam Squares.
I enjoyed making this card for today, and love adding lots of layers. This one has 5+ Layers, and flowers & branches!
Thank you for looking and hope you have a super awesome day!
Hugs
Cheryl

Saturday, January 14, 2017

Live Laugh Love

Hello everyone, and Happy Saturday to you all! Today's card was created for Really Reasonable Ribbon using the Beautiful Shimmer Satin, in Electric Blue.  What a gorgeous color this ribbon is, and it goes perfect with the design papers I used. I LOVE LOVE LOVE this ribbon, and the beautiful glitz it has.
The bow I made is a double bow. I like the fullness of it. I did add a beautiful RRR Embellishment Rhinestone to the center of my bow.

I also wanted to add some Really Reasonable Ribbons Mulberry flowers, as I miss seeing them in bloom. So I added some Sweetheart Blossoms in yellow, orange, and blue to my card. The leaves I used are the green leaves, and everything is hot glued on.

All of the beautiful layers of my card were put together using Really Reasonable Ribbons Scor-Tape , and Foam tabs both can be found here. Design paper & stamps used are from club scraps "color me happy" kit.
Thank you for looking and have a lovely day!
hugs to all,
Cheryl

Monday, May 16, 2016

Ribbon to the Rescue: Salvaging a precious heirloom with ribbon

Hello, Ribbon Lovers!

In the wake of our recent move, I was working on getting a closet tidied up today.  In the course of arranging the books all nice and neat, I ran across a family heirloom: my mother's Bible.  (Well, one of my mother's Bibles, that is.  She had several and used them all. ) This one was given to her by my dad in 1969; the last Christmas gift he ever gave her.  A few short months later, he died suddenly of a heart attack.  It remained her favorite Bible for many, many years and was nearly falling apart.  Filled with her personal notes, Bible journaling (before it was a trendy topic) and her own handwriting, it is something I have treasured.  It made my heart sad to see how very dilapidated it had become, and I worried that it might not be around to pass on to our children and grandchildren.  I mean, peeps...it was really, really sad!
You can see that she tried to hold it together with tape, bumper stickers, anything she could find.
The inside had actually separated from the spine.  What to do?

Then, an idea struck my brain!  Dropping everything, I carried the Bible into my studio with me and went to work.  A few hours later, this is what my mom's Bible looked like.
Ta-da!  Ribbon to the rescue!  I pulled out a piece of sturdy canvas, some shabby chic ribbon, crocheted lace, flowers in my mom's favorite colors and gave this precious book a face lift!

The first thing I did was to line the book signatures and the interior of the spine with 1/2" Scor-Tape.  Using the tape on both surfaces worked well, and the pages are now nicely secured back within the covers.
I'm not much of a seamstress, but I managed to stitch 2.5" Cotton Blend Vintage Pink Floral Ribbon to the top, bottom, sides and spine of the canvas to make a sturdy cover that should last for some time.   I also stitched  Debra Natural Crochet Lace along the edge where the canvas and ribbon meet to add a nice finishing touch...and to cover up my not so perfect stitching!  Sorry, Mom!.
 I used tea to stain a doily I found in my stash, and glued it in place with Studio Matte Multi-Medium.  Then I used Scor-tape again to adhere my 1.5" Antique Gold Plaid Ribbon to be used as a ribbon closure.  I wanted to do this, not just because it is pretty, but because it helps hold the Bible together.
Then I had lots of fun! I painted a wooden key/door plate and flourish to add to the mix. Next, I die cut lots of foliage from old book pages and sprayed them with TA Olive Mist. I pulled loads of flowers from my stash, and was amazed to find these that matched the ribbon perfectly. The elements were artfully arranged onto the cover of Mom's Bible.  The finishing touch was the addition of a shabby chic bow tied with Fuchsia Seam Binding.

Now Mom's favorite Bible is restored, and more beautiful than ever.  She would have loved this shabby chic cover, the beautiful vintage roses and crocheted lace.  I have displayed it in my Grandmother's bookcase, and it makes my heart happy every time I see it.  Once again, Ribbon came to my rescue!

Isn't it amazing what ribbon can do?

Thanks for stopping by!

Cheerio,
kathy

Saturday, May 14, 2016

Girly Posh Mini Album Page

 Hello everyone , Cheryl here with a page I designed for a Mini Album I am working on for my Grandbaby Chloey who is due to arrive this month!!! Wooohooo, can't wait to meet her!!! I am loving how my album is turning out, and I used LOTS of beautiful Really Reasonable Ribbon on this page today!
So for this page I used the beautiful Satin Double faced ribbon in Hot Pink 5/8" wide for my BOW! On the interactive part where the photos will go inside I used the Black Sheer Box Pleat Trim.  I hot glued it, and then added some bling. Next I added some of the Double Ruffled Edge Satin in Azalea 1 1/2" thick, cut in half and layered for a double ruffle layered look.
 I did add some WOC flowers, random flowers, and glass leaves to my layout for today. I used feathers, and some swirl bling for my page as well.  I can't wait to finish my album and share in a video with you all!
 I absolutely LOVE LOVE LOVE how all the ribbon and embellishments look on this Posh Paper! I hope my daughter loves it too! I figured this will be Chloey's album for when she is in her toddler years. I will have to work on an actual BABY album, and have plenty of time to do so :)
 Supplies:
Really Reasonable Ribbon Black Box Pleated Trim, Double Ruffled Edge Satin Ribbon, Satin Hot Pink Ribbon 5/8". Feathers, flowers, bling, sewing, swirls, tag, Posh paper line. Interactive Page! Really Reasonable Ribbon Scor-Tape
Thank you for looking and Please let me know what you think of my page today!! :)
Hugs to all,
Cheryl