Showing posts with label Shimmer Satin Ribbon. Show all posts

Friday, October 11, 2019

Snarky Masculine Birthday Card

Hello, Ribbon Lovers!  Do you struggle to find a way to use ribbon on a masculine card?   When I do, I look for textures and fabrics that make me think of men's ties and suit coats.  So for this slightly snarky birthday card, I chose to work with Shell Grey Shimmer Satin on the bow.  Top the bow with a grey button and a little birthday charm for the perfect finishing touch.


You can also layer a patterned ribbon, like this Black and Grey Diamond Print Grosgrain Ribbon over the same shimmer satin to create a stunning border treatment.  Simply place a layer of 1/2" Scor-Tape on the card base, then wrap the ends around to the back side of the card panel for a neat and tidy finish.  Follow the same process with the Diamond Print grosgrain, but use 1/4" Scor-Tape this time.  Top with a trio of the same grey buttons.  This look makes me think of a man's French cuff.  It's very chic!


Here's a peek at the inside of this fun masculine birthday card.  Clean and simple works just fine here.

I hope I've shared some tips and tricks that will help you make your next masculine card with ribbon!

Thanks for stopping by!
Cheerio,
kathy

Wednesday, September 5, 2018

Deer Winter Card

Hello everyone and Happy Wednesday to you all! Today's winter themed card was designed using Really Reasonable Ribbons beautiful Shimmer Red Satin Ribbon. I tried to keep my card kind of simple, so very limited embellishments and layers. Normally I love embellishing and using tons of layers as most of you know, but sometimes its nice to change it up a bit. Today's post will be short and sweet...hehehe

For my card I kept this one on the smaller side, it measures 4 1/2" x 4 1/2"  and the second layer with the scenery measures 3" x 3". I stamped them using Justrite Papercrafts stamps, and the deer as well. I did add some glitter, to give a little added glitz. I believe the design paper is DCWV.

For my layering I used Really Reasonable Ribbon's adhesive foam squares, and Scotch ATG refill tape. Lastly I did add some white gel dots, and sewing to my card.

Really Reasonable Ribbon Supplies:
Shimmer Satin Ribbon
Foam Squares
Scotch ATG refill Tape


I love how fast and easy my card came together. Hope you enjoy my post for today! Thank you so much for stopping by and have a lovely day!
Hugs to all,
Cheryl

Monday, August 20, 2018

Let it Snow Winter Card

Hello everyone and Happy Monday to you all! Today I have a sweet little snowman card I made using the beautiful ribbons from Really Reasonable Ribbon, and also some of the darling embellishments and rose buds on my card for today.

Of course Christmas is my favorite time of year, however it takes me a while to get into the crafting mode on this, so I do like to try to start early, as by October I will have huge messes in the craft room with all Christmas goodies and paper stacks and stuff all over, and anyway I'm sure I'm not the only one who does this...hehehehe.  So for my card I did use this darling paper.  It has sweet snowman on it, and I thought it would go perfectly with this sweet stamp set from JustRite Papercrafts. I love how Really Reasonable Ribbon matches perfectly with all sorts of designs, and both the Shimmer Satin Red and Satin Swiss Dots Pearl Pink go with this collection to make my double bows.

All layers were done using the ATG refill tape, and then I added sewing using my sewing machine. Next I also used the Foam Tabs to pop and give a 3-D look to the layers after they were put together.

For my poinsettias, which were cut using JustRite dies, I added some of Really Reasonable Ribbons 8mm and 10mm white flat backed pearls to the centers. Each poinsettia was brushed using  perfect pearl to give a little glitz to the flowers. Next I added in some of the RRR Rose Buds in a white , they look so pretty, love these!

Resin Flowers were added to the corners, and these little flowers are so sweet and perfect for cards, and centers of flowers, also for decorating up the corners of your card like I did here.

Really Reasonable Ribbon:
Satin Swiss Dots Pearl Pink
Shimmer Satin Ribbon for the Red
Scotch ATG Refill Tape to put together layers
Foam Tabs
Rose Buds
white flat backed pearls
Resin Flowers

The little snowman and Let it Snow were stamped using the Mini Misti tool, and colored pens. I added some Stickles to the snowman for his black buttons. Love the colors I used for this card, they are not your normal traditional Christmas colors but they sure are fun!
Hope you enjoyed my post for today, and thank you so much for stopping by!
Have a lovely day!

Hugs to all,
Cheryl

Wednesday, August 2, 2017

Everything Starts with a Dream

Hi ribbon lovers.  Bonnie here with you today with a colorful card featuring a few of my favorite ribbon styles from Really Reasonable Ribbon.
This is such a wonderful color combination, right?  I am using great new digital stamp and paper packs from Graciellie Design today.
I ran a strip of 5/8" Misty Turquoise Shimmer Satin Ribbon across the center of the card and topped it with 3/8" Hot Pink Quatrefoil Satin Ribbon and then centered my magnolia image over that.
My bow was created on my Bow-it-All V3.0 Tool using 5/8" Rose Bloom and Shocking Pink Delicate Stitched Satin Ribbon and then center is adorned with a Heart Shaped Flat Back Pearl from Really Reasonable Ribbon.

For a video tutorial on how to create this pretty bow, please click HERE.
Thanks so much for stopping by today.  For more information on the other products used on my card, please visit my Make Time to Craft Blog.  Happy crafting!

~ Bonnie ~

Sunday, May 28, 2017

Lovely

{judy} Hello Ribbon Friends! Today I have a "lovely" card to share.
My background was made with Distress Stains painted into my embossing folder, spritzed, and then run through my Big Shot. I love how it turned out. 
I then adhered a doily and wrapped it to the back of the card, so only half was showing. I added some beautiful Aqua Satin Shimmer Ribbon, and a Rhinestone Ribbon Slider for my trims, and used one of the beautiful Magnolia Blossoms in the RRR Store. 
I finished off my card with a word die from Concord & 9th. All of my layers are adhered using Scor-Tape.

A fun card mixing traditional elements, as well as a newer technique! Thanks for stopping by!

Tuesday, March 28, 2017

Wonderful Friend

{judy} Good morning ribbon lovers! Today I have a monochromatic card (almost!) to share with you, using some of the gorgeous Shimmer Satin Ribbon that Bonnie carries and a little touch of bling!
I used all sorts of teal and aqua shades in my inks and paper, and added another shade for my ribbon, using the Aqua Shimmer Satin. I love the sheen of this ribbon, and it comes in so many beautiful colors!

The silver metallic butterfly adds its own sparkle in the light, and I set that off with one of the pretty Rhinestone Ribbon Sliders in the RRR Store - the 18mm round slider.
Images and dies by Stampin' Up! I love the elegance that the ribbon sliders add - fast and easy! Thanks for stopping by today!

Friday, March 24, 2017

Floral Layout

Hello everyone, and Happy Friday to all!  Cheryl here today with a beautiful layout of my Grandma I created for Really Reasonable Ribbon using the beautiful shimmer satin, and embellishments. I LOVE how this layout turned out!!
I truly miss my Grandma, she was such an inspiration.  Not only was she my Grandma, but a Mom, Best Friend, and someone who would listen to what you had to say, and never was negative about it. Always tried to cheer you up when things were down and have you look at the brighter side of life. Wow how I miss hearing her voice and spending time with her. She was so loving, and spent her time with you.  We always enjoyed having my grandma come stay at our house for the day, have dinner, and then hubby or I would bring her home. All the sweet memories I have , I will cherish forever! Love you Grandma!!!!

Anyway, now that I have tears, I best move on to my layout! I chose these 3 photos of my Grandma. One was from when she was little baby(1917) and then next I'm not sure what age she was. But the last is from when we had photos done in 1991.  We did a 4 generation photo.  I just cut off the rest of us to make this layout just of my grandma. All photos were copied in black in white years back, and now are being used, so happy for this!

I ended up printing out the borders from the Delft Digital set, backed them with the dark blue from Boardwalk Club Kit, and then added blue sewing to each. The tag that I cut in half for this layout I just love.  It's absolutely beautiful, and there is room for writing.  I just LOVE the printouts of these, and love how they look on my layout for today.

The yellow background design paper is from the Delft Deluxe Kit. I also used the stencil from this collection to use on the background of the photo mattes for each photo.

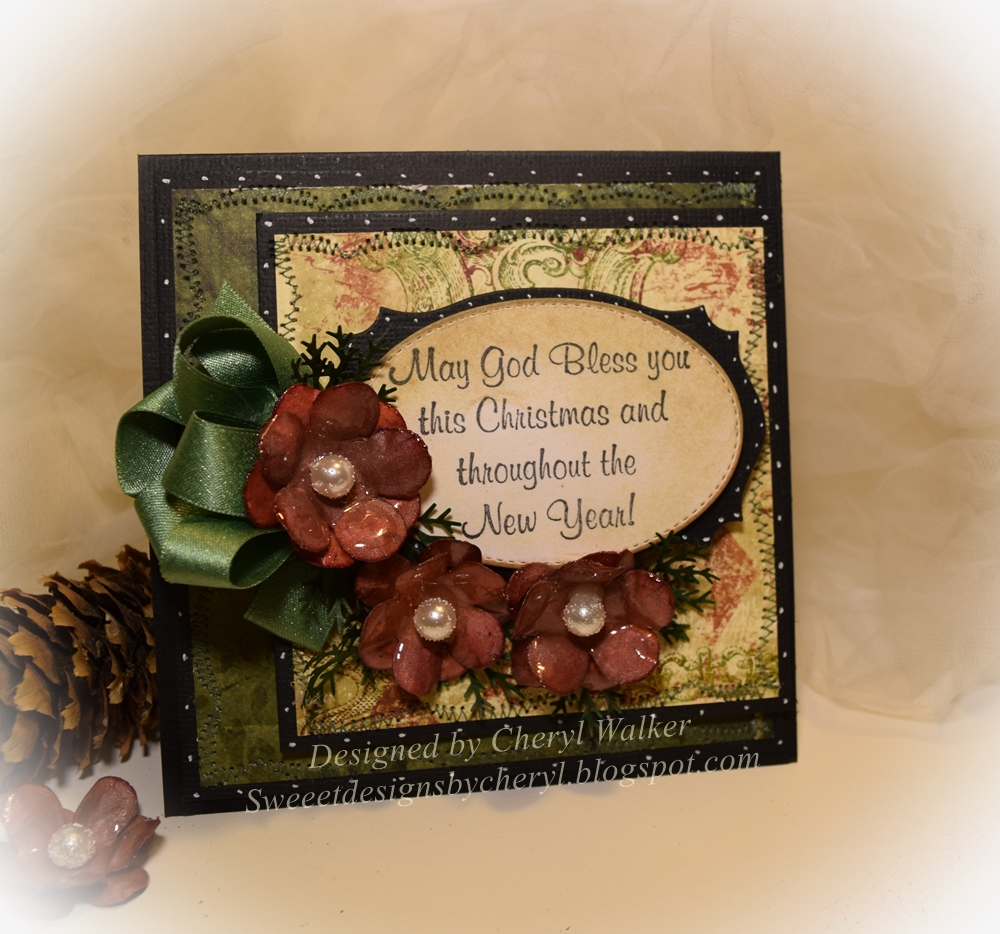
Flowers were cut using white card stock, and then airbrushed using a blue and yellow Copic marker and my air compressor. I added some flowers from Really Reasonable Ribbon to the centers of each Daisy. Dies used are from Cheery Lynn Designs.

Bows were created using Really Reasonable Ribbon's Blue Shimmer Satin.  The center pieces are from their clear rhinestone embellishments.

I hope you enjoyed my post for today, as I truly enjoyed creating this beauty.  Please let me know what you think, as I always love reading your comments!

Hugs to all,
Cheryl

Saturday, December 24, 2016

White Christmas Holiday Tag

Hello everyone and Merry Christmas Eve to all!  I hope you all have a Blessed Christmas and enjoy your time with your loved ones .

Today I have a tag I created using Really Reasonable Ribbon's Beautiful Shimmer Satin Ribbon, and Bakers Twine.
My tag was designed using several Cheery Lynn dies, some Stickles, stickers, pearls, and Really Reasonable Ribbons beautiful Crystal Embellishment that I put on my bow treatment. I LOVE making my bows using the beautiful Shimmer Satin Pearl Pink, and this one is one of my many favorites from RRR. To hang the tag on a gift, I used Baker's Twine in Silver Metallic.

I LOVE making these fun BIG tags, and they not only look pretty on gifts, but make it easy to read who the gift is for, as on the back I do the writing :)
I hope you enjoyed today's post, and thank you for looking.  Have a Very Merry Christmas!
Hugs to all,
Cheryl

Tuesday, November 15, 2016

Joyeux Noel

 Good morning RRR peeps!  Cherry here today to share a seasonal card for the holidays.  A classic combination of golds, whites, and creams.  I used Old Gold Shimmer Satin Ribbon to create my loopy bow.  I tucked in some pinecones and mini acorns that I collected outside.
 I also decorated the inside a bit using papers and some pretty Cross Hatch on Gold Satin Ribbon.  I adhered it easy peasy by using some Scor-Tape.  I love using it, especially for slimmer ribbons.
 Lots of pretty layers and dimension using Tombow 3d tabs
 I used a vintage Nativity ornament as my focal point and several gorgeous poinsettias to frame it.

                                               As always enjoy! Hugs, Cherry


Saturday, September 24, 2016

Merry Christmas to You!

 Hello everyone, and Happy Saturday to all!
Today I've created  this beautiful Christmas card for Really Reasonable Ribbon using Ribbon, Score Tape, and Foam Tabs. Its hard to believe Christmas will be here so soon, but one good thing is I have some cards created and set aside to send out this year.  .

my card for today
Layers-
Base is white cut at 6" x 12" and scored at 6"
All layers except the 3-d ones are done using Really Reasonable Ribbons Score Tape
Layer1 - Bazzill Red embossed dots is cut at 5 3/4" x 5 3/4" then the StampinUp! Holly Berry Boutique is cut at 5 1/2" x 5 1/2"
Layer2- Red dot cut at 5"x 5" , then SU! Holly Berry cut at 4 3/4" x 4 3/4"
Layer3-  Red cut at 4 3/4" x 2" then the SU! design paper cut at 4 1/2" x 1 3/4"
Layer 4- Sentiment layering is done with
Sentiment layer  Hope Oval Frame cut in brown dp, and then in red.Layered using Really Reasonable Ribbons Foam Tabs
Next I cut the DIE-Hello Decorative Oval Frame scalloped edge larger one in white and distressed it with antique line distressed inks by tim holtz, and then stamped the CR-05097 sentiment in Tim Holtz Black Soot ink.
Ribbon- I used Really Reasonable Ribbons Shimmer Satin in Brown.


I love creating Christmas cards, its just hard to believe that it will be here before we know it. At least I am getting some done to send out this year :) hehehehehe

I enjoyed creating my card today, and hope you enjoyed my post!
I hope you enjoyed my post for today! Please leave a comment letting me know what you think :)
Hugs to all,
Cheryl

Wednesday, September 14, 2016

Christmas Past Card

 Hello everyone and Happy Wednesday to all!
Today's card was designed for Really Reasonable Ribbon using the beautiful Shimmer Satin in the color "Kiwi". I am so addicted to the Shimmer satin ribbons, and LOVE all the colors that Really Reasonable Ribbon carries.  I absolutely love how easy my bows turn out using this beautiful ribbon. I hope you enjoy my post today!
For my card today I chose to use Graphic45 Old Christmas Past design paper, and the Kiwi Shimmer Satin works PERFECT with this collection. The red card stock is from SU! (Riding Hood Red), the green is AC and is one of the colors from the  assorted packs.


I created my bow doing 4 loops on each side, then hot glued the loops together and created this cluster with flowers and leaves. Love the way it looks together.

My image is from I Brake For Stamps and is colored using copic markers Y28,C1, R00,E57,E93,B18,R85,RV34,RV11,RV21,R39,R37,YG67,E15,E37,E31,B41. I also used stickles in crystal ice, and cotton candy. Lastly I embellished the corners with green gems. Stitching was done with red thread.
Christmas is my favorite holiday, and I absolutely love decorating up the inside & outside of my home.
Thank you for looking and have a lovely day!
hugs to all,
Cheryl

Sunday, September 4, 2016

HAUNT IT! Box & Video Tutorial

 Hello everyone, Cheryl here today with a Laughing Cow Container turned into a Halloween Treat Box using Really Reasonable Ribbon. I have two videos , one is a complete walk through on making this treat box, and the other is on the Dusted Glass Flowers.
 Supplies Used:
Really Reasonable Ribbon Shimmer Satin in Gold Tangerine
Really Reasonable Ribbon Satin Tangerine 3/8"
Really Reasonable Ribbon Swiss Dots Grosgrain Black
Gem trim from my stash
Flowers, versa mark, embossing poswer, Gala Glitz black, distress ink, Martha stewart punch, spellbinders dies, laughing cow container.
American Crafts design paper pumpkin patch.
JustRite Dies, The Project Bin stamps
Mini Misti tool, heat gun, glue gun
These containers are so much fun to make! I really had a fun time creating this one. LOVE the Really Reasonable Ribbons I chose to use today!


Thank you for looking and have a lovely day!!
Hugs to all,
Cheryl

Wednesday, August 24, 2016

Blessings for Christmas & Video Tutorial

 Hello everyone, and Happy Wednesday to you all! So for today's Really Reasonable Ribbon card I do have a video on both my Ribbon Bow using RRR Shimmer Satin (LOVE THIS STUFF) , and my Glass Flowers using a spray technique to get the color you see.
 So for my card base, I used black card stock, cut at 5" x 10" and then scored at 5"
Next I did my 1st layer with black card stock cut at 4 3/4" x 4 3/4", then the Bo Bunny design paper is cut at 41/2" x 4 1/2".
Next Layer 2- is cut at 4" x 4" and that is the black card stock. Now Bo Bunny dp is cut at 3/34" x 3 3/4", then added sewing in a green thread. I also added some white gel dots for a different look.

The I Brake for stamps sentiment is cut out using different spellbinders dies.

Ribbon bow is created using Really Reasonable Ribbons Beautiful Shimmer Satin in Sage Green color. LOVE LOVE LOVE this ribbon. I just bought 5 rolls of it, that is how much I love it. Also will be getting more rolls in different colors, as Bonnie does carry some really Gorgeous colors of this.

Glass Flowers are done using my Glass Flower Technique along with the spray and distress technique. Video can be seen here on my blog
Thank you for looking and have a lovely day!
hugs to all,
Cheryl

Sunday, February 28, 2016

Happy Birthday with a Ribbon Slider Buckle

Welcome back Really Reasonable Ribbon bloggers.  I bought some ribbon slider buckles at various stores while in Boise for my granddaughter's basketball tournament.  I was so impressed with bows made with these ribbon slider buckles used from various people in our Really Reasonable Ribbon challenges, I wanted to start using them for some of my bows. 


All of these supplies along with the stunning Wild Orchid Craft flowers are from the Really Reasonable Ribbon on-line store.  The gorgeous ribbon is the Shimmer Satin Shell Grey and I couldn't have created this bow without the Zutter Bow-It-All bow maker.  The ribbon is attached to the card with the 3/8" Scor-Tape


Other supplies:
Cheery Lynn Designs: Polynesian Sail Doily
Creative Expression-Sue Wilson Designs-Rambling Rose embossing folder
Creative Expression-Sue Wilson Designs- Happy Birthday
Creative Expression-Sue Wilson Designs-Petite Vinery
Creative Expression-Sue Wilson Designs-Corvus
Creative Expression-Sue Wilson Designs-Dandelion
Creative Expression-Sue Wilson Designs-Delicate Garden Frame set (Butterfly)
Impression Obsession:  Fir Sprig set
Mirror cardstock

I always love to hear from you so please leave a comment.  Also if you want to see my next card and projects with ribbon and flowers, follow me on http://hillfarmcards.blogspot.com If you have any questions, don't hesitate to contact me at lehill@mtida.net.

Come join us for our challenges and can't wait to see what you create this time.    Thanks again for stopping by!!!

Sunday, October 11, 2015

Halloween Stocking Ornaments

Hey there Peeps! Dropping in to share a festive set of Halloween Stocking Ornaments. I created these decorations with Really Reasonable Ribbon trims and Crafty Secrets printed papers and images.
 I added these to a display with other seasonal items to create some spooktacular holiday decor : )
Really Reasonable Ribbon Trims~ Black and White Houndstooth, Black and White Plaid, Black Netting, Natural Burlap Wired Edge Black/White , Tangerine Shimmer, Swiss Dots on Black SatinPlaid Ribbon Oranage with Black Stitching , Yellow/Orange Plaid.
Crafty Secrets~ Creating With Vintage Halloween CD, Halloween Digital Scraps.
Okay that's all for me. Wishing you a happy and productive day with lots of time to be creative : )