Showing posts with label Judy Rozema. Show all posts

Monday, August 28, 2017

Baker's Twine - My Favorite!

{judy} Happy Monday! I hope you had a chance to unwind over the weekend! Or shall I say, "unwined"?
My images are from Shall We Unwined? -- a cute Itty Bitty set by Unity Stamp Co. I love mixing paper patterns, and this one is no exception! Several different coordinating Echo Park papers were used, as well as different banner dies. All of my layers are held together with Scor-Tape, my absolute favorite "go-to" adhesive. And it's all wrapped with Raspberry Baker's Twine. Baker's Twine has long been a favorite trim of mine, and Bonnie has such a variety of colors in the RRR Store.

And -- the RRR DT has been a favorite for a long time as well. Today is my last post as a Really Reasonable Ribbon Design Team member. I want to say THANK YOU to Bonnie for being the most amazing to work for, and with, and to my talented teammates for being so incredibly kind and fun to work with!


Stamps: Shall We Unwined? (Unity Stamp Co.)
Paper: Crumb Cake, Soft Suede (SU!), Echo Park DP
Ink: Memento Tuxedo Black
Accessories: Baker's Twine and kraft bag (Really Reasonable Ribbon), pennant die cuts (MFT, SB, TE, TSOL)

Saturday, August 19, 2017

Hello

{judy} Good morning! I was recently asked about pattern mixing with designer papers, so today I am sharing this sweet little, mailable card, showing four different patterns. Paper companies make it so easy to mix and match, using papers from the same paper pack. These are from The {Stamps} of Life, as is my sentiment stamp. There are elements of each of the same shades of colors, which makes for a fun, eye-catching card.

 
I "tied" it all together with some of my favorite Cotton Candy Baker's Twine, but still kept it flat for easy mailing! As always, I use Scor-Tape to hold my layers together. That's it for me today! Be sure to come play along in our "Anything Goes" Challenge! Thanks for stopping by!

Friday, July 28, 2017

Beloved


{judy} Today I am sharing a card made with a collage stamp from I Brake For Stamps. This card is from one of my favorite sets called Bird and Blossom Post. Carnations are one of my favorite flowers! They are fragrant for so long.

I used the Ink, Spray & Smash Technique on Glossy White paper and then stamped my image with Memento Tuxedo Black Ink. I then embossed with Clear Detail Embossing Powder.
I added a little flower that I crocheted and some beautiful 3/8" Black Satin ribbon that I weaved through the Fiskars Threaded Ribbon punch. It makes for a nice accent! All of my layers are held together with Scor-Tape and Foam Tabs.

That's it for me today! Thanks for stopping by!


Tuesday, July 18, 2017

Hello!

{judy} Hello Ribbon Friends!
While summer is just halfway over here, the heat has made me long for cooler temperatures and the fall crisp air. So today I am sharing a shaker card with an autumn theme. 
I thought I would lay it flat so you can see all of the pretty sequins and the different colors inside my punched out leaves (Stampin' Up!).

I used Autumn Leaves on Ivory Grosgrain because it matched perfectly! I added a wheat stalk die cut (Reverse Confetti) and then a half twist of ribbon, with a paper leaf and a matching rhinestone on top for embellishments. 
I think the ribbon pattern adds such a fun touch! Thanks for stopping by today!

Saturday, July 8, 2017

A Mini Junk Journal

{judy} Today I want to share several pages of my Junk Journal that I recently completed. This is a ring bound journal that is reinforced by double cardstock on each page, so it is quite sturdy.  Different from the pages you might find in a regular junk journal, which are usually copy paper weight before adding any embellishments and sewn in as "signatures." While I won't be showing all of the page spreads, I will be sharing some of my favorites - and some without ribbon or trim.

Most all of my pages are from a digital kit by Tsunami Rose Designs called Life Abloom. The cover is wrapped with Silky Crush Rose Ribbon, and two large Silky Crush Champagne bows are tied on the outer rings (this journal's "binding"). This is one of my favorite ribbons to work with. It's very slightly stiff, and holds up beautifully to "reworking" when you want to get it just right. There are so many beautiful colors in the RRR Store.
The Prima flower is very sparkly, as it is full of beautiful glitter.

You can see on the next two pages the inside cover, where I also wrapped the Silky Crush Rose Ribbon to match the cover. Keep in mind that these are two separate pages, both printed on copy paper, then attached to their own Kraft Cardstock, and then adhered to each other back to back. So double the weight of a card with embellishments. The rose color in the ribbon matched the color of the digital kit exactly. On the first page of the journal, I added some White Flat Back Pearls with glue dots.

I liked the designs on these pages so much that I didn't cover them up with a lot of "stuff," like I might in another junk journal. On the righthand side of this spread, I attached a length of Rosemary Natural Crochet Lace down the entire page. I thought it fit so well with the design of the doily.

I added the Rosemary Lace on my glassine bag that holds a postcard in this spread. All of the edges of my pages are sponged with Memento Rich Cocoa ink.

The little "woodgrain" envelope on the left of these pages isn't attached, and can move back and forth as an add-in to hold ticket stubs or a little note. The Rosemary Lace on the right is holding the two removable cards for notes or just for decoration.

On these two music themed pages, I changed up the trims, with Soapstone Seam Binding on the left and Chloe Crochet Lace on the right. The seam binding looks a little green in this photo, but Soapstone is kind of a magic color. Since it's close to the green leaves from the roses, it picks up some of those hues as well. My flower is made from an old hymnal I have for papercrafting purposes.


Here is a close up of the Chloe Lace down the side of this page.


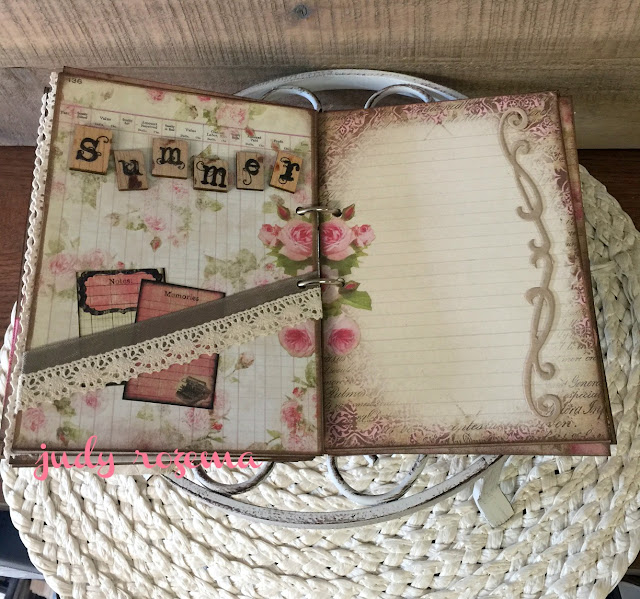
These are two of my favorite pages. I had the wooden letters left over from a project from years ago, and finally was able to use them! The Soapstone Seam Binding and Chloe Lace were combined here to hold the mini Memories journaling cards. I added the Kraft die cut on the right side with a fine tip glue pen.


The "summer" letters are about the size of Scrabble tiles.


The add-in on the right is actually a legal sized envelope that just fit perfectly with the theme of the journal. I cut off one end and then punched out the half circle at the top for cards and keepsakes to go inside.
You can see the backside of the envelope peeking out in this picture on the left. I love pink, and this doily has a sparkle to it (not evident here) that added some spunk to the sweet rose journaling paper. 

The last two pages I want to show are more like a signature piece. The typewriter page is actually cardstock from a Prima paper pack. I collect old typewriters, and always have to get a typewriter in my journals somewhere! So while the color doesn't match exactly, I love having this page in there. It is embellished with the beautiful Rosemary Natural Crocheted Lace. You can see another glassine bag that holds the post card laying on top, and the inside back cover behind it. All of my pages and layers, lace and ribbons are adhered with Scor-Tape. I find it to be the best holding, and fastest to apply.

I hope you have enjoyed this walk through some of my journal pages in this Mini Junk Journal!

Wednesday, June 28, 2017

Just For You

{judy} It's so much fun to make backgrounds with shaving cream! It's making a comeback! You can find all sorts of tutorials using this technique on YouTube. I didn't want to cover up too much of the pretty background, so I used vellum to hold my embossed sentiment and embellishments. 
 I used Cindy White Crocheted Lace and a few 8mm White Flat Backed Pearls to hold down the vellum. The pink Tea Rose finishes it off and pulls out the pinks (my favorite color) in the background. Everything is adhered with Scor-Tape.

If you haven't tried this background, I hope you will. It's a ton of fun, and always a surprise!

Sunday, June 25, 2017

Watercolor Rainbows

{judy} Hello Ribbon Friends! Today I have a watercolor background to share:
We had a beautiful full rainbow over our Capitol last week, and it just inspired me to create a rainbow background. I used my Kuretake paints on watercolor paper. When it was dry, I stamped my sentiment (The Stamps of Life) in VersaFine Onyx Black ink. 
Since gold is associated with rainbows, I used Metallic Gold Baker's Twine, and wrapped it several times around my card, fanning it out. I then tied all the pieces together with a half bow and added some sequins (Pretty Posh) for sparkle! All of my layers are held together with Scor-Tape and Foam Tabs.

That's it for me today! Thanks for stopping by!

Sunday, May 28, 2017

Lovely

{judy} Hello Ribbon Friends! Today I have a "lovely" card to share.
My background was made with Distress Stains painted into my embossing folder, spritzed, and then run through my Big Shot. I love how it turned out. 
I then adhered a doily and wrapped it to the back of the card, so only half was showing. I added some beautiful Aqua Satin Shimmer Ribbon, and a Rhinestone Ribbon Slider for my trims, and used one of the beautiful Magnolia Blossoms in the RRR Store. 
I finished off my card with a word die from Concord & 9th. All of my layers are adhered using Scor-Tape.

A fun card mixing traditional elements, as well as a newer technique! Thanks for stopping by!

Thursday, May 18, 2017

Dutch Fold Beach Card

{judy} I love fun and easy folds that make a card look different from the "norm." But I also want them to be QUICK, and not take up my entire morning or afternoon. The Single Dutch Fold card fits perfectly: it's easy, looks fun, and is quick!
It was hard to know how to photograph it in a single photo and not make it look weird, but also show the bottom "open" door. There are two types of Dutch Fold Cards - this one (Single) and a Double Dutch Door Fold, where the bottom door opens like a gate fold. You can find tutorials for both here.

I used some fun papers and stickers from Echo Park, and some chipboard from Simple Stories to make this beachy card. I added a shell charm from my stash, tied up with some of my favorite spring and summer burlap string: PINK! I LOVE this stuff. If you don't have any yet, take a peek HERE at all of the fab colors Bonnie carries in the RRR Store.
The inside has a sentiment sticker inbetween the fun patterned paper. I love how just the bottom half of the card opens! All of my layers are held together with Scor-Tape.

Thanks for stopping by today!


Monday, May 8, 2017

Shaker Birthday Greetings

{judy} Sometimes you find this beautiful designer paper, and you don't want to cover it up. That's the case with my card today. I love the bold rainbow of colors in this patterned paper from The Paper Studio.
I started by watercoloring a background of greens and yellows using Kuretake watercolors. I stamped my pear image and the sentiment (Stampin' Up! Fresh Fruit) using VersaFine Onyx Black ink, and cut the panel and a frame using Stampin' Up!'s stitched oval dies.
I added my acetate sheet to the frame, and carefully placed my colored sequins (Doodlebug) on the pear panel, then added the frame on top.
The Green Apple Plaid Ribbon was a perfect match for my watercolored panels, so I wrapped it around the front of the card, and then added a simply tied, single bow. It has such a great texture to work with too, and really holds its shape. The plaid gingham adds such a nice contrast to the fruit designer paper, I think!

The inside has another piece of the designer paper, and another (flat) watercolored oval that says "Happy Birthday."

Thanks for stopping by today!

Friday, April 28, 2017

Beautiful Bees

{judy} Hello ribbon friends! Today I am sharing a quick card made with the Bees Please Tags designed by my fellow teammate, Ginny! I am planting an entire section of my yard with flowers for bees. I don't see them around much, and wanted to provide a place for them in my neighborhood!

I started by layering papers from Kaisercraft's Be-you-tiful patterned paper collection, then added a lace doily from Stampin' Up! in the mix. I printed out two sets of tags, and cut one bee out, so I could layer and pop him up on the tag. 
I added a strip of burlap behind the tag, and added my beautiful trims: a double bow of Black Seam Binding, a single bow of Black Burlap String, and a gorgeous Cottage Rose from the Mixed Reds Collection. The rose is accented with a Brown Mulberry Paper Leaf.
I tied a little Black Seam Binding in the top of the tag, and some of the Black Burlap String around the front panels. I added a White Flat Back Pearl to help keep the string in place, and for some glam.
My sentiment is a die cut from the Paper Smooches Kudos Word die Collection. I backed my black cardstock piece (Basic Black - Stampin' Up!) with a piece cut from a 6x6 Scor-Tape Adhesive Sheet and then ran those pieces through my Big Shot. Easy to peel out and adhere to the front of my card! The sheets are a must-have for intricate die cuts - especially word dies. All of my layers are held together with Scor-Tape.
I love the contrast of the burgundy and gold. What do you think?
Don't forget about our challenge going on right now on the RRR Blog - Put A Bow On It! Come play along! The deadline is May 3!
Thanks for stopping by today!

Tuesday, April 18, 2017

Watercolor Hooray

{judy} Hello RRR Lovers! Today I spent some time watercoloring - an easy background, with four loosely blended colors. If you have seen many of my posts, a lot of times, I like to mix comtemporary and traditional elements, as well as graphic or geometric and vintage. 
I stamped my sentiment (Watercolor Words) in Archival Black Ink (Stampin' Up!) several times using my MISTI, as watercolor paper has a texture that sometimes takes a few impressions for the solid look I want. Next, I added washi tape (also Stampin' Up!) down the left side, and layered Black Diamond Metallic Baker's Twine and Pink Burlap String on top. I love this string, and want every color Bonnie offers in the RRR Store! This pink matches the upper right corner of my watercolor perfectly.
Finally, I added a heart shaped mini shaker, with sequins inside to the upper right corner, and mounted this panel on Basic Black cardstock. The final layer is vintage black lace patterned paper (Paper House) on a light pink (Blush Blossom) cardstock.
All my layers are held together with Scor-Tape. I think it makes for a fun celebratory card! Thanks for stopping by today!


Saturday, April 8, 2017

Petite Notes for Big Greetings

{judy} Hello! Today is my day to share on the RRR Blog, and I have some super cute petite notecards to share.
These little cards are about 3x3 and 2.75x4 -- just the right size to tuck into a sweet little envelope and attach to a gift, or hand deliver to the recipient. Each one has some cute die cuts, a little bling or washi tape, and some sweet trims from Really Reasonable Ribbon!


The first card uses a watercolor background, three die cuts, and some sweet Cotton Candy Baker's Twine. Tied around the middle, it adds some warmth and "homespun" to the card. I love all the patterns on the little camera!


The next is so sweet with its contrast of navy and yellow. I have a thing for typewriters (and own several - working and vintage), so I love this little contemporary yellow one. Sequins and a row of Mini Ric Rac are all it needs to pack a punch!


Finally, we have a graphic note with different shapes and designs, wrapped with Oyster Baker's Twine above the navy sentiment and washi tape, for a casual contrast.

I love having little notes on hand, ready at a moment's notice for whatever occasion occurs!

Tuesday, March 28, 2017

Wonderful Friend

{judy} Good morning ribbon lovers! Today I have a monochromatic card (almost!) to share with you, using some of the gorgeous Shimmer Satin Ribbon that Bonnie carries and a little touch of bling!
I used all sorts of teal and aqua shades in my inks and paper, and added another shade for my ribbon, using the Aqua Shimmer Satin. I love the sheen of this ribbon, and it comes in so many beautiful colors!

The silver metallic butterfly adds its own sparkle in the light, and I set that off with one of the pretty Rhinestone Ribbon Sliders in the RRR Store - the 18mm round slider.
Images and dies by Stampin' Up! I love the elegance that the ribbon sliders add - fast and easy! Thanks for stopping by today!

Wednesday, March 8, 2017

Life

{judy} Happy Wednesday, everyone! Today I have a fun, contemporary look for my card of encouragement.
On Confetti cardstock, I sprinkled several colors of Brushos, and then spritzed with water to make the powder active and run. Once that was dry, I stamped my sentiment (Stampin' Up!) with Archival Black ink (SU!), I adhered this to a panel of purple cardstock, and tied a triple bow around the card using the beautiful Tiny Sheer Purple Floral Organza ribbon. This ribbon is so sweet, and allows for the colors to show through beautifully.
I added three Cosmos Daisy Stem Flowers in shades of purple on top of the bow. All of my layers are adhered with 3/8" Scor-Tape. I like the mix of contemporary and traditional looks!
 Thanks for stopping by today!