Showing posts with label Organza Ribbon. Show all posts

Monday, March 25, 2019

Perfectly Poised Shabby Chic Card

Hello, Ribbon Lovers!  I've had such fun this month with the March Ribbon Club Assortment, how about you?  I had just enough Charcoal Checkerboard Satin Ribbon to make a fabulous bow cluster on this Perfectly Poised Shabby Chic Card.


This chic color combo is perfectly paired for the Poised Collection from Authentique Paper.

Yellow Organza Ribbon adds a jolt of color to the bow cluster that I tied with my Zutter Bow it All Tool


TIP: Brush Wild Orchid Crafts Cottage Roses with Hickory Smoke Distress Ink to add definition and depth to the lovely petals. 


And here's a peek at the inside!

It's fun to add color, texture and dimension to a card with ribbons and flowers!  I hope I've shared some tips and tricks you can use in your own crafty adventures!

Thanks for stopping by!
Cheerio,
kathy

Saturday, March 19, 2016

Get Well Card

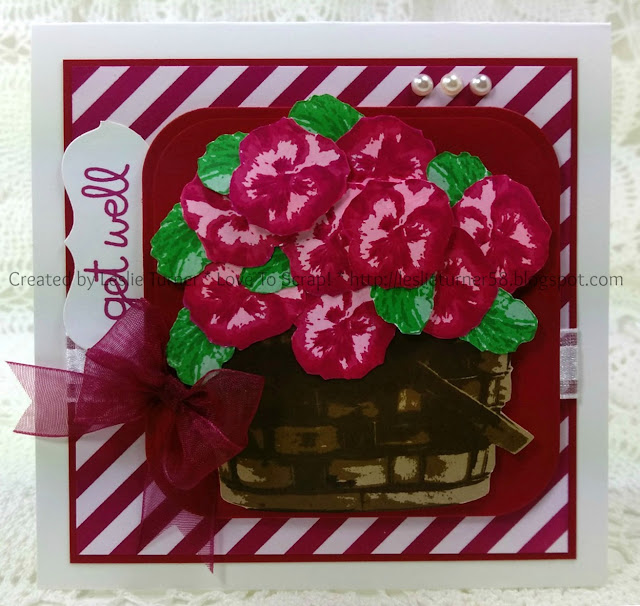
Hi everyone! Leslie here, sharing a Really Reasonable Ribbon DT inspiration project with you today, a pretty get well card I created using the absolutely gorgeous White Sheer Organza with Satin Center and Wine Organza ribbon. Both of these ribbons are so pretty and the organza really makes nice fluffy bows! ;)
Yep, you guessed it... I created this gorgeous bow with my Bow-it-All v2.0! Creating bows couldn't be any easier with this awesome tool!
For more details and additional photos, please see my blog post at Love To Scrap!

I hope you've enjoyed today's project! Be sure to check out all the ribbon and crafty goodies and tools at Really Reasonable Ribbon! I can't brag enough about the amazing selection of products, awesome prices, fast shipping and great customer service! Thanks so much for stopping by today - we'll see you next time! ;)

Scrappy hugs,
Leslie

Monday, February 22, 2016

Pocket Folio

Hey there Peeps! Well I'm here today to admit that I have a problem. I am a chronic list writer. Any little scrap of paper is fair game to scribble on. Is the list the problem? Nope. Losing the lists is the problem. When you write important information on something that looks like trash.....guess what's gonna happen? Yep you got it...lost lists.  So I created a hardcover pocket folio to tuck in all those precious little scraps.


I've already put it to work as you can see!
Really Reasonable Ribbons~Satin Swirls on Red, Satin Swiss Dots on Turquoise, Sheer Organza with Satin Center Black.
I'm using my Crafter's Companion supplies. For a full list please visit me at:
pollyspaper.wordpress.com.
Okay that's all for me. Wishing you all a happy and productive day with lots of time to be creative : ) G

Monday, January 18, 2016

Thank You from the Bottom of my Heart

Hello, crafty friends! Leslie here, sharing a Really Reasonable Ribbon DT inspiration project with you today, a corner card! I l.o.v.e. fancy folds and this was definitely a fun one! I used the absolutely gorgeous White Sheer Organza with Satin Center from the January Ribbon Club Assortment. This ribbon makes some really yummy bows! ;)


I created this gorgeous multi-loop bow with my Bow-it-All v2.0. Be sure to take a peek at Bonnie's awesome bow tutorials on YouTube!

For more details and additional photos, please see my blog post at Love To Scrap!

I hope you've enjoyed today's project! Be sure to check out all the ribbon and crafty goodies and tools at Really Reasonable Ribbon! I can't brag enough about the amazing selection of products, awesome prices, fast shipping and great customer service! 

Thanks so much for stopping by today - we'll see you next time! ;)
Scrappy hugs,
Leslie

Sunday, December 20, 2015

Happy Birthday Card

Hi, I am Nancy and I want to share with you this card showcasing gorgeous ribbon along with the beautiful Wild Orchid Crafts flowers from Really Reasonable Ribbon.   This card is for my daughter for her birthday at the end of this month. 
 This ribbon is called Sheer Organza with Satin Center White and it comes in a variety of colors.  I use it often especially when achieving more of an elegant look for my cards.
I love flowers on cards that I make.  These flowers are the gorgeous pink aster daisy stem with pink roses from Really Reasonable Ribbon.  I recommend to take a look at all of the varieties of Wild Orchid Crafts flowers from Really Reasonable Ribbon.  You'll definitely want to order some for your next cards if you don't have these in stock. 
Dies that were used are:  Cherry Lynn Exotic Butterfly Set, Creative Expression-Sue Wilson-Striplet-Heart Lattice, Tattered Lace Interlocking Heart/Celebration Set, Sue Wilson-Happy Birthday Script, Sue Wilson Delicate Fronds, Sue Wilson Pinpoint Embossing Folder.
  
Keep visiting the Really Reasonable Ribbon blog to continue to see the wonderful projects and cards that Really Reasonable Ribbon Designers have for you during the holidays and stay with us for the next exciting challenge on January 8th.  Can't wait to see what you created for us!

Have a Very Merry Christmas!

Thursday, November 19, 2015

Birthday Boy Card


Hi!  I am Nancy and welcome back.  I am so excited to share my card with this gorgeous satin  ribbon from Really Reasonable Ribbon called Stitched Sheer/Satin Ombre Light Blue
Stitched Sheer/Satin Ombre Light Blue
You'll just love the wonderful selection of other beautiful ribbon, products, awesome prices, fast shipping and great customer service!  This beautiful ribbon comes in three other colors and only 30 cents a yard. I love the gorgeous shine and the delicate white stitch in this ribbon.  I made the bow using the easy-to-use Bow-it-All v2.0 which was purchased at Really Reasonable Ribbon.   Behind the beautiful blue ribbon is the 1.5" white netting ribbon which comes in a variety of colors.  I added some blue Stickles glitter glue on parts of the white netting to accent the area.

Also, Really Reasonable Ribbon has the Wild Orchid Craft flowers.  I used the Wild Orchid Craft Open White Rose size 15mm. throughout this card.   I made my own angel pin attached to the blue ribbon. 
If you want to know more about how I created this card, please visit my blog at http://hillfarmcards.blogspot.com/

Thank you a bunch for stopping by!  I would appreciate a comment in the comment section below.
Now it is your turn and come join us at Really Reasonable Ribbon blog this Friday for another new and exciting challenge.  Can't wait to see your new creation!

Wednesday, September 16, 2015

Trick or Treat

Hello, Ribbon Lovers!

I love this time of year!  Fall colors and autumn holidays are my favorite!  I dug into my crafty stash and put together a really cute vintage Trick or Treat pocket card that uses both burlap string and fabulous ribbon.
The adorable image and papers are from the Crafty Secrets Vintage Jumbo Halloween Kit. These sneaky Trick or Treat mice crack me up.  The playful feel of this card is enhanced by the addition of a perky bow made from Orange Sheer Organza with a Satin Center ribbon. I've topped this with a suitably spooky black burlap string bow, an orange daisy and some felt leaves.  
I love using my Zutter Bow-it-All Tool to make these burlap string bows.  Here, I've added orange burlap string to the black, then fanned the individual loops out to make a great base for my jack-o-lantern button and spider web.  I also added a strip of the too cute to spook Pumpkins on White Grosgrain Ribbon adding more texture to the card, and picking up on the orange tones in the paper. 
The inside of the card is where this party really gets started!  I've decorated the upper half of this top fold card with more Crafty Secrets goodies, then built a pocket below and stuffed it with tags.
Bits of ribbon and more twine really make the tags pop!  I curled the burlap string by dampening it with a 50/50 mixture of liquid glue and water.  Then I wrapped the loose ends around the barrel of a slim paintbrush and let them dry.  Voila!  Fun curlicue burlap string!
Here's a closer look at all those spook-tacular tags!  This is such a frightfully fabulous card to send out...especially if you tucked a gift card for ice cream inside!  Just like a party in a card!

Thanks for stopping by!

Cheerio,

kathy
Wednesday, September 9, 2015

Gouling Good Time by Jenn Cochran

Hello to all the Really Reasonable Ribbon friends and fans.  I just love this time of year.  Especially since Halloween in just around the corner.  You know that 2 months is going to FLY by!!!

Today I have made a card to get you into the spirit of Fall and Halloween.  I pulled out Deloris (my Silhouette).  If any of you follow me at my blog, well then you know all about Deloris!  I cut out two circles and attached them together with foam tape.  I used a Sharpie and outlined the large circle and added legs.  Super easy little spider.  His "web" is Bakers Twine in Halloween.  
I made the fun bow on the front of the card using 3 different Really Reasonable Ribbons and black lace.  The base of my bow is Plaid Ribbon in Orange with Black Stitching.   Then I added Sheer Ribbon with 4 Thin Satin Stripes in Black.  Finally the last part of my bow is a tripple loop of 3/8" Gingham Orange.  Once I tied my bow I added it on top of Glady's Black Crochet Lace.
This is not the last of these fun little spiders.  I plan on doing a few more layouts before Halloween.  Maybe even a quick tutorial!  
Thanks for stopping by!  Happy Hump Day!  Enjoy the rest of your week.


Thursday, September 3, 2015

Vintage Halloween Banner

Hi there crafty peeps!  I am back today to share a banner I made with ribbons from the new September Ribbon Club Assortment and the Vintage Inspired Halloween Creativity Kit from Polly's Paper Studio Etsy shop.  I have to start out by explaining that Halloween is my favorite holiday after Christmas.  I just love the crisp fall weather, the pumpkins, the candy, and the fun spookiness of it all.  I was so excited to be able to create a banner to decorate with!
I cut out the banner shapes with the Stitched Party Banners Die by Lawn Fawn in black cardstock and then layered the patterned papers and cute images from the kit on top.  I inked all of the edges with Black Soot Distress ink.  I added pearls and Rhinestones in black and orange to add a bit of sparkle.  I then threaded the banners onto Black and White Houndstooth Plaid Ribbon.  I created two double layer triple loop bows with my Bow-It-All tool and some Orange Sheer Organza with Satin Edges ribbon.  I finished it off with White Gypsophilia Flowers by each hole and on the orange bows.

I hope you enjoy this banner as much as I enjoyed making it.  Make sure to head over to the Really Reasonable Ribbon store for all of your Halloween themed ribbons.  Have a wonderful day!

Thursday, August 27, 2015

Fall Gift Bag and Card Set

Hi Crafty RRR fans, it's Teresa here today to share an idea for a quick gift bag and card to give filled with maybe some yummy homemade jam and cookies for this fall.  I was thinking if you wanted to share some of those homemade goodies with the neighbors, this would be a fun bag to send them over in and of course it has gorgeous ribbons from Really Reasonable Ribbon to make it that much more extra special too.
For my project I used papers from Basic Grey's Vivienne, Herbs and Honey papers and Picadilly stickers. I loved the rich fall country colors of these and they all worked really well together.  And for my ribbons I used some "Sheer Ombre Ribbon" and a little bit of "Crochet Lace" for the top.  On the mini card I used "cream seam binding ribbon".
Here is a quick closeup of the sheer ombre ribbon.  It's really gorgeous and comes in so many colors and would be really pretty on so many projects.  I hope you like it too.  Thanks so much for stopping over today and have a really great Thursday making something fun :)

Wednesday, August 26, 2015

All You Need is Love, a Cat and Red Satin Ribbon


Hello, Ribbon Lovers!

Kathy here, popping in with a little card making inspiration this morning.
I seem to be grooving on this red and aqua color combo of late, and used it once again in this card made with Graphic 45's Raining Cats and Dogs paper collection.    The Pouftastic double loop,  double layer bow was tied with glorious Red Sheer Organza with Red Satin Center Ribbon.  It was tied, of course, with my Zutter Bow-it-All Tool.  If you aren't familiar with this tool, or have the tool but don't know how to tie this bow, here's a great video from Really Reasonable Ribbon's YouTube Channel that will show you how easy it is to do.
I love that Bonnie also shares her favorite ribbon selections in this handy video.
To top off this bodacious bow, I simply added an aqua flower from my stash, and then hand cut some leaves from paper scraps. I cut one of Tim Holtz' Pediment dies cut from chipboard and covered it in matching paper from the collection.  This was glued down behind the card focal.
The inside of the card uses more of the layered papers and has plenty of room for a little note.

Thanks for stopping by!

Cheerio,
kathy

Wednesday, July 29, 2015

Iris by Jenn Cochran

Hi RRR friends and followers!  So excited to have you join me today.  I have this fun fuschia inspired card today.  It features Sheer Organza with a Satin Center ribbon from Really Reasonable Ribbon.  It comes in a variety of colors.  It is really easy to tie and the bows turn out really poofy and full.  I have tied a triple looped bow for this flowery card.  
Thanks so much for joining me today.  Hope you all have a crafty week.

Friday, July 24, 2015

Summer Botanicals Card

Hi there crafty peeps!  I am back again with a card I created by coloring one of the beautiful botanical stamps from PowerPoppy with my Copic Markers and adding some stunning shimmering ribbon from the Really Reasonable Ribbon Store.  
After I stamped and colored the image, I die-cut it out my Pierced Rectangle Stax from MFT and matted it onto peach cardstock.  I took three designer patterned papers from my stash (My Girl by American Crafts) and layered them together onto more peach cardstock to create a background for my card.  I matted the image onto this background with foam tape.  I then wrapped Sheer Iridescent Ribbon in Peach around the card and also created a triple loop double layered bow with my Bow-It-All tool.  Finally, I added some aqua flat backed adhesive gems to the top and bottom for an accent, and adhered it all to a white A6 card base.  I hope you enjoy this fun summer colored card. Please visit my blog http://pinkchicpaperdesign.blogspot.com/ to see more cards with beautiful images and ribbons.  Have a wonderful day!

Sunday, July 12, 2015

It's a Good Day to Have a Good Day!


Hi friends.  It IS a good day to have a good day, right?  I love a good inspirational quote paired with a really fabby bow made with great ribbons from Really Reasonable Ribbon.

I created the bow for this card using two of the white ribbon styles from the July Ribbon Club Assortment from Really Reasonable Ribbon using my Bow-it-All V2.0.  It's fun to create a bow using one color and two different ribbons styles as opposed to two different colors of ribbon.  You can find my video tutorial for this bow on YouTube HERE.  You'll be surprised just how easy it is!
The July Ribbon Club assortment contains 9 styles and 17 yards of ribbon and trim.  
This is a really great assortment as a base for your ribbon collection as black and white go with everything!  Each monthly assortment is a fun color or holiday themed assortment of coordinating styles.  JOIN TODAY and begin with this fantastic assortment.  What a fun way to build your ribbon stash and experiment with lots of different ribbon styles.

White on white is not and easy color theme for me, but I will continue to work at it to see if I can improve.  I have to tell you that I was itching to put a thin black border around each layer.....  I still want to tear it apart and do that...... but I won't.  Ha!
Thanks so much for stopping by today.  For more information on the other products used on my card, please visit my Make Time to Craft Blog.

~ Bonnie ~

Tuesday, July 7, 2015

Cute Nautical Cards

Today I have a few nautical inspired cards to share being that it's summer and everyone finally has the chance to be out on the water.  I found these cute papers with lots of red, white and blue nautical patterns on them and had some cute navy satin and jute ribbons to inspire me so I went to work and this is what I came up with.
The colors and prints are bright and fun.  I layered lots of the tags and embellishments that came with the papers and set it on a punched circle die from Spellbinders.  To finish the card and make it that much cuter, I added the navy blue organza with satin center ribbon to the tag so that it stood up at the top tied with just a bit of navy jute string to match it.  And I had a cute metal flower and button in my stash to add on top of that.
 Here is a closeup of the Spellbinders die that I used for the back circle and the other cute pieces that came with the paper line.
I really like this one and it all started with that cute sentiment and I just added on from there.  I am normally not much of an orange person but I think this works really well together.  Love that little dot for the background and the wave paper was just perfect.  To finish it I tied a cute bow with jute string in navy and you can find lots more colors here.... it such a good addition on cards because it's so lightweight for mailing and not so bulky either.  

And that's all for today but be sure and stop back for more fun ideas and also share us on Pinterest too!  Big Hugs... Teresa

Wednesday, July 1, 2015

French Chalkboard Labels Pocket with Tags

Hey there Paper Peeps! We're knee deep in the summer activities schedule here and loving every minute of the warm weather!!! But a busy schedule will not keep me from my studio and this week I've created a lovely little pocket filled with tags. It's a thoughtful way to present a gift card or fill with pictures and journaling for a not so traditional scrapbooking project. I used the beautiful trims from the July Ribbon Club Assortment "Black and White" 
All the patterned papers I used were from my scrap and salvage box and the vintagy images are from my French Floral Chalkboard Labels Digital Collage Sheet.
 To top the tags I created bows from Black Checkerboard Satin, Black Sheer with 4 Thin Satin Stripes,  and Black Satin Swiss Dots.
A pocket with the tags removed should look just as pretty, so I finished the inside with coordinating polka dots.
I used more of the Black Satin Swiss Dots and layered on some Barbara Crocheted Lace. The gorgeous flowers are from Petaloo..I just love them! I added an additional bow created with Chevron Striped Twill in Black.
The bows on the tags are finished with Wild Orchid Crafts Black Roses, and some sweet little charms and keys.
I really love my old school label maker and for this project the black tape was a perfect match. I layered the label with a glittery flowers and tag then anchored them with a metal clip.
The tags have more of the French Floral Chalkboard Labels on coordinating papers with bold graphic patterns.
As you can see...a little accent with Stickles really helps the flowers pop and gives them a little sparkle.
I just love all the layers and textures on this pocket. It's already gone to a good home and I hope they enjoy it as much as I enjoyed making it!
Okay that's all for me. Wishing you all a happy and productive day with lots of time to be creative : ) G