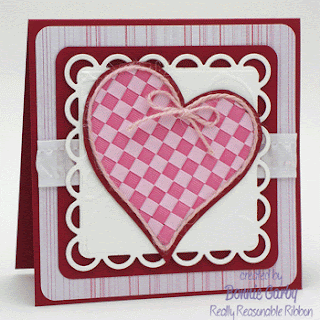
Here's how I made my card:
1. I laid out my base ribbon strips (I used pieces about 10" long) and pinned them to a cardboard base that I laid graph paper over so I could keep things straight. You can push the strips right up tight next to each other, or with the case of grosgrain which is a bit thicker, you can leave a tiny space between each ribbon. I did not leave a space, but I wish that I had. :)
The base pieces are laid on top of a piece of Heat & Bond which you can see in the photo. This is so you can adhere the finished piece to the Heat & Bond when you are finished weaving. You can use any type of heat activated adhesive that you have in your stash or you can purchase inexpensive interfacing at a sewing store.
2. Start weaving your second color over and under the base strips. I secured each piece with a pin when I finished with it just to keep it where I wanted it. I did leave a tiny space between each of these rows which worked better. You can see the space in the sides, but there is no gap in the weaving.
3. This is what it looked like when all my pieces were woven in.
4. Now I took my iron and did a quick tack to the Heat & Bond. Since I was unable to find my 'no stick' pressing sheet, I trimmed off the excess Heat & Bond. If you don't do this, you will have a HUGE mess to clean on your iron. Make sure it's stuck enough to hold together and then remove the pins.
5. Flip it over and press again until the ribbon is fully adhered to the Heat and Bond. It's hard to get a good stick from the front side because the grosgrain is so thick. From the back it works fine.
6. I decided I wanted to make a heart with my woven fabric. I hand drew a heart on the back of the piece and then I cut it out by hand. I believe you would also be able to use a Sizzix or other deep cutting die to cut this out too if you have one on hand. I wasn't able to try because I don't have any. (On a side note - I have had Sizzix dies piled in my craft room for years and I never used them. I finally give them away and now I'm looking to use them! This is why I'm a craft hoarder!! As soon as I get rid of it, I need it. Does this happen to you too??)
7. I mounted the heart on a slightly larger red cardstock heart. Then I adhered a piece of pink jute string around the outside to cover the rough edges. I used my 1/8" Scor-Tape which is the perfect adhesive for this. You can adhere the thinnest trims with this tape with no adhesive showing through. I just take the tape and kind of twist it as I apply it, and it goes down in a really sticky thin strip. Just press the string in and it's there to stay.
8. Then I added my pretty woven ribbon heart to my card. The white piece across the middle of the card is 7/8" White Mid-Ruffle Satin. Isn't it pretty??
Don't forget to stop back tomorrow for our Monthly Blog Hop!!
~ Bonnie ~


Wow, that's amazing! I love the look the weaving creates.
ReplyDeleteStunning Bonnie - you make it look so easy lol!
ReplyDeleteOh my gosh, I just love this! Thanks for showing all of the steps. Makes it seem quite do-able now!
ReplyDeleteWhat a gorgeous heart! Strano Designs makes a product called Ribbon Stiff which makes weaving a lot easier. :)
ReplyDeleteThe whole card is beautiful, but the heart really pop after using the ribbon weaving.
ReplyDeleteBONNIE. Seriously. It's a good thing you are posting because people need to see how freaking talented you are!!!!!!!!!!!!!!!!!
ReplyDeleteThis is divine~!
LOVE! And the pink jute is the perfect trim... your card is simple but wow! =)
ReplyDeleteThis is amazing!!!
ReplyDeleteI just love your tutorial
OmGosh Bonnie this is BEAUTIFUL hun!!! And Ribbon weaving,you super smart cookie you!!!! wow, I love how you made the heat out of the ribbon!!! Beautiful job!!!
ReplyDeletehugs,
cheryl
This is beautiful. TFS.
ReplyDeleteWhat wonderful talent you have, Bonnie! TFS!
ReplyDeleteHow stinkin' cute and fun is that! Love the card and the tutorial. I WILL be giving it a try!
ReplyDeleteHugs,
True :D
Really!!??? WHY have you not shared your talents with us before now!!!??? LOVE it Bonnie!!!!1
ReplyDeleteVery creative!! Thanks for sharing:) Love this!
ReplyDeleteSherrie K
http://sherriescraps.blogspot.com
Lovely card and thanks for sharing the idea.
ReplyDeleteWow this heart is wonderful. Great project, thank you to see this creation.
ReplyDeleteFrancy
Beautiful woven heart! TFS
ReplyDeleteThis is soooo pretty! Great tutorial.
ReplyDeleteThank you for sharing! :)