Wednesday, November 30, 2022

Older and Wiser

Hello, everyone! It is Gloria with you again! I am taking a break from Christmas projects to share a masculine birthday card! My oldest son turns (GULP) 31 on December 12th and I need a card. Two birds...one stone!

Despite having a husband, two sons, three brothers, many nephews, and one awesome great-nephew, I never seem to make enough masculine cards! I am always scrambling at the last minute to make one! And it's not as if I don't have masculine papers or other embellishments, because believe me, I do! I just love to do flowers and ribbons and sparkle more! 
I pulled out this beautiful paper from Authentique (Mister Collection) for my card. I love the colors of this collection - brown, rust, charcoal, gray, navy. So masculine and so vintage! 

I chose one of the ephemera cards for my focal point...but gave it a bit of a make-over to change the date to my son's birth year, 1991. I love the "older and wiser" sentiment, too.  

For the trim I used the stunning 3/8" Charcoal Satin with Grosgrain Edge ribbon. I love this ribbon color and think I need to get it in all the sizes...maybe in a spool....  The color is not black nor gray nor navy, but just a bit of all of those colors! 

I wrapped some Navy Burlap String around the center of the ribbon and attached it all to the back of the panel. I then tied a knot with a short bit of the 3/8" Charcoal Satin with Grosgrain Edge ribbon. This is a simple, yet masculine way to add ribbon and trim to a card without using any big loopy bows. (The men in my life are not that into loopy bows!)

I added a lining to the inside of the card and stamped a birthday sentiment, plus added some bits of paper to trim out the inside of the card. There is still plenty of space to write a message.
I glued three metal studs to the lower right corner of the card to finish it off. 

Thank you so much for joining me today!

Really Reasonable Ribbon Supplies Used:
Other Supplies Used: cardstock, printed paper, metal studs, stamps, ink


Monday, November 28, 2022

Warm Wishes for a Golden Christmas

Really Reasonable Ribbon, Old Gold Checkerboard Satin Ribbon, Graphic 45 Warm Wishes, Kathy Clement, Kathy by Design

 Hello, Ribbon Lovers!  One of the things I love the  most about the holidays is that you get to bling up your cards and projects with lots of shiny things!  Take this gorgeous Old Gold Checkerboard Satin Ribbon, for instance.  It adds such a lovely vintage shine and texture to the composition of this Warm Wishes Christmas card. Gold Metallic String Bows layered on top add just that extra bit of subtle sparkle.

November 2022 Ribbon Club Assortment, Really Reasonable Ribbon, Graphic 45 Warm Wishes, Kathy Clement, Kathy by Design

Layered ribbon borders are another way to add holiday elegance to a design.  I've used Scor-Tape to create this layered border using ribbons from the November Ribbon Club Assortment. The Copper and Gold Confetti Dots Grosgrain Ribbon makes me think of pretty Christmas ornaments hanging on the tree! 

There's not much time left on the clock to get your Christmas projects made, but you can still find lots of great Christmas Ribbon in the RRR Shop. 

Wishing you all a warm and cozy day!

Cheerio,

kathy

Friday, November 25, 2022

Black Friday 5-Day SALE at Really Reasonable Ribbon!


We're rolling in with a BIG 5-Day Black Friday SALE this weekend at Really Reasonable Ribbon.

Now through midnight eastern time on Tuesday, November 29th, 2022 we have a terrific SALE going on.

Everyone Saves!
Please use the codes below in the promotional code area on the first page of checkout.

The code is good now through midnight eastern time on Tuesday 11/29/2022.
(Sale code is not valid on prior orders, ribbon club subscriptions, ribbon club gift subscriptions or special order items.)

Order subtotals over $15.00 will SAVE 15% using code BLACKFRIDAY15.

The sale code is good on everything including SALE items!
Did you know we stock a full selection of Scor-Tape?  Stock up today!

Along with gorgeous ribbon, we also have a new large offering of unique Embellishments.
(some examples below)


Don't forget to take a look at our vast offering of Mulberry Flowers from Wild Orchid Crafts.
(some examples below)

Are you a member of our Monthly Ribbon Club yet?
If not, JOIN TODAY and we'll give you the discount on your first assortment.
(All future shipments will be billed at full price.)

The November assortment contains 9 styles and a total of 18 yards of ribbon.
Each monthly ribbon assortment is a holiday or color themed assortment of ribbon.
What a fun way to build your ribbon stash and try new ribbon styles.


Wednesday, November 23, 2022

Merry Christmas Treat Pocket Tag

 
Hello crafty friends and Happy Wednesday to you all! Today I'm sharing another fun Christmas pocket tag, this one is a pocket one I designed for Really Reasonable Ribbon, it can hold hot cocoa and a stir stick, or candys or whatnot. Love making these as they are so fun to create and give as gifts.
Love that you can take your large dies, and create these pockets, and then decorate them up using other dies and embellishments. I used the beautiful ribbons from Really Reasonable Ribbon, one is a Forest Green Satin, and the other is a christmas plaid. I used the Kadoodle Bug Designs Christmas cup ginger that I had put together last year. Love these! The sentitment tags are stampinup! I added some white dots, and then a little santa hat button up on the top bow.
Really Reasonable Ribbon:


Thank you so much for stopping by and have a lovely day! Hugs to all, Cheryl


Sunday, November 20, 2022

Christmas Sweets & Ribbon Treats

Hi, friends!  It's Karen here today.  Are you ready for Christmas?  I'm most definitely not.  Luckily, our family isn't actually visiting until the day after Christmas, so I do get a little extra time to prepare.  In the meantime, I'm having a lot of fun creating Christmas cards and projects and picking up gifts and stocking stuffers.  Today I'm sharing a cute Christmas mitten filled with lots of sweet treats.  Really Reasonable Ribbon made it easy.
Oh my!  Where do I start?  I used a die-cut from PTI to cut that treat bag.  The base (back) is cut from cardboard and the front is cut from kraft tissue paper.  I machine stitched the edges to create the pocket where I could slip in goodies.  I added some peppermint sticks, candies, etc.  I ran some pretty Crochet Lace and some Red & White Gingham Ribbon across the lower part of the treat bag.
Each trim from Really Reasonable Ribbon that I added just made it cuter and cuter.  At the top of the mitten, I added some Black & White Bold Check Ribbon, some more of the pretty Crochet Lace and a piece of White Pom Pom Ribbon.  I also tucked in a few Milk White Double Head Stamens underneath the holly berries and ivy that were cut from wool felt.  I hung the mini kraft tag (JOY) from a Rusty Pear- Shaped Clip from the Embellishments section.  These adorable Pins are currently sold out.  But, for anyone (US only) who places an order at RRR this week and lets me know, I'll send you one dozen of these cuties.
I added a Flatback White Pearl to the tiny snowflake.  I also made another cute Santa cinnamon stick and it's hung with a length of Red Satin Ribbon.  I realize there's a lot going on with this project.  If you have any questions, just let me know.  There's always lots of great inspiration here on the RRR Blog and lots of great shopping at Really Reasonable Ribbon.  Thanks so much for visiting today, and please stop by again soon.

Blessings,
Karen

Friday, November 18, 2022

All Occasion Greeting Cards

 Hey friends and crafty peeps! Ginny here to share some all occasion greeting cards I created with trims from Really Reasonable Ribbon.


I've recently been enjoying working with the 3/8th inch wide ribbons and this Satin with Gold Metallic Edge in Vannila is perfect to coordinate to some handmade flowers.

~Really Reasonable Ribbon~ 3/8th Satin with Gold Metallic Edge Vanilla, Ivory Burlap String, Double Head Stamens Gold.

Wishing everyone a happy and productive day : ) G

Thursday, November 17, 2022

Really Reasonable Ribbon November Blog Hop Winner!

Thank you so much for hopping along with us this month on the Really Reasonable Ribbon Blog Hop. We had so much fun and we hope you did too!! We'll be hopping on the 13th of each month, so be sure to mark your calendars and join us again next month.


Now, on to our winner who will receive the November Ribbon Club Assortment from Really Reasonable Ribbon.


The winner will have 48 hours to contact me by clicking on the contact button at the top of the blog and sending me your full name and US shipping address.

True Random Number Generator  
12
Min: 1, Max: 12
2022-11-17 20:44:47 UTC

Congratulations Natalie!

12. Natalie11/15/22, 9:50 AM

I love the color combo of the ribbons. My favorite side dish at Thanksgiving is the stuffing with a slice of cranberry sauce and gravy. And I make my stuffing like my mom use too.


Now if you didn't win, don't worry!! We will be 'hopping' each month so you'll have another chance to win soon! We hope you stop by and visit our blog often.


Wednesday, November 16, 2022

December Daily 2022

Hello, everyone! It is Gloria with you again! I have started working on a December Daily Album, my first in several years! I wanted to share the cover with you today.

I am still working on the pages of the album, but since I used Really Really Ribbon trims for the front cover, I thought I would share it and get everyone excited to see the inside (which should be soon)!

I love plaid ribbon and this black and white plaid is just perfect for the vibe I wanted for my album! I love the country/vintage Christmas feeling it gives.
I wrapped a 14" length of the 1.5" Black Gingham ribbon around the front cover of the album. (The album is the Simple Stories Hearth and Holiday 6" x 8" Snap Binder.) I secured the ribbon to the inside front cover. I then used a six-inch piece of the same ribbon to tie a knot with tails to the lower part of the cover. I used scissors to trim the ribbon tails into a traditional shape.
I then used 5/8" Plaid Black ribbon to create a loopy bow, which I glued to the top of the original knot. I find it easier to make a pretty bow with the thinner ribbon, plus I did not have enough of the wider ribbon to make the kind of bow I wanted! {add to shopping cart....check!}
I glued a selection of holiday items to the bow, such as a snowflake brad, a tag, and a die cut shape of Santa's boot. I also added a metal sentiment strip to the right of the bow. 
I finished the cover by adding chipboard stars and some sparkly pearls, enamel dots, and gems. I may need to coat the cover with a multi-medium of some sort to keep the gems and such from falling off over time, but for  now, I will leave it as is.

I used a bit of  Cherry Baker's Twine to the spine element. (There is a Peppermint Baker's Twine, too! Which is so pretty!)

Here is a sneaky peeky at the inside of the book...
I used Christmas Baker's Twine to make a swoopy bow at the top of this page. I used some dries clear glue to make the swoopy tails stay put! 
I used a short length of the 5/8" Plaid Black ribbon to tie onto the top of the tag shown on this pocket page. I am sure I will use more ribbon throughout this project!

I will have the finished project posted on my personal blog in a few weeks! (I hope! The holidays are coming up FAST!)

Thank you so much for joining me today!

Really Reasonable Ribbon Supplies Used:

Other Supplies Used: 2-ring binder, various embellishments, printed paper, cardstock


Sunday, November 13, 2022

Really Reasonable Ribbon November Blog Hop


Hello everyone and welcome to another amazing Blog Hop here at the Really Reasonable Ribbon Blog!


Today you will see some great projects using our November Ribbon Club Assortment from our very talented design team. They always come up with some super ideas. 


Isn't this assortment great??  It contains 9 styles and a total of 18 yards.  If you aren't already a ribbon club member, why not join us today!  You will get a fun new ribbon assortment shipped automatically each month.

Now let's get hopping and see what our fabulous design team has created this month!

Here is our blog hop list.  If you get lost along the way, hop on back here and we'll get you back on track.

Really Reasonable Ribbon Blog

Now, be sure to leave some love at all the stops along the way. Your comments are most appreciated!


At the end of the hop, comment on this post answering the question below for a chance to win our November Ribbon Club assortment shown below.
Prize is offered to customers with US shipping addresses only.

Our question of the month is:
What is your favorite Thanksgiving side dish?

Our winner will be selected from the numbered comments on this post on Thursday, November 17th. Be sure to check back on Thursday evening to see if you are our lucky winner.

Thanks so much for hopping with us today. We hope you'll stop by and so some shopping at Really Reasonable Ribbon soon.

~Bonnie Garby~


Friday, November 11, 2022

Bringing Home the Christmas Wreath with Christmas Plaid Ribbon


Really Reasonable Ribbon Christmas Plaid Ribbon-Kathy Clement-Kathy by Design-Blue Fern Studios-Yuletide-Reneabouquets
Hello, Ribbon Lovers!  Would you like to help me bring home the Christmas Wreath today?  Oh, how I love the old fashioned beauty of this Red, Green and Gold Christmas Plaid Ribbon!  It's the perfect accent for this Victorian Style Slimline Greeting Card.  Pair it up with a Gold Metallic String Bow and you've got some serious Christmas vibes going on! 

Victorian Style Slimline Christmas Card with Christmas Plaid Ribbon from Really Reasonable Ribbon by Kathy Clement

The only thing better than one Christmas Plaid Bow is TWO Christmas Plaid Bows!  So I've placed one in each corner of this 4 1/4" x 8 1/2" slimline card.  


The Christmas Plaid Ribbon makes a great border, too!  Just run 1/2" Scor-Tape down the side of your card panel before you adhere it to your card.  Then cut the ends a little longer than the height of your card.  This way, you can wrap the ribbon ends behind the card panel for a neat and tidy finish. 

Wishing you a warm and cozy day!
Cheerio,
kathy

Thursday, November 10, 2022

Hang It Up!

 Hi Y'all, and Happy Thursday!  Misty here again today sneaking in for another guest spot.  I think I may have mentioned this before, but just in case I haven't, let me say it again...
I AM ADDICTED TO REALLY REASONABLE RIBBON
There is so much to choose from and always the perfect addition to ANY project!  Sometimes I feel like that Grandma that does those commercials for the Frank's Hot Sauce company ..."I put that schtuff on EVERYTHING!"  HA HA!! 

Today I am going to share another "off the page" ribbon craft with you!  While I am a scrapbooker first and foremost, I also seem to have been blessed with the gift of  "crafty fingers" and everyone around me knows it.  I haven't quite decided if that is a good or bad thing, because there is always SOMEONE who is in need of a crafty favor and comes straight to me.  LOL.  Of course, I always say yes!  I will do whatever they are wanting if it falls within my scope of crafts.  It usually does!! 

Most recently I was asked to create personalized hangers for the bridesmaids and groomsmen.  While it may seem a bit of an odd request, I knew exactly what the goal was.  This bride wants every little detail to be precise and perfect, so that the photos come out top notch.  I don't blame her! Even the hangers will need to match to help create the storybook wedding that she wants and deserves.  Of course I was all too excited to do this for her! 

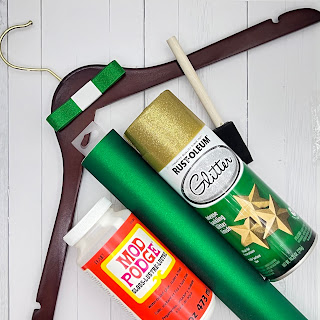
With 5 bridesmaids and 6 groomsmen, I knew that I would need 11 wooden hangers. I also needed spray paint to match her colors(Emerald and Gold), painters' tape to cover the hook of the hanger when I paint, a clear coat to seal in the paint, (I used Mod Podge), and of course the vinyl and tools to cut the names on my Cricut Maker.

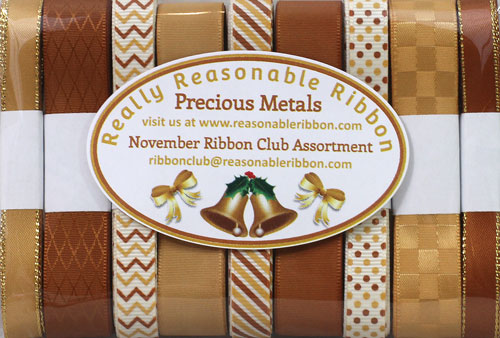
From the RRR Store I used Shimmer Satin Emerald ribbon and 11MM White heart pearl beads to add a touch of beauty to the otherwise plain hangers.


The steps are SO SIMPLE! 
First, wrap the painter's tape around all the hooks of the hangers to protect from overspray.

Next, lay all of your hangers out onto a large drop cloth in a nice sunny open area.
spray your hangers on one side, letting dry 30 minutes.  

Next, flip them over and do the opposite side, making sure to get good coverage. 
Let dry 30 minutes.
Check for any missed spots and do your touch ups now.
Once you start adding the names you will not want to have to paint again. 
(The painting stages are all done outside on a nice day)

Now that part is done, you can gather the hangers and take them inside...here comes the fun part! 

While the hangers were in the drying stages,

I was cutting out the names on my Cricut


and I was making the bows getting them ready to glue on:


For the hangers for the Bridesmaids, I painted them with a glittery gold paint,
and used emerald for the accents the names. 
I added all the names, then I used Mod Podge to seal the entire painted surfaces. 
Once that dried, I hot glued the bows in place and was Done! Y'all, this 
Shimmer Satin Emerald ribbon is flippin' gorgeous! 

 
For the Groomsmen, I used the Emerald for the hanger, and Gold for the Accents.
While they didn't get bows or hearts or pearls to make them pop, I decided to still share them since they were part of my project. Without any other accent to make the names stand out, I decided
to mount them on a just solid black square of vinyl. 
WOW what a difference that made! 


I thoroughly enjoyed transforming these plain wooden hangers into something beautiful for the Bride to give to her wedding party.  I'm pretty sure that she loved them and is excited to give them! The colors and fonts all matched and so will her photos.  Hopefully, these will help to create the perfect storybook wedding that she deserves! 
AND....Hopefully I have inspired you to do something crafty! 
Head on over to Really Reasonable Ribbon and get started with the perfect ribbons! 


Wednesday, November 9, 2022

Hot Cocoa gift Pocket using RRR


Hello crafty friends and Happy Wednesday to you all! Cheryl here today with a super fun Christmas Hot Cocoa gift Pocket using some of the Christmas ribbons from last months Really Reasonable Ribbon club. Loved the ribbons so much that I wanted to use more of them in my projects for Christmas.

these tag pockets are perfect for gift giving. Love that you can make them for neighbors, co-workers, family and so on. To create these I just cut 2 large die cuts any shape that works. Next I cut the design paper I wanted and then glued to each one. Now to create the pocket you will have to cut one in half, super easy! then glue to the bottom and decorate. super easy and fun. I had to add my bows,Love using Really Reasonable Ribbon to create these, so I added 2.
 Little Standing Nash bear is so sweet and is a SVG file. Love working with these too. I did add lots of dew drops as well. to add the ribbon across the border and cup I used 1/4" scor-tape. Nash is popped using the foam tabs and so is the little sentiment tag.

I hope you enjoy my post for today and thank you for stopping by!

hugs to all,

Cheryl