Friday, August 31, 2018

It's Your Day Sunflower Card

Hey friends.  Bonnie here today popping in with a quick post to share a birthday card I made earlier this month for a special young lady.  I added some of my favorite ribbons and trims from Really Reasonable Ribbon to finish off the card.
I used a great sunflower die from Cheery Lynn Designs and I shaded it with Distress Inks.
I just love the dimension you get by layering the die cuts.
My card is topped off with a pretty bi-color bow created on my Bow-it-All V3.0 Tool using Yellow Gold and Tangerine Delicate Stitched Satin Ribbon.  I also added two pieces of Natural Burlap String behind the bow to add some texture.

For a video tutorial on how to make this pretty bow, please click HERE.
Thanks so much for stopping by today.  For more information on the other products I used on my card, please visit my Make Time to Craft blog.


Wednesday, August 29, 2018

Fill Your Life With Adventures

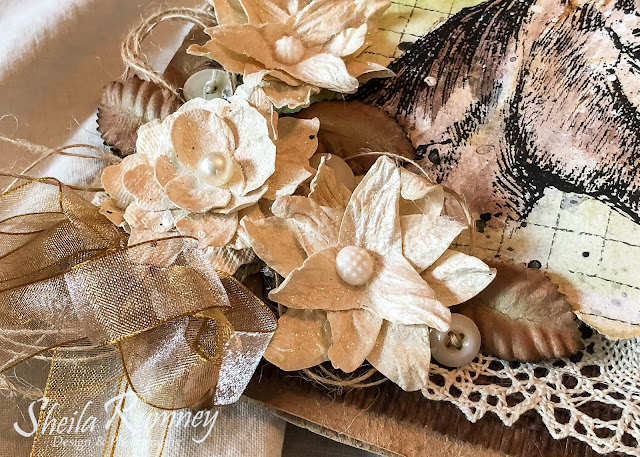
Life is an adventure...  You never know where your journey will take you.  I created the cover of my newest mini album using some beautiful ribbons and embellishments from Really Reasonable Ribbon.
I added bows with one of my new favorite ribbons the Sheer Iridescent Antique Gold Ribbon, then tucked in the Natural Jute String to add more dimension.
Then I tucked in some vintage buttons and the Mulberry Leaves.
I then added some vintage lace and burlap.  I am excited to start creating pages to capture all my life's adventures.
Hoping you have a wonderfully creative day.

Sheila

Monday, August 27, 2018

Home Sweet Home Mini Album

Hello, all our ribbon-loving friends of Really Reasonable Ribbon.    Thanks for stopping by today.  I apologize ahead of time for this lengthy blog post.  It's just that I wanted to show you all the pages and list all the fabulous Really Reasonable Ribbon products I used on this mini album.  I used lots of fabulous Carta Bella products (patterned papers, chipboard, stickers, ephemera, etc.) from a sweet line called Spring Market.  At the top of the cover, I added a gathered length of Natural Burlap String topped with White Double Head Stamens,  and Pink Double Head Stamens, as well as a Deep Ivory Open End Rose and two Pink Miniature Sweetheart Blossoms.
On the second page (inside left - below) I added two of the patterned papers and inked them with Tim Holtz Hickory Smoke Distress Ink.  Everything in my mini album is secured down with various length strips of Scor-Tape Adhesive.  I added a die-cut doily, a journalling sticker, a chipboard sentiment (smiles), some Pink and White Sweetheart Blossoms, and some Mixed Pinks and Ivory Miniature Sweetheart Blossoms to this photo mat page.
Page number three (seen below) is totally a photo page.  I didn't want to lay out specific photo mats on this page so that any size photo(s) can be added later.  I did ink the patterned paper, and I added a small chipboard sentiment piece, part of a Maya Road canvas tage, some Ivory Burlap StringOlive Burlap String, a Ivory Miniature Sweetheart Blossoms, and a small journalling sticker.
You turn to the next page (number four on the inside left) and you will see two patterned papers inked with Tim Holtz Distress Inks, a journalling card with a stamped sentiment on a journalling card, and three (a pink, a white and a green) Acrylic Flowers from our Embellishments section.  I also ran a length of super sweet White Crochet Lace up the side of this page.
Move to the right, and you will see part of a folded glassine bag that makes up page five...with another small photo mat.  I added a die-cut doily, and on the right side of the doily I added a 25mm Green, Yellow and White Mulberry Leave topped with a length of Ivory Burlap String, a Deep Pink Open End Rose, two Ivory Miniature Sweetheart Blossoms, and some Pink Double Head Stamens.
Flip that glassine bag open, and you see page six which is the narrow side of the glassine bag. I created a cute tag to attach to this page.  I used lots of the sweet patterned papers, a chipboard sentiment at top (laughter), and I stamped a miniature tag with "love grows here" and hung it using a length of Cotton Candy Baker's Twine.  At the top of the tag, you will see a bow tied with Moss & Cream Plaid Ribbon.
To the right, you will see page seven which is the side of the glassine bag that's a bit wider.  I covered it with patterned paper and added a Spring Market sticker towards the top.  Near the bottom, I added a small Maya Road kraft with white polka dots envelope.  I added a Spring Market sticker to the little envelope and also attached a darling 11mm White Heart Shaped Flatback Immitation Pearl Accent.
By now.....peeking out from the bottom right, you have probably already caught a glimpse or two of the tag I created and tucked into the glassine bag (just before the back cover).  I attached a cute patterned paper photo mat to some extra patterned paper to create the tag.  I attached a sweet floral "pull tab" to the tag so that you can easily pull it out of the glassine bag and attach a photo or tuck in other little momentos.  I made this "pull tab" of sorts by tying bows of the Moss & Cream Plaid Ribbon and Baby Pink Plaid Ribbon topped with a White Aster Daisy, some Pink and Ivory Miniature Sweetheart Blossoms, and some White and Pink Double Head Stamens.  SO pretty!

After that........the very boring back cover.  But I thought I'd show y'all anyway.  LOL  And on the wire binding, I added lengths of Burlap Pink Center-Stitch RibbonIvory Natural Crochet Lace, and Moss & Cream Plaid Ribbon.......just for fun.  Ribbons make EVERYTHING better!
Thanks again for visiting us today.  There's always so much inspiration here on the RRR Blog, as well as information about special promotions and sales; and........I really hope that you will stop in at the Really Reasonable Ribbon store to check out all the amazing products.  I sure enjoy creating with them, and I know you will too.
Happy crafting and creating, everyone!
Karen Letchworth

Sunday, August 26, 2018

Make a Wish, Cue the Confetti, It's Your Day!

Hi friends.   Bonnie popping in today to share a pretty birthday card I made for a dear friend.  I picked some of my favorite ribbons and embellishments from Really Reasonable Ribbon to complete the card.
Debbie loves purple just like I do, so I went all out purple and pink.  Those are my happy colors!
The pretty flowers were handmade using a favorite die set from Cheery Lynn Designs.  I used Distress Ink papers I created for the background and the flowers and the centers were finished with 10mm Flat Back Pearls.
My card is topped off with a pretty bi-color bow created on my Bow-it-All V3.0 Tool using Regal Purple and Rose Bloom Delicate Stitched Satin Ribbon.  The center of the bow is topped with a 10mm Resin Flower embellishment.  I also ran the Regal Purple Delicate Stitched Satin Ribbon topped with 3/8" Tutti Frutti Chevron Grosgrain Ribbon across the center of the card behind the sentiment panel.

For a video tutorial on how to create this pretty bow, please click HERE.
Thanks so much for stopping by today.  For more information on the other products used on my card, please visit my Make Time to Craft Blog.
  
Happy crafting!


Friday, August 24, 2018

Vintage Masculine Birthday Card

Hello, Ribbon Lovers!  I hope you are all having a Fabulous Friday!  August is birthday month in our family, so I thought I'd share this really fun Vintage Masculine Birthday Card that I made for our middle son.


Blue and brown is a great color combo for masculine cards, especially when you pair it up with a fabulous bow.  This double loop bow is tied with Ivory/Brown/Copper Plaid Ribbon.  This is really soft and  supple so it's easy to tie.  The woven fabric really comes through, adding even more texture to this 5" x 7" top fold card design.

Natural burlap string adds even more texture and does a good job of amping up the vintage vibe I was going for.

The card interior turned out super cute with pockets, flaps and a little gift card holder.


It's great to have ribbon options that work on masculine cards!  I hope I've shared some tips and tricks with you today that you can use in your own crafty adventures.

Have a great weekend!
kathy

Thursday, August 23, 2018

Leaves are Falling, Autumn is Calling Note Card

Hi friends.  Bonnie here with you today sharing a pretty Autumn themed greeting card featuring some of the ribbon from the August Ribbon Club Assortment from Really Reasonable Ribbon.

Not a Ribbon Club Member yet?
The August Ribbon Club Assortment is a collection of rich autumn colors and prints.  It contains 9 styles and a total of 17 yards of ribbon and crochet lace.  Each monthly assortment is a color or holiday themed collection of ribbon.  What a fun way to build your ribbon stash and try new ribbon styles.

I just adore creating projects with a beautiful autumn color palette.  There is just something about the mix of colors...

My card is topped off with a pretty bi-color bow created on my Bow-it-All V3.0 Tool using two of the ribbons from the August Ribbon Club Assortment from Really Reasonable Ribbon.  The center of the bow is topped with a Antique Bronze Gear Embellishment.  I also ran two ribbons from the assortment across the center of the card behind the flower focal point.

For a video tutorial on how to create this pretty bow, please click HERE.
Thanks so much for stopping by today.  For more information of the other products used on my card, please visit my Make Time to Craft Blog.


Wednesday, August 22, 2018

Summertime Bug Catcher

Hey friends! Linsey here today sharing my super fun summertime bug catcher-home, custom decorated and adorned with some of my current favorite ribbons from the August Ribbon Club Assortment! Come along with me and see what the buzz is all about! 😊
First, the bug catcher was covered with some fun patterned papers. Next, each side of the arch on the catcher was decorated with a double-layered bow using 5/8" Kiwi Taffeta Ribbon and Flowers on Ivory Grosgrain Ribbon from August Ribbon Assortment. I really love how these ribbons coordinate with the summery outdoor theme of my project. A pretty butterfly is attracted to the yummy ribbons too! She has fluttered her way to rest atop a pink button for a closer gaze at these lovely bows! I think she may stay awhile.
I layered the grosgrain bow on top of the wider green taffeta bow, then added a brightly colored button with Mays Arts Yellow Burlap String to the center of each bow. RRR carries Burlap String in 15 colors and I can tell you, I use it on lots of craft projects! It's just right for stringing through buttons of all kinds and so much more! The light, wispiness and natural texture of it is often the perfect final touch to add to my creations. On cards, scrapbook pages, tags, altered crafts like this one and of course lots more! I simply love it!
The inside of the catcher is filled with interesting finds from our bug hunt! Everything from  red and black ants to spiders and ladybugs--even a very hungry caterpillar who shall be getting his supper very soon. In my bug catcher-home, all are welcome, you may come and go as you please, bring new friends and everyone gets along and lives happily ever after! Hooray!!!
Thanks so much for stopping by today! I hope you enjoyed my project! Until next time, happy summer, happy bug hunting and happy crafting!

Tuesday, August 21, 2018

RRR August Blog Hop Winner!

Thank you so much for hopping along with us this month on the Really Reasonable Ribbon Blog Hop. We had so much fun and we hope you did too!! We'll be hopping on the 13th of each month, so be sure to mark your calendars and join us again next month.


Now, on to our winner who will receive the August Ribbon Club Assortment from Really Reasonable Ribbon.


The winner will have 48 hours to contact me by clicking on the contact button at the top of the blog and sending me your full name and US shipping address.

True Random Number Generator  
Result:
4

Congratulations Char - The Mad Shopper!

4.  Char- The Mad Shopper8/13/18, 11:19 AM
I love making and eating pumpkin butter which is made a lot like apple butter but with pumpkins and other spices. It is a great way to use up a bumper crop of pumpkins.


Now if you didn't win, don't worry!! We will be 'hopping' each month so you'll have another chance to win soon! We hope you stop by and visit our blog often.

Monday, August 20, 2018

Let it Snow Winter Card

Hello everyone and Happy Monday to you all! Today I have a sweet little snowman card I made using the beautiful ribbons from Really Reasonable Ribbon, and also some of the darling embellishments and rose buds on my card for today.

Of course Christmas is my favorite time of year, however it takes me a while to get into the crafting mode on this, so I do like to try to start early, as by October I will have huge messes in the craft room with all Christmas goodies and paper stacks and stuff all over, and anyway I'm sure I'm not the only one who does this...hehehehe.  So for my card I did use this darling paper.  It has sweet snowman on it, and I thought it would go perfectly with this sweet stamp set from JustRite Papercrafts. I love how Really Reasonable Ribbon matches perfectly with all sorts of designs, and both the Shimmer Satin Red and Satin Swiss Dots Pearl Pink go with this collection to make my double bows.

All layers were done using the ATG refill tape, and then I added sewing using my sewing machine. Next I also used the Foam Tabs to pop and give a 3-D look to the layers after they were put together.

For my poinsettias, which were cut using JustRite dies, I added some of Really Reasonable Ribbons 8mm and 10mm white flat backed pearls to the centers. Each poinsettia was brushed using  perfect pearl to give a little glitz to the flowers. Next I added in some of the RRR Rose Buds in a white , they look so pretty, love these!

Resin Flowers were added to the corners, and these little flowers are so sweet and perfect for cards, and centers of flowers, also for decorating up the corners of your card like I did here.

Really Reasonable Ribbon:
Satin Swiss Dots Pearl Pink
Shimmer Satin Ribbon for the Red
Scotch ATG Refill Tape to put together layers
Foam Tabs
Rose Buds
white flat backed pearls
Resin Flowers

The little snowman and Let it Snow were stamped using the Mini Misti tool, and colored pens. I added some Stickles to the snowman for his black buttons. Love the colors I used for this card, they are not your normal traditional Christmas colors but they sure are fun!
Hope you enjoyed my post for today, and thank you so much for stopping by!
Have a lovely day!

Hugs to all,
Cheryl

Friday, August 17, 2018

Little Baby Greeting Card

Hello there friends and crafty peeps! Today I'm sharing a card I created especially for my cousin to celebrate the birth of his first baby. I just love babies!!! Congrats to the new parents!!!!

I just love the vintagy feel of this card. Maybe it will be used to decorate the nursery?

I used a garden of Wild Orchid Crafts flowers for this card all in dreamy shades of blue and Cream.
Really Reasonable Ribbon~Cherry Blossom in Cream & Blue, Sweetheart Blossoms in Blue, Cottage Rose in Blue, Chevron Striped Twill in Light Blue, and Burlap String in Light Blue.

Wishing everyone a happy and productive day : ) G

Wednesday, August 15, 2018

From Our Kitchen to Yours

There is something special about giving a thoughtful gift of baked goods.  It is like giving a piece of yourself.  Why not make that gift extra special by adding a creative container to hold those homebaked goodies?
It was easy by easing a vintage berry basket and ribbons and lace from Really Reasonable Ribbons.  
I wrapped the Sheer Iridescent Antique Gold Ribbon around the container, then tied a pretty bow, tucking a bow under the ribbon made out of the Antique Gold Burlap String.
I then added the Chloe Natural Crochet Lace around the top of the basket.
Then I tuck in a tag and filled up the container with some yummy homemade chocolate chip cookies.  It was so easy to create this cute container to give as a gift.  Looking forward to creating a few more to have on hand when a special gift is needed.
Wishing you a creative day, dear friends.

Monday, August 13, 2018

Really Reasonable Ribbon August Blog Hop


Hello everyone and welcome to another amazing Blog Hop here at the Really Reasonable Ribbon Blog!


Today you will see some great projects using our August Ribbon Club Assortment from our very talented design team. They always come up with some super ideas. 


Isn't this assortment great??  It contains 9 styles and a total of 17 yards.  If you aren't already a ribbon club member, why not join us today!  You will get a fun new ribbon assortment shipped automatically each month.

Now let's get hopping and see what our fabulous design team has created this month!

Here is our blog hop list.  If you get lost along the way, hop on back here and we'll get you back on track.

Really Reasonable Ribbon Blog

Now, be sure to leave some love at all the stops along the way. Your comments are most appreciated!


At the end of the hop, comment on this post answering the question below for a chance to win our August Ribbon Club assortment shown below.
Prize is offered to customers with US shipping addresses only.


Our question of the month is:
While we are not quite there yet, what is your favorite autumn food or baked treat?  

Our winner will be selected from the numbered comments on this post on Tuesday 8/21. Be sure to check back on Tuesday evening to see if you are our lucky winner.

Thanks so much for hopping with us today. We hope you'll stop by and so some shopping at Really Reasonable Ribbon soon.

~Bonnie Garby~