Thursday, May 31, 2012

Graduation Money Holder


Hi everyone!  Can you guys believe it's the last day of May?  We have a ton of graduation parties coming up in the next few weeks so I need a cute way package up some cash.  I made a really cute money holder with my Silhouette but I thought it would be fun to design one that didn't require a die cutting machine.
 
So here is a simple tutuorial on how to make a quick money envelope with cardstock and your score board.


This step creates the pocket that will hold the money.

To make the little twine tassel....I wrapped some twine around my Bow Easy and then tied another piece around the upper portion.  I trimmed above and below the tied portion to create the fringe. 
I embellished my envelope with some Echo Park - Note to Self paper and a strip of totally twill ribbon and a die cut graduation cap.

You can read more on my blog.
Thanks so much for stopping by!

Corri

Wednesday, May 30, 2012

To die for ...


This is my last post as a Guest Designer here on Really Reasonable Ribbon for the month of May.  I've had such fun.  Thank you Bonnie for giving me this wonderful opportunity to be part of the RRR team again.
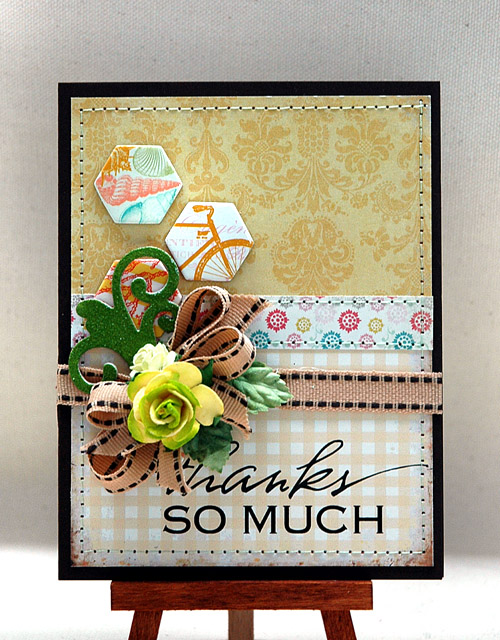
With so many amazing new dies and cutting machines on the market right now, it's only right that ribbon should be used to help sell them, don't you think? LOL How can you not want to play with layers of ribbon behind the fantastic die-cut shapes on offer?  Paper needs to take a backseat for awhile!  So, here are 2 quick cards I made to get your creative die-cutting and ribbon combo juices flowing.
They are very simple.  I used doublesided adhesive paper on a card scrap for the ribbon layering.  Cut the shape you've chosen (I used my Cuttlebug and Spellbinders' bird and butterfly dies), and decide on your sequence of ribbons to suite the die-cut you're playing with, then cut the required strips of ribbon and lay them down over the adhesive.  Position the ribbon panel behind the shape on your cardfront, use doublsided tape to stick it down in the right place, then pop the top die-cut card up on adhesive foam tape or Pop Dots.  Not only does this add a shadow and therefore dimension to the look of the card, but it also keeps the cardfront elevated above the ribbon panel.  I think it looks good layered this way and it also avoids bumps and an uneven top surface that would result if you adhered the two layers together directly.
I hope you like these cards, and hope that they've inspired you to look at your ribbons and die-cuts in a different light.  Experiment and have fun!


Remember, Really Reasonable Ribbon Rocks!


Tuesday, May 29, 2012

Thanks So Much...


Hi everyone...
Linda here and today is my turn to share with all of you...

I have a sweet thank you card to show you here with earthy color combination. Nice to create for any general occasion.
The ribbon was double bow tie to give a nice foundation to layer multiple flowers and swirl was heat set with embossing powder to add more texture. You can find the link here to purchase this sweet bow!


Other Materials:
Hero Arts Hybrid Stamp
Prima flower
Papertreyink Cutting die
My Mind's Eye patterned paper
American Crafts cardstock

I really hope you enjoyed today's show! Thank you very much for stopping by today!

Linda

Monday, May 28, 2012

Party! Party! Party!


Hello everyone! It's Emily here from Create Serendipity. I have a fun little project to share today.
I made a little birthday party hat and a matching firecracker gift package. Lovely ribbon & twine was the perfect finishing touch for these! 

I used my silhouette Cameo to cut the hat and package. 

RRR Products Used: 


Sunday, May 27, 2012

My New Acquisitions

Wow! A week ago I was writing a post the night before my trip to see my daughter. I can't believe I am home again already. We had a great time shopping, eating, hiking and hanging out! I miss her! It's a good thing I had to stamp right away to keep me occupied! 

My Ivory Jute Ribbon and Penelope Crocheted Lace are two of my new acquisitions from the RRR Store. I simply LOVE the Jute Ribbon. It also comes in Natural, Red, Spring Moss, Black, Burgundy, Slate and Moss. Oh, I will need them all! The Ivory Jute adds such a cool organic feel to this card:
I used Bloom & Simplify by Unity Stamps for my images. I stamped the sentiment and flower in Blue Bayou ink, then watercolored in some So Saffron and Blue Bayou ink. The sentiment was stamped again (without reinking) onto the flower circle to continue the words without overpowering the flower. 
The designer paper is Stella & Rose Hattie Papers by My Mind's Eye. I added a clip, button and crocheted flower. The flower is tied with a little piece of Natural Jute String.
The sentiment reads: 
be the one
to start an
incredible 
journey
to love with
an
open heart.
the dream of
better things
for tomorrow.
to embrace life
right now.
this moment.
be the one...
only you can
have the faith
and
determination
to grab hold
of what this
life has to
offer.
you be that
person to
start 
the journey...
and watch
others
follow.

Thanks for stopping by today and remember what Memorial Day is all about.


Stamps: Bloom & Simplify by Unity Stamps (Angie Blom)
Ink: So Saffron and Blue Bayou
Paper: Stella and Rose Hattie Papers (My Mind's Eye), Kraft and Naturals Ivory (Stampin' Up!)
Accessories and Tools: distressing tool, clip and crocheted flower (The Paper Studio), button (CTMH), Natural Jute String, Ivory Jute Ribbon and Penelope Crocheted Lace (Really Reasonable Ribbon)


Saturday, May 26, 2012

My Favorite Combination!!!


Hi! It's Patti, and I hope you are all having a wonderful Holiday week-end!! Today I am sharing a combination that has become a favorite of mine lately! I am hooked on using the twill ribbon and the baker's twine together!!! 


On this card I've used the blue twill in the twill assortment and the blue baker's twine in the baker's twin assortment. I also layered it with the Allison crocheted trim. I added a little pin and vintage button and that was it. This is a cute little Birthday card that took hardly any time to create!!!

Friday, May 25, 2012

Wanna make a shabby bloom?


Helllllllllo to you!  I am excited  today because I get to share a little tutorial , my first for Reasonable Ribbon.  I decided to keep things simple here and show you (with many pics) how to create your own rolled shabby bloom.  Now many of you may be familiar with how to do these.  I am always late to the party but humor me, ok?  LOL!  I decided to use some of the  burlap ribbon in teal.  This stuff is great..first it has wire in it and is very forgiving ..and secondly it is just plain gorgeous.  I love burlap of any kind..and this is so cool because it has gorgoeus ticking style stripes through it.  The other thing main goody I used were the Middy biddy polka dot Kraft bags.  Great bags to use to put yummy treats in or create tags like I did to tuck inside. 
                          I started by tying a simple knot in the end of the ribbon...leaving just a snip of it at the end.  This makes for a place to hold on to and the base of the actual bloom.  Start wrapping the ribbon around the knot and than alternating every so often by twisting the ribbon in a 360.  Every so often use some hot glue to keep the ribbon in place.  This ribbon is very easy to manipulate so just have fun with it.  Just keep repeating the steps till the bloom becomes the size you want.  You can create small ones or larger ones.  Mine is medium because I decided to add texture to mine by adding some vintage hankie fabric and a crochet doily.  As you can see from the pics I simply just layered each piece on top of eachother.....using hot glue.  I attached my bloom to my bag and than added all the fun toppings!  I had to use some lace and used both the Allison lace and the Penelope lace combining both together. 
I topped it off with some of the new two tone texture ribbon from May Arts .  I used some of the same ribbons on my tags and also used some of the sweet jute  in blue that I tied onto the tags and in my buttons.  I tucked my tags into the bag..leaving some room for a sweet treat and I was done!  Hope you have enjoyed ...and uhhh hope I made sense.  Don't look to close at my nails....I am not a manicure chick...at all...I would rather spend my mad money on paper!  Hugs, cherry

Thursday, May 24, 2012

Set of cards


With the end of school coming up on so so quickly,
I have been making cards for my kiddos to give to their friends and teachers.
A handmade card and a candy bar is a fantastic way to 
say hi, bye, or lets celebrate the end of the year!  
Here are a couple of the cards that I created for them to be able to
give to their friends to end the school year:

The kite tail in the "HI" card is created using bakers twine 
and 1/4 inch ribbons tied into tight knots. 


The "Time to Celebrate" Card was enhanced with 


What are you giving to teachers and friends for the end of the year?
Are you using ribbon to help tie it all together?
You SHOULD!  
Ribbon make everything prettier!

Have a wonderful day! 

Wednesday, May 23, 2012

Tea Pot Mini Album & Double Ruffled Flower Video


Hello everyone, Cheryl here with my Tea Pot Mini Album designed for Really Reasonable Ribbon and The Scrapping Cottage.

To tie my album together I used RRR Ivory Double Faced Satin Ribbon. I also used the Seam binding that Bonnie carries for my Tea Time Tags in the front pocket. Next I added lots of RRR Penelope Natural Crocheted Lace to the bottom of my tea pot and just below the strand of pearls. All die cutz are from The Scrapping Cottage and are the Tea Time CottageCutz release.

I wanted to show the tags that fit in the front pocket. I also have added my Tea Time Mini album video to my Youtube Channel if you would like to see it in a video. :)

On this next page I used more Seam Binding and Silky Crush Champagne Ribbon up the side where the Mini Tea Cakes are. I also used more Satin Ribbon for my bows and around the top of the plastic holder for the Mini Album. The bow on the photo mat is Satin as well from RRR :)

I added a feather, wedding spray, Prima flowers, Wild Orchid flowers, pearls, and the Mini CottageCutz Tea Cakes. I also added some tags to the top using a clip.

On my next page I used more Really Reasonable Ribbon Seam Binding, Satin, and Penelope Crocheted Lace.


For my Strawberry Page, I used Really Reasonable Ribbon's Red Polka Dot in 2 different sizes. I also used Red Velvet Ribbon, and Red Double Ruffled Plaid Trim for the mini ruffled flower, and along the bottom of my tea pot I used the Sheer Box Pleated Trim in Red. All pearls are also from RRR.

For the Blue Flower page I used RRR Blue Seam Binding and Satin with Scallop Edge Ivory.  I used the Scallop Ivory ribbon along the sides of the pocket and then added pearls through the center of them both.  For the seam binding I used it ruched up to make little flowers and such for this page. 

I hope you enjoyed my Tea Pot Mini for today and thank you all for looking and your wonderful SWEET comments!!! I sooo LOVE reading them all!!!!
RUFFLED FLOWER VIDEO!
Thank you for looking and Have a Nice Day!!
Hugs to all,
Cheryl