Sunday, April 30, 2017

Thank U

Hello, dear blog friends!  It's Karen Letchworth here posting today with a sweet card that I made a couple of weeks ago.  The inspiration for this card goes to the talented Amy Sheffer from a card she shared on Pinterest several years ago.  I fell in love with the layout of her card, and it really inspired me.  I made my card by using up some older patterned papers and several FABULOUS goodies from Really Reasonable Ribbon.
Once I had all my patterned papers in place, I added a strip of 1 1/2" Ivory Grosgrain Ribbon that I looped over the top, and gathered/tied with several lengths of Ivory Burlap String.  To that, I added one Red Open End Rose and two Two-Toned Yellow Open End Roses.  I also have a length of Red Swiss Dot Grosgrain Ribbon peeking through, as well as a length of Debra Natural Crochet Lace.  Each trim I added just gave my card a little more personality.  You can never really add too much ribbon, right?
Really Reasonable Ribbon has so many great colors/varieties of ribbons, trims, LacesMulberry FlowersEmbellishments, and SO much more.  You're sure to find something perfect for your next project.  There's also a FUN CHALLENGE where you can play along, and we always enjoy seeing your creativity at work.  Be sure to stop by the Really Reasonable Ribbon Blog every day for more great inspiration from my talented Design Team-mates.  Thanks so much for visiting!

Have a blessed day,

Saturday, April 29, 2017

Open to Adding Layers

Hello ribbon lovers!  
Are you open to adding layers of ribbons, lace and embellishments to your artwork?
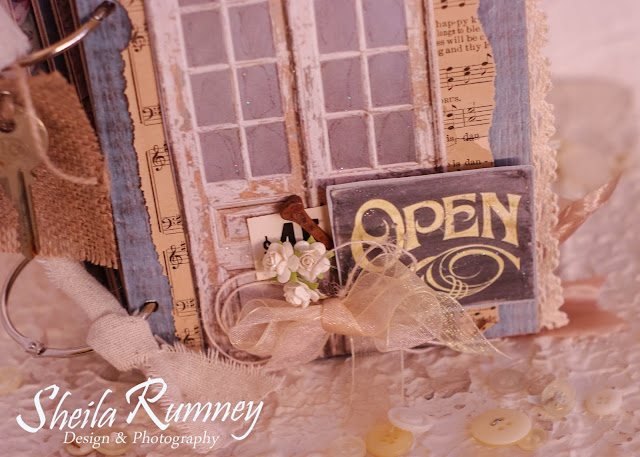
Really Reasonable Ribbon makes it easy to get your layers of ribbons, lace and floral embellishments all in one place.  By adding layers of Cream Roses, then a bow of Burlap String Natural String and topping it up with the Sheer Iridescent Champagne Ribbon, it adds visual interest to your artwork.
By adding layers of Cream Roses, then a bow of Burlap String Natural String and topping it up with the Sheer Iridescent Champagne Ribbon, it adds visual interest to your artwork.
I then added the gorgeous Debra Natural Crochet Lace to the side of album page to add additional layers.  
Hoping you are open to adding a few layers of beautiful ribbons, lace and embellishments to your next creative project.

Friday, April 28, 2017

Beautiful Bees

{judy} Hello ribbon friends! Today I am sharing a quick card made with the Bees Please Tags designed by my fellow teammate, Ginny! I am planting an entire section of my yard with flowers for bees. I don't see them around much, and wanted to provide a place for them in my neighborhood!

I started by layering papers from Kaisercraft's Be-you-tiful patterned paper collection, then added a lace doily from Stampin' Up! in the mix. I printed out two sets of tags, and cut one bee out, so I could layer and pop him up on the tag. 
I added a strip of burlap behind the tag, and added my beautiful trims: a double bow of Black Seam Binding, a single bow of Black Burlap String, and a gorgeous Cottage Rose from the Mixed Reds Collection. The rose is accented with a Brown Mulberry Paper Leaf.
I tied a little Black Seam Binding in the top of the tag, and some of the Black Burlap String around the front panels. I added a White Flat Back Pearl to help keep the string in place, and for some glam.
My sentiment is a die cut from the Paper Smooches Kudos Word die Collection. I backed my black cardstock piece (Basic Black - Stampin' Up!) with a piece cut from a 6x6 Scor-Tape Adhesive Sheet and then ran those pieces through my Big Shot. Easy to peel out and adhere to the front of my card! The sheets are a must-have for intricate die cuts - especially word dies. All of my layers are held together with Scor-Tape.
I love the contrast of the burgundy and gold. What do you think?
Don't forget about our challenge going on right now on the RRR Blog - Put A Bow On It! Come play along! The deadline is May 3!
Thanks for stopping by today!

Thursday, April 27, 2017

Altering Seam Binding Ribbon with Distress Oxide Inks

Hello, Ribbon Lovers!  You all know how much I love to use Distress Inks to create custom seam binding ribbon on my cards and projects.  Well, I caved in and bought the new Distress Oxide Inks recently, and I was curious to see if they would do a good job of creating custom ribbon.  After an afternoon of inky goodness, I'm happy to report that I love the results!

I started with a standard sized manila tag, then added Distress Oxide Ink in Broken China, Faded Jeans, Fossilized Amber and Wilted Violet to build my base layer.  One thing I've learned about working with Distress Oxides is that the  more water you spritz onto the ink, the better it seems to look.  For this background, I used the standard "smoosh onto your craft sheet, spritz with water, swipe and tap" method, but I only worked with one color at a time.  I also heat dried each layer before proceeding to the next.


After dressing the tag up with some rub ons and texture paste, I spritzed it with Dylusions White Linen Spray.  These cute paper dolls from Tim Holtz are colored with the DO Inks and added to the party along with a chipboard frame that I painted with Picket Fence Distress Paint. 


To alter my seam binding ribbon, I smooshed Fossilized Amber DO Ink onto my craft sheet.  Then I spritzed it with water until little beadlets formed.  Next, I tapped about a yard of white seam binding into that inky puddle. The DO Ink gives the ribbon a heavier body than standard Distress Ink, and it holds the lovely crinkles even better. 

 After drying the Fossilized Amber, I created a smaller puddle of Wilted Violet Ink and just tapped the ribbon in here and there to add some purple highlights. Then I dried the ribbon with my heat tool again. Next, a visit to the Zutter-Bow-it-All Tool where I tied a shabbylicious bow. WOC  Cream Cherry Blossoms and Sweetheart Blossoms were the perfect finishing touch. 

So, if you were curious, now you know: Distress Oxide Inks are great for altering seam binding ribbon!

Thanks for stopping by!
Cheerio,
kathy


Wednesday, April 26, 2017

Live Simply CAS Card

Hello friends, Linsey here today! Has Spring sprung where you live yet? I live in the Seattle, WA area and we are going through periods of sunshine mixed with bouts of rain, making way for all the signs of Spring, like the blooming flowers and beginning of new leaves on all the bare trees. I love this time of year and this card is just right for the feelings that Spring evokes.
I normally don't do CAS (clean and simple) cards well. My style tends to be more of the "less is not more, more is more!" approach, hehe. However, this card came together quickly and easily by dry embossing the base and keeping with a simple white and pop of color combo. The sentiment and WOC Sweetheart Blossoms in Ivory and Cosmos Daisy Stem Flowers in Mixed Purple/White along with the ever-so-versatile Bamboo Cord Multi-Weight Set and a few sequins embellish this card to make it complete. I hope you like it and feel the warmth of Springtime in it! Thanks so much for stopping by today! Happy crafting!

Tuesday, April 25, 2017

Eat Your Veggies by Cherry Nelson


Hi there..and happy Tuesday. My day over at the RRR blog.
I have a garden greeting to share today!
 Perfect for a veggie lover .....full of bright Summer colors.
 I used both Palos Verdes Baker's Twine and Cherry Baker's Twine and wrapped it around several times.  I also used it on my button row and inside my card.
Thank for visiting!  Cherry

Monday, April 24, 2017

Cherry Blossom Card


Hello everyone and Happy Monday to all! Today's card is a super fun one I made using the beautiful Satin Ribbon from Really Reasonable Ribbon and the Gorgeous Pearl Embellishments. I have to say that I think I'm addicted to these fun beautiful little half backed pearls, they make for beautiful flowers and embellishment for anything on your card.

The ribbon is gorgeous and makes for an easy bow for today's card. I chose to use a Cherry Blossom kit for the design paper and stamps. I also cut out the stamped flowers and added the Really Reasonable Ribbon Pearl Embellishments, in 8mm, and love the way they turned out. I also popped them up using Really Reasonable Ribbons Foam Tabs.

My bow was created using Really Reasonable Ribbons White Satin, and my bow consists of 4 loops on each side, with a large pearl in the center. I also save the wires from the flowers that I get from RRR to tie my bows together. Love recycling these.

I hope you enjoy my card today, as I surely enjoyed creating this one. I always love when cards come together super easy, and this one did just that :)
Thank you so much for stopping by and have a lovely day!

Hugs to all,
Cheryl

Sunday, April 23, 2017

Happy Anniversary

Hi there ribbon lovers.  Bonnie here today sharing a pretty anniversary card I made for my sister-in-law and brother-in-law showcasing some pretty ribbon, embellishments and mulberry flowers from Really Reasonable Ribbon.
Since I was using some Distress Ink papers that I had already made, this was a pretty quick card to put together.  I cut my background die and layered it on the Distress Ink paper and then added a brown and navy blue layer with a final layer of natural mulberry paper at the bottom..  I then wrapped a piece of Navy Diamond Satin Ribbon across the center and topped that with Natural Burlap String.  This panel was then attached to a 5-1/2" square navy blue card base that was topped with a piece of my Distress Ink paper.

My sentiment was stamped and die cut and layered again on brown and navy cardstock with a final layer of natural mulberry paper at the bottom.  The sentiment was attached to the card front with 3D Foam Tabs.  
I added three Chrysanthemums from the Mixed Earth Tone Chrysanthemum Assortment under my sentiment.  I curled the wire around a needle tool before I added them.  These chrysanthemums some in a variety of colors and are a great addition to any project.
My pretty bi-color bow was created on my Bow-it-All V3.0 Tool using Turftan Brown and Capri Blue Delicate Stitched Satin Ribbon.

For a video tutorial on how I made this pretty bow, please click HERE.
Thanks so much for stopping by today.  For more information on the other products on my card, please visit my Make Time to Craft Blog.

~ Bonnie ~

Saturday, April 22, 2017

Little Birdie Loves You All Occaion Greeting Card by Ginny

Hey there Peeps! I'm dropping in this morning to share a sweet greeting card that's perfect for just about any occasion with a simple greeting, gorgeous bird images, altered chipboard and of course ribbon trims from Really Reasonable Ribbon.
This color combination is really on trend but I'm keeping the vintage vibe going with the large floral background and details like the pearl headed pins.
This bow is created with Chevron Striped Twill in Pink topped off with Ivory Burlap String. I've also added some Magnolia flowers for added depth.
 The altered chipboard bird cage is extra girly with the curvy lines and helps to separate the busy patterns. 
Okay that's all for me. Wishing everyone a happy and productive day : ) G

Friday, April 21, 2017

Really Reasonable Ribbon Challenge #162 - Put a Bow on it Theme


Hello everyone! It's time for a new challenge here at Really Reasonable Ribbon. Please scroll down to the next post for the winners of the last challenge.


The theme for Challenge #162 is 'Put a Bow on it' with ribbon or trim.
Create a card, layout, multi media piece, tag, ATC, hair bow, you name it. Just be sure to follow the theme above and use ribbon, lace or trim somewhere on your project.
  
*******************

Here is a little inspiration from our design team for challenge #162 to get you started.  All of the sample projects feature ribbon from Really Reasonable Ribbon.


************************

Now, let's see your 'Put a Bow on it' creations! 
We will be selecting our top three favorite projects to feature, so stop back on May 5th to see our picks along with our next challenge theme. 

Here's what you need to do:
* Create a new project using the posted theme. A layout, card, ATC, home decor item, hair bow, or anything you can think of provided it fits the weekly theme.
* You may enter up to 6 projects, but you're asked to provide newly designed projects. No back-linking please.
* All projects must also include some sort of ribbon, lace or trim.
* A maximum of 6 entries per person per challenge please.
* Post your project on your blog or an online gallery (using code RRR162) and link it here with the Inlinkz tool below. Please provide a direct link to your post, not an entire blog.
* You have until Wednesday May 3rd at 11:59 PM Eastern time to enter your projects. Thanks so much for playing and good luck.
 
 PLEASE consider turning off your word verification.
It would be a great help to us if you would consider turning off your word verification if it's active on your blog. To do this is really easy and all you need to do is go to Customize > Settings > Comments > then scroll down to where it says comment moderation and select always (this won't stop anybody leaving you a comment but they won't show on your blog until you approve them). Then scroll down to show word verification for comments? and select No.
We love to visit your blogs and leave comments on all the terrific entries, but the word verification really slows us down. :o)

Really Reasonable Ribbon Challenge #161 Winners!


Challenge #161 was lots of fun with our Flowers theme. 
We saw a wide variety of wonderful projects this time around. Many thanks to all who participated.

Our top three picks for Challenge #161 in no particular order are:

Congratulations to our top 3 for a job well done. Grab your "I made the RRR Top 3" badge (located on the right column of the blog, near the bottom) and display it with pride. You ladies did a fantastic job!

~~~~~~~~~~~~~~~~~~~

Thanks again to everyone who played along with us on our Flowers themed Challenge.  I hope to see you all back again for Challenge #162 which is now up and running.


~ Bonnie Garby ~

Thursday, April 20, 2017

Always Better With Ribbons

Like all of you, I SO enjoy making cards.  I especially love digging in to my stash and using older supplies as I did for these three cards today.  But to be perfectly honest, my cards are always SO much better with ribbons and trims; and Really Reasonable Ribbon has the PERFECT ribbons and trims for every project.
All three of these cards use lots of cute October Afternoon patterned papers, stickers, etc., but each card was "made even better" with some of my favorite trims and Embellishments from Really Reasonable Ribbon.  My first card uses a length of Pink Center Stitch Burlap, and Teal Baker's Twine.
It's easy to see how these two fun trims really give this card great dimension and just add SO much to a really simple design.  Really Reasonable Ribbon carries 44 styles/colors of Baker's Twine, and at just ten cents ($0.10/yd.), it's a very inexpensive trim with SO many possibilities.  You're sure to find the perfect color for your next project.
My second card (above) uses three patterned papers, a rubber charm, and half of a Cherry Lynn Designs doily die-cut.  This card was decorated, again using just two Really Reasonable Ribbon trims.  I used a length of 1.5" Black Gingham Ribbon and some Peppermint Baker's Twine.
This ADORABLE Peppermint Baker's Twine combines the colors white, pink and red.  It's SO cute, and is a great trim for Valentine's Day, Christmas, or as with this card...just about any time.  I also added a White Flatback Pearl to the bottom of my card.  These sweet White Flatback Pearls come in FIVE sizes, and are such a cute little accent.
The last card I'm sharing today uses just one patterned paper.  Look how much pizzazz this sweet trim I ran across my card adds to its overall design.  It's our 3/4 Pink Chevron Striped Twill and this fun trim comes in 11 different colors (in this width).  Yup, Really Reasonable Ribbon truly has it all!!
This third card has a Blingy Metal Rhinestone Ribbon Slide on the 3/4 Pink Chevron Striped Twill.  I also added a little bow with Red Solid Bakers Twine and Cotton Candy Baker's Twine.  I topped that with some Red Open End Roses and Two-Toned Ivory and Pink Open End Roses, a 35mm Green Leaf and a 30mm Two-Toned Leaf.   Lots of great "Spring Blooms" on this card.

Before I run off, I want to remind you that there's a FUN CHALLENGE at Really Reasonable Ribbon, as well as LOTS of great inspiration every day on the RRR Blog, and SO many amazing products in the Really Reasonable Ribbon Store.  You won't want to miss a thing.  Thanks for stopping by!

Wishing blessings on you all,

Karen


Wednesday, April 19, 2017

Love You a Bushel Layout

Hello Ribbon Lovers!  
I am sharing my recent scrapbook layout using gorgeous ribbon from Really Reasonable Ribbon.
I used one of my favorite ribbons, the Sheer Iridescent Champagne Ribbon to make a bow.  Then I applied Tattered Angels Glimmer Mist to antique the gorgeous Trellis Rose.  Once dried I added Stickles to add more glimmer.

The ribbon and flower added a soft delicate touch to this layout.  
Wishing you a creative day.  

Tuesday, April 18, 2017

Really Reasonable Ribbon April Blog Hop Winner!


This is the second post of the day. Be sure to scroll down to see the beautiful project that Judy has made for us today.

Thank you so much for hopping along with us this month on the Really Reasonable Ribbon's Ramblings Blog Hop. We had so much fun and we hope you did too!! We'll be hopping on the 13th of each month, so be sure to mark your calendars and join us again next month.

Now, on to our winner who will receive the April Ribbon Club Assortment from Really Reasonable Ribbon.


The winner will have 48 hours to contact me by clicking on the contact button at the top of the blog and sending me your full name and US shipping address.

True Random Number Generator  1

Congratulations Esther Asbury!

1. Esther Asbury4/13/17, 2:44 PM
One of my favorite summer time "activities" is going to a little ice cream shop on Saturday nights and getting a hand - dipped Hershey's waffle cone!


Now if you didn't win, don't worry!! We will be 'hopping' each month so you'll have another chance to win soon! We hope you stop by and visit our blog often.

Be sure to check out our current challenge here. We'd love to have you play along with us. Have a super day!


~ Bonnie Garby ~ 

Watercolor Hooray

{judy} Hello RRR Lovers! Today I spent some time watercoloring - an easy background, with four loosely blended colors. If you have seen many of my posts, a lot of times, I like to mix comtemporary and traditional elements, as well as graphic or geometric and vintage. 
I stamped my sentiment (Watercolor Words) in Archival Black Ink (Stampin' Up!) several times using my MISTI, as watercolor paper has a texture that sometimes takes a few impressions for the solid look I want. Next, I added washi tape (also Stampin' Up!) down the left side, and layered Black Diamond Metallic Baker's Twine and Pink Burlap String on top. I love this string, and want every color Bonnie offers in the RRR Store! This pink matches the upper right corner of my watercolor perfectly.
Finally, I added a heart shaped mini shaker, with sequins inside to the upper right corner, and mounted this panel on Basic Black cardstock. The final layer is vintage black lace patterned paper (Paper House) on a light pink (Blush Blossom) cardstock.
All my layers are held together with Scor-Tape. I think it makes for a fun celebratory card! Thanks for stopping by today!