Hello and thank you for stopping by today! My name is Misty Foresman, and I am SO EXCITED that Bonnie has invited me to share one of my projects with you all! My love for ribbon runs very deep, and it spills over into many of my projects, the most recent one being my daughter's Senior Homecoming Mum. Typically the mum would boast the school's colors, but since it is her senior year, she wanted solid white with a few splashes of silver. Here is a little photo of it tucked into my Light box:

As you can see, I used a ton of ribbons from the Really Reasonable Ribbon Store in this. Some of them I have had for a very long time and others I ordered just recently. Here is a list with links to most of the beautiful ribbons that I used in this project:
Silky Crush White Silver Grosgrain Metallic
1/4 inch grosgrain white Double faced Satin Light Silver
Grosgrain with silver edges Shimmer Satin Shell Gray
Double faced satin white in various widths Silver Satin with silver metallic edges
Satin with Grosgrain edge Glitz Ribbon Silver
Shimmer White Satin Grosgrain White in various widths
Glitz White Ribbon Double Faced Satin Light Silver
1 1/2 White Satin Double Ruffle Shimmer Satin Light Orchid
I used SO much ribbon on this, and it was SOOO Heavy! If I had to guess, I would say that it weighs close to ten pounds, probably even more...and it is just RIBBON y'all!! There were a total of 72 strands of ribbon in various lengths and widths, along with a few other embellishments. I decorated almost every ribbon with bling, pearls, roses, hearts, etc. Here is photo of it still in the process of being assembled. It is not all there yet!
Usually, the bigger the mum, the better, right? Well, Skye doesn't share this belief....THANK GOODNESS! In addition to all of the RRR Ribbons, I added a few of their
resin embellishments, like the pearls, hearts, and stars. I also pulled a few Bells, beads, and garlands from my stash that added to the weight. Oh, all those garlands are Christmas decorations by the way! There's no shame in my Mum making Game!! LOL
Oh, And look at some of the gorgeous embellishments that I was able to add!
This super cute tiny rose is the
Wild Orchid 2-tone white with baby pink centers and I LOVED the
35mm Chelsea Roses! I put these things all through the ribbons and layers of her Mum.
Here is a photo of her trying it on to let me know if it was going to work. At this point, I was instructed to add more ribbon and some more pearls and more roses! LOL WHAT!!??
This girl grew up with all things ribbon. From head to toe she was decked out with Mom's DIY ribbon projects... hair bows, hand bags, ribbon flip flops and more. So, needless to say, she knew without a doubt that I could make the perfect mum for her. She was not about to cut me any slack!
By the time I had finished adding everything to her mum to make it perfect, This Mama was exhausted! I not only did her Mum, I ended up doing her boyfriend's arm band mum as well, as you can see here in this picture. They looked great, and the smiles on their faces tell me that they were happy. Skye said that they got lots of compliments on their "Real Ribbon Mums" and how beautiful they were. In a world where everyone uses the plastic ribbons, Skye and her boyfriend looked like "Royalty" with their amazing real ribbon mums.
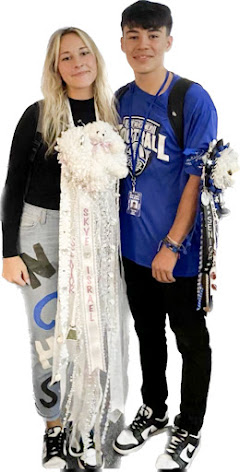
They boyfriend had never gone to Homecoming or even worn one of the armbands. He is the #2 High School Kicker in the State of Texas, and he has never been to Homecoming? I didn't believe that for a second! He said he is always on the field and never took part in the fun stuff. His entire high school career has been behind the ball. AHHHH! That makes sense! He said he was glad that his first and only experience with being on the other side of Homecoming was with the "Best of the Best" LOL>>>That kid sure knows how to get on a Mom's Good side!!
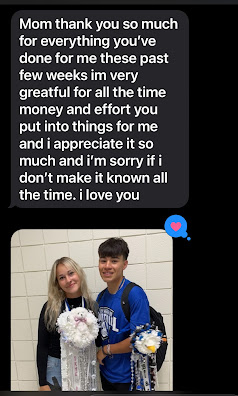
Skye and Israel got the Mums and the smiles, The comments and the compliments, and I got this:
And I couldn't have asked for anything more.
Thank you all for stopping by, and I hope that I have inspired you today.
The ribbons in the
Really Reasonable Ribbon Store are AMAZING and gorgeous, and so versatile!
You don't have to be just a card maker or a scrapbooker to enjoy adding ribbon to your projects. Head on over the the
RRR store and start filling your cart with all your favorites!



.JPEG)











