Showing posts with label easel cards. Show all posts

Saturday, June 24, 2023

All the Pretty Bows

Hello, everyone! It is Gloria with you today. Thank you so much for joining me today! I want to talk about bows...because I use a lot of them! I not only use bows on my cards and mini albums, but occasionally on scrapbook layouts, and most definitely on off the page creations, but my new favorite way to use ribbons and bows is on counted cross stitch projects!

As I have gotten back into stitching (after over 20 years away), I have had to find low cost ways to finish the completed stitching. Well, I have a lot of scrapbook paper and A LOT of ribbon! Why not make a marriage out of those things and create some easel style stitching projects...with BOWS?!

As always, I start with my Bow-It-All tool, which is how I create prefect bows nearly every time! I had just received a few packages of ribbon from the RRR store, so I put those out to see if there were any colors I could use, and I ironed my finished stitching. (The orange border around the stitching is just some painters tape I used to keep the material from fraying.)
Step two is to mount my stitching onto chipboard. I cut a piece of chipboard to about 1" larger than my stitching, which gives me 1/2" on  all sides for a border. I added batting between the chipboard and the fabric, then wrapped the fabric round the board and secured with double-stick tape. 

Note: My stitching is 5 5/8" x 5 3/8", so I cut the chipboard to 6 5/8" x 6 3/8". 
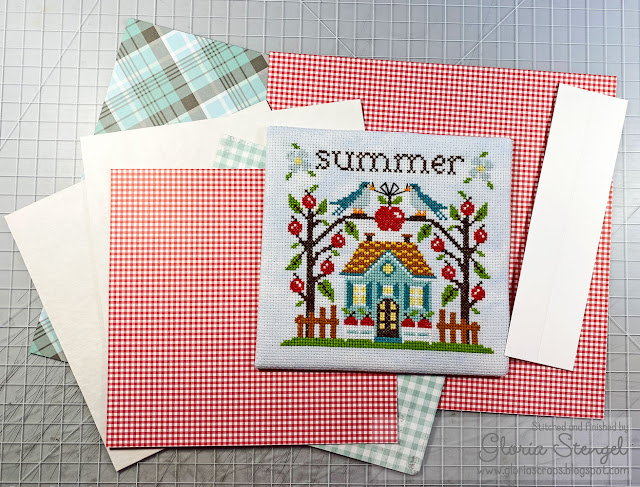
Next I cut two more pieces of chipboard for the easel. Both pieces are 7 5/8" x 7 3/8". I also cut a piece of sturdy white cardstock to 7 5/8" x 2" and scored it at 1" on the two-inch side to make a hinge.

I cut two pieces of printed paper to 9 5/8" x 9 3/8" to wrap the chipboard. I then cut two more pieces to 7 5/8" x 7 3/8" to cover the backs of the wrapped pieces. Once assembled it is a paper covered, chipboard easel. 
I used hot glue to attach the mounted stitching to the easel. You could use magnets or hook and loop tape if you did not want to put glue onto the finished piece of stitching. This is just a fun thing to display, not an heirloom, so I did not care about the glue! 

I then chose some ribbons for my bow, trying to color match the thread I used for stitching.
I used 5/8" Mineral Ice Taffeta ribbon to create a wide bow with three loops. The bow is nearly six inches wide! Next I created a smaller bow from 3/16" Red Plaid ribbon, which also comes in the 3/16" Plaid Assortment. I like buying the assortments when there is something I want to try, but I am not sure I want to buy a lot of it yet. The 3/16" ribbons are a YES, and I plan to buy more colors and styles! 
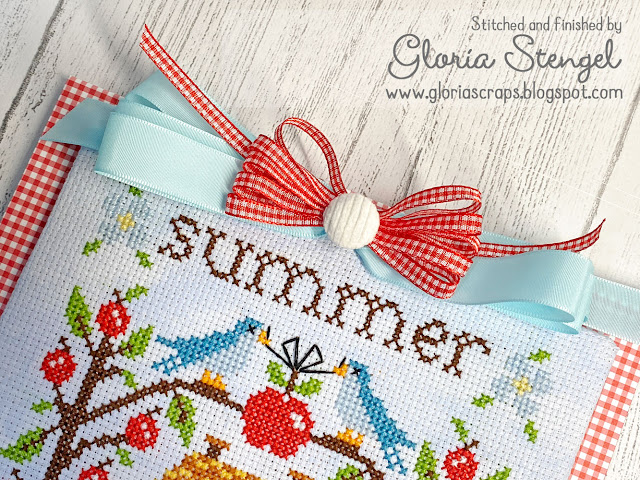
The smaller bow has five loops and measures about three inches. I hot glued the plaid bow to the longer, blue bow. Then, I cut the prongs off a cloth covered brad, and glued it to the top of the bows. 
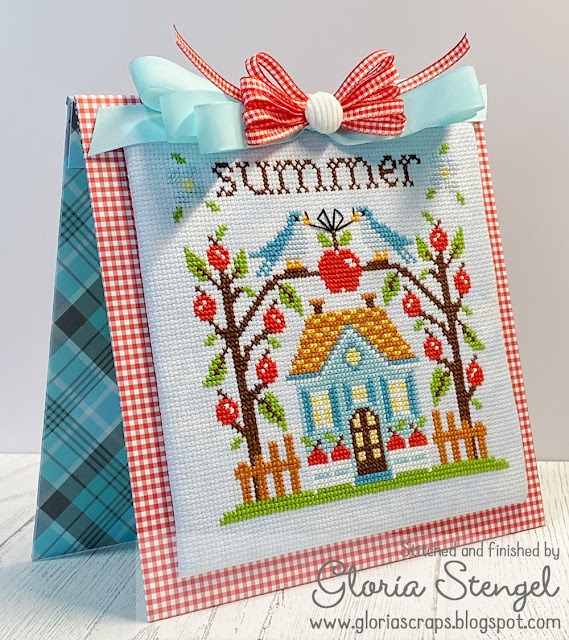
Isn't this adorable?! I love the blue plaid peeking out from the easel, and it is a lovely contrast to the red gingham on the front of the easel and on the plaid ribbon.
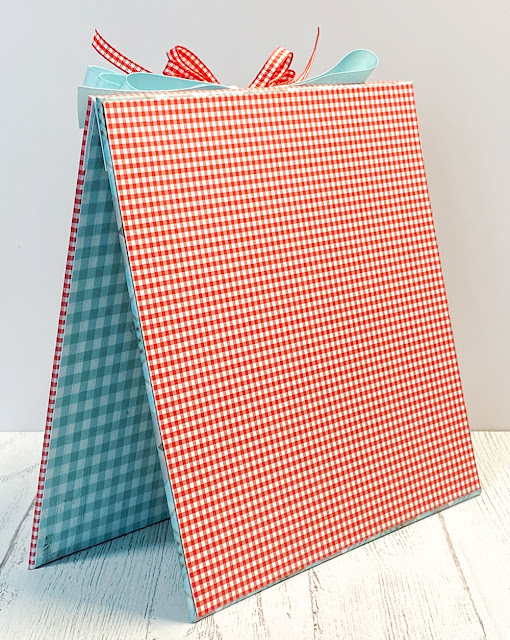
Here is what the back of the ease looks like. This is slightly smaller than 10" x 10" and will fit perfectly on my front room sideboard!
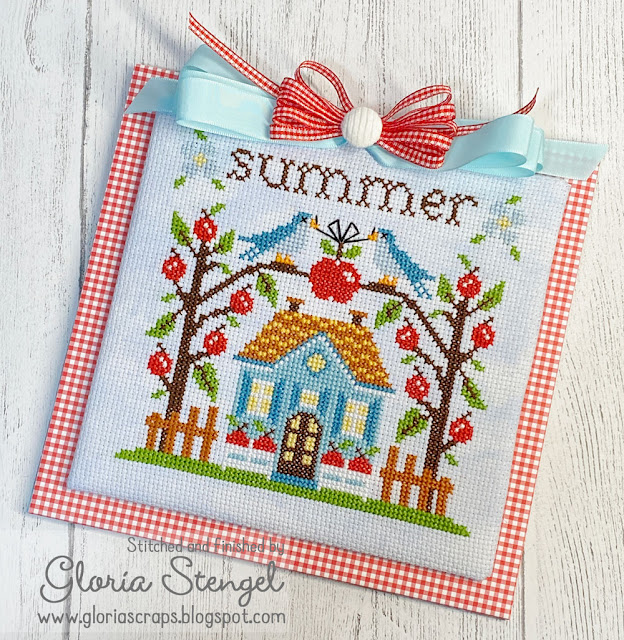
Using ribbon for home dΓ©cor is a such a nice way to either create some seasonal color schemes, as I did here, or to color match your existing decorations. I really enjoy the different textiles and mediums together, as it looks inviting and touchable! 
Thanks for joining me today! I hope you are getting into the swing of summer wherever you are. And...that you are having fun with ribbons, too!

Really Reasonable Ribbon Supplies Used:
Other Supplies Used: cardstock, printed paper, chipboard, brad, finished cross stitch project

Friday, March 31, 2023

Put on Your Easter Bonnet

Kathy Clement, Really Reasonable Ribbon, Easel Card, Shaker Card, Easter

Hello, Ribbon Lovers!  Do you remember Easter Bonnets?  I do!  Especially those mean little elastic strings that snapped under your chin to hold the Easter bonnet in place.  Well, today's card features a mighty cute Easter bonnet and a Light Blue Chevron Twill bow that doesn't cause any pain at all!  
Shaker Cards, Easter, Light Blue Chevron Twill Ribbon, Really Reasonable Ribbon, Kathy Clement

Sometimes, wide ribbon can be difficult to work with.  But this 3/4 Chevron Stripe Twill is soft and supple, and it ties a beautiful bow! Really Reasonable Ribbon has it in loads of colors. And if you're not a fan of wide ribbon, it comes in 1/4" width, too. I've paired it up with my favorite Iridescent Metallic String on the cover of this 6x6 shaker easel card. 


 Here's a peek at the inside of this cute card.  I created a pocket that doubles as a stopper for the easel mechanism.  Then I used my envelope punch board to make a cute Easter egg envelope to hold all the goodies I tucked inside. 

Do you have a great Easter Bonnet story?  We'd love to hear about it in the comment section below.

Thanks for stopping by!

Kathy

Monday, December 16, 2019

More Gingerbread House Cards

Hey friends and happy Monday to you! I hope you had a marvelous weekend! Linsey here today! I finished the rest of my special gingerbread house cards over the weekend, so I thought I'd go ahead and share them with you! They are so much fun to make because I can create one-of-a-kind houses--each and every one is unique and different and I love to use different ribbons and accents to decorate the houses too! So here are few that I have designed using all sorts of pretty things from RRR!
πŸŽ…
The first house showcases beautiful Emerald Checkerboard Satin Ribbon. The smaller bows have White Flat Back Pearls added to the centers of them. 
The next house features gorgeous Double-faced Satin in Hot Pink. This ribbon is so luxurious, it doesn't need anything else to accompany it. That bow says it all, don't ya think? ;) 
This third house might be my favorite, which is why I saved it for last It features 3/8" Crosshatch on Red Satin Ribbon. The centers of each bow has an 11mm Silver Glitter Stardust Heart Shaped Rhinestone and White Flat Back Pearls accent the centers of the lollipops and the red poinsettia flower. 
So, which one is your favorite? 
I hope you enjoyed this festive post today and I wish you happy holiday crafting! 

Monday, November 11, 2019

Silver & Gold Gingerbread House Card

Hello friends and happy Monday to you! I hope you had a lovely weekend and to start of the week, I have a super sweet and special holiday card to show you! I just received my new Gingerbread House Die set from Anna Griffin and let me tell you, it is so much fun! Almost as much fun as making a real gingerbread house for the holidays, but without all the mixing, baking and dishes to clean up...just lots of little pieces of paper scraps)😊
And what goes perfect with this silver and gold gingerbread house? The fabulous Silver and Gold Mix November Ribbon Club Assortment, but of course! It sparkles, it shines and it's a match made in heaven with my little gingerbread house easel card! πŸ’– it! I made a big double bow for the chimney using 2 of the beautiful ribbons from this assortment; Diamond Satin Old Gold and Holiday Dots and Gold Ovals on White Satin Ribbon. I added a Silver Glitter Stardust Heart Shaped Rhinestone to the center of the double bow.
For the decorations on the front of the house, I used 3D foam sheets, then added gold glitter foil to them. I made 2 small bows using 3/8" Satin with Silver Metallic Edge White and added a rhinestone heart to each center, then I placed them atop each gold lollipop.
What a shimmery, glittery good time this festive easel card was to put together! I hope you like it!
And that's all for me today! Thanks so much for stopping by and letting me share a bit of holiday inspiration with you! Until next time, happy crafting! 

Wednesday, August 8, 2018

Garden Themed Shaker Easel Card with August Ribbon Club Assortment

Hello, Ribbon Lovers!  Have you seen the gorgeous August Ribbon Club Assortment yet?  Ooh la la!  It's a beauty!  I love the fact that the ribbons can be used for our upcoming fall themed projects, but they are also fabulous for end of summer card making.  Take a peep at this pretty "Life Began in a Garden" Easel Shaker Card.


I found so many wonderful ways to use the ribbons from the club assortment on this card.  To create my border, I layered 3/8" Sunflowers on Kiwi Grosgrain Ribbon over  Crochet Lace. Another snippet of the same crochet lace is tucked beneath a trio of my cherished vintage ivory buttons.


This double layer bow cluster is made with cheery Dandelion Diamond Stitch Satin Ribbon and adorable 3/8" Sunflowers on Grograin Ribbon.   It's the perfect color match for my pretty mulberry flowers. Naturally, I tied all my bows with my Zutter Bow it All Tool.  That tool gets a daily workout in my studio, and I love it!


Here's a peek at the inside.  I added a couple of little pockets to the upper portion of the card.


Then I tucked in a little lavender sachet and magnet set.  Just for fun!

Wishing you all a day filled with lots of joy and creativity!

Cheerio,
kathy


Thursday, December 7, 2017

I'll Have a Shabby Chic Pink Christmas

Hello, Ribbon Lovers!  Are you still working on your Christmas cards?  I have been having fun playing with non-traditional ribbons and color palettes this year.  This shabby chic pink Woodland Christmas card adorned with Pearl Pink Swiss Dots Satin Ribbon is so pretty, you could leave it up all winter long. 


I love the soft sheen that satin ribbon adds to a card design!


Easel cards are one of my favorite fancy folds to make, because they can double as home decor.


This triple loop bow tied beautifully, thanks to my Zutter Bow-it-All Tool.  I use it literally every single time I create!

A little gift card/treat pocket, a little spot to write a personal greeting, and this one's ready for the mail! Now on to the next card!

Thanks for stopping by!
Cheerio,
kathy


Wednesday, December 7, 2016

Woodland Christmas Joy Easel Card

Hello, Ribbon Lovers!  It's Kathy here today with a seasonal card that's very quick and easy to make.  One of the things I love about this time of year is all the sweet songbirds that flock to my feeders in the backyard.  This card celebrates both Christmas, and winter birds which makes me doubly happy!
I just love easel cards because they can double as home decor.  And if you're like me, you're taking things right down to the wire.  The fact that this card is super quick and easy to make is a real bonus in that department! 

I combined an older Christmas collection from my stash (MME Joyous) with this darling chickadee image that I found in Polly's Paper Studio Etsy Shop.   My festive bow is tied with one of my favorite Christmas ribbons: Sheer Iridescent Red Organza.  It adds so much shimmer and texture to the composition.  It's also a very "soft" ribbon so it's easy to use in these multi-layer/multi-loop bows! Of course, I used my handy dandy Bow-it-All Tool!


Inside, I've added a little vintage style postcard where you can add your own personal Christmas message.  The whole card has a lovely woodland feel that I just love.

Have you finished making your holiday cards yet?  Not me!  I'm off to make some more because that clock keeps right on ticking!.

Thanks for stopping by!
Cheerio,
kathy