Showing posts with label shimmer satin. Show all posts

Monday, November 11, 2024

Gift box with RRR


Hello everyone, and Happy Monday to you all! Cheryl here today to share a fun gift box I decorated for Really Reasonable Ribbon using the gorgeous flowers and ribbons from the shop. 


On my gift box today I used some Shimmer Satin Brown ribbon to create my bow. then hot glued it to the flap of my box. Next I used the trellis rose for the center and some leaves behind it. I then glued on the carnations, cherry blossom and lastly the sweetheart blossom to complete my decorating. The box I had premade, as I like to have some things ready to go when I need them. I left the tag off, as Im not sure what gift will go in this yet, so at least I will have it ready to go when I need.


Really Reasonable Ribbon supplies: 


Thank you so much for looking and have a lovely day! Hugs to all, Cheryl 


Friday, October 18, 2024

Cauldron Treats

Hello everyone and Happy Friday to you all! Today Im sharing this little cauldrons I decorated up using Really Reasonable Ribbon, and some treats for a luncheon I was to go to. My mom was nice enough to pick them up and bring them for the ladies since I was sick all week. Anyways these were super fun to make and I ended up making 10.

To start with I bought the cauldrons at the dollar tree, next I tied the Bright green Apple Dots 5/8" dot, and the Tangerine is Shimmer satin. Next I made my bow using the 3/8" Apple Grosgrain ribbon and then hot glued it on. For my tag I used a punch and an old SU! stamp for Happy Halloween. My name is on the back of each tag so they know who these were from. Lastly I tied them on using the orange pumpkin twine
what do you think of these little cuties for Halloween?


Thank you so very much for lookin and have a lovely day! Hugs to all, Cheryl 


Friday, May 24, 2024

Boutique Hairbow


Hello and Happy Friday to you all! 
Misty (@Mommyofkidz) here with you today. 
Do you ever see something and just KNOW that you have to create a project centered around it?  Well, that is exactly what happened when I created the bow that I am sharing today. I  was browsing the Really Reasonable Ribbon shop and saw this GORGEOUS blue & lavender 3/8 grosgrain butterfly ribbon and just HAD TO HAVE IT!  I didn't know what I would do with it yet, but it was way too pretty not to buy! 


Even though I did not have a clear image of a project in mind, I am so glad that I decided to get it!
No matter what I had decided to do, I am a complete sucker for the lavender/turquoise combo. Even the jumbled mess of ribbon on my desk looks pretty when it is a mixture of those colors!


Once I decided that I would make a pretty little hair bow with this lovely array of ribbons, I had to narrow it down to which ones I would use! I finally settled on: 
(**Only the Purple) 
and a 3/8 blue striped ribbon that has sold out, 
but there are plenty of other similar choices in the shop! 

After selecting my ribbons, the rest is history! 
Just make each component to the hair bow and then stack them up and assemble! Oh, and I decided to elevate this one a little by tossing in a bit of marabou feathers. I think the feathers were a perfect final touch!
And just look at that shimmer on the satin ribbon! 


The photos do not do this hair bow and ribbons justice! I can tell you how pretty these ribbons are all day long, but you have to SEE them to truly understand! Head on over the Really Reasonable Ribbon Shop and start filling your basket...there are quite a few sales so you can stock up! Go fill your basket today!

Thank you so much for stopping by today! Have a crafty weekend! 


Wednesday, July 26, 2023

Embellishment box with Really Reasonable Ribbon


 Hello everyone and Happy Wednesday to you all! Today I have a fun project I designed for Really Reasonable Ribbon and The Robins Nest Creative using the gorgeous ribbons, laces, and then dew drops. Love how fun and easy this was to create.
So I had this little bead box that I got for free a long time ago, and thought it would be super cute decorated using some design paper, flowers I made, and ribbons and laces. I think the thing that took me the longest was the flowers as I had to fussy cut them out an then do my faux glass technique on them. 

I started by using some of Heartfelt creations design paper and the flowers were part of this collection. I did fussy cut them out and then did my faux glass technique on them you can see one of my videos here under tutorials as I have many. I love doing this on the flowers once in awhile and have done this for many many years. Now I did measure the box and cut out some card stock in white, and design paper to fit this box, and used Scor-tape to attach them to the box on the inside and outside. Next I added the beautiful dew drops in yellow to the centers of the flowers. I also did the leaves as well. Lastly for the flowers I added some of RRR Rose buds in white and pink. love the look! Ooo I did also use some flourishes for the greenery. 

Window - Its a shaker window die I used from Cheery Lynn, its an old one and not sure if they are even sold anymore, but love it. I added inside of it some of the Robins Nest Dew Drops and some little shaker balls and then some beads. I did add a butterfly dew drop and some pink dew drops to the shutters.

Cluster of flowers- So first I added my Ribbon and I chose the pink Shimmer Satin as it matched this paper perfectly, then I added some Gabrielle Lace as I made both into bows and hot glue them onto the box. Next I added my large flower, some leaves, an then the medium size flowers, and then the small. After adding all my flowers I chose to use some green tear drops (dew drops) from the Robins Nest Creative to the greenery on this. Love how it looks. Lastly I added a tag.

inside of my box.
Really Reasonable Ribbon supplies used:

The Robins Nest Creative-
Yellow dew drops
Butterfly dew drop
Pink dew drops for the diamond shaped ones
Green River Bed tear drops
Hyacinth dew drops for the pink shades


Thank you so very much for stopping by and have a lovely day!
Hugs to all, Cheryl


Thursday, November 10, 2022

Hang It Up!

 Hi Y'all, and Happy Thursday!  Misty here again today sneaking in for another guest spot.  I think I may have mentioned this before, but just in case I haven't, let me say it again...
I AM ADDICTED TO REALLY REASONABLE RIBBON
There is so much to choose from and always the perfect addition to ANY project!  Sometimes I feel like that Grandma that does those commercials for the Frank's Hot Sauce company ..."I put that schtuff on EVERYTHING!"  HA HA!! 

Today I am going to share another "off the page" ribbon craft with you!  While I am a scrapbooker first and foremost, I also seem to have been blessed with the gift of  "crafty fingers" and everyone around me knows it.  I haven't quite decided if that is a good or bad thing, because there is always SOMEONE who is in need of a crafty favor and comes straight to me.  LOL.  Of course, I always say yes!  I will do whatever they are wanting if it falls within my scope of crafts.  It usually does!! 

Most recently I was asked to create personalized hangers for the bridesmaids and groomsmen.  While it may seem a bit of an odd request, I knew exactly what the goal was.  This bride wants every little detail to be precise and perfect, so that the photos come out top notch.  I don't blame her! Even the hangers will need to match to help create the storybook wedding that she wants and deserves.  Of course I was all too excited to do this for her! 

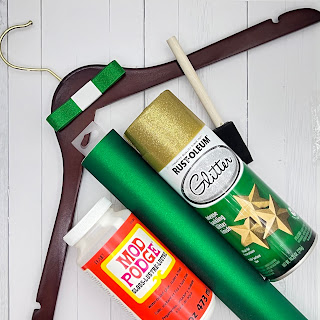
With 5 bridesmaids and 6 groomsmen, I knew that I would need 11 wooden hangers. I also needed spray paint to match her colors(Emerald and Gold), painters' tape to cover the hook of the hanger when I paint, a clear coat to seal in the paint, (I used Mod Podge), and of course the vinyl and tools to cut the names on my Cricut Maker.

From the RRR Store I used Shimmer Satin Emerald ribbon and 11MM White heart pearl beads to add a touch of beauty to the otherwise plain hangers.


The steps are SO SIMPLE! 
First, wrap the painter's tape around all the hooks of the hangers to protect from overspray.

Next, lay all of your hangers out onto a large drop cloth in a nice sunny open area.
spray your hangers on one side, letting dry 30 minutes.  

Next, flip them over and do the opposite side, making sure to get good coverage. 
Let dry 30 minutes.
Check for any missed spots and do your touch ups now.
Once you start adding the names you will not want to have to paint again. 
(The painting stages are all done outside on a nice day)

Now that part is done, you can gather the hangers and take them inside...here comes the fun part! 

While the hangers were in the drying stages,

I was cutting out the names on my Cricut


and I was making the bows getting them ready to glue on:


For the hangers for the Bridesmaids, I painted them with a glittery gold paint,
and used emerald for the accents the names. 
I added all the names, then I used Mod Podge to seal the entire painted surfaces. 
Once that dried, I hot glued the bows in place and was Done! Y'all, this 
Shimmer Satin Emerald ribbon is flippin' gorgeous! 

 
For the Groomsmen, I used the Emerald for the hanger, and Gold for the Accents.
While they didn't get bows or hearts or pearls to make them pop, I decided to still share them since they were part of my project. Without any other accent to make the names stand out, I decided
to mount them on a just solid black square of vinyl. 
WOW what a difference that made! 


I thoroughly enjoyed transforming these plain wooden hangers into something beautiful for the Bride to give to her wedding party.  I'm pretty sure that she loved them and is excited to give them! The colors and fonts all matched and so will her photos.  Hopefully, these will help to create the perfect storybook wedding that she deserves! 
AND....Hopefully I have inspired you to do something crafty! 
Head on over to Really Reasonable Ribbon and get started with the perfect ribbons! 



Monday, November 8, 2021

Give Thanks Treat Box

Hello crafty friends and happy Monday to you all! Today I'm sharing a treat box, or gift box I made using Really Reasonable Ribbon and this darling little turkey. I love decorating these boxes as they are so much fun! These will be used on my table as place name tags for seating.
For my box I bought these at Hobby Lobby, and then cut design paper to cover the front and back of the box. You can use design papers for the entire box, but I wanted to do this one different. I then layered some oval shapes, and this darling turkey that I cut on my cricut using Kadoodlebug Svg. Next I made the big bows using Really Reasonable Ribbons Plaid Cream and brown Tartan Ribbon, and then the Shimmer Satin Tangerine with gold. Each piece was popped using the Foam Tabs, and paper was added using the scor tape.

My image was airbrushed and then colored using copics. Name was done with Thickers.

Supplies :

Thank you so much for looking and have a lovely day!

Hugs to all, Cheryl

Friday, October 8, 2021

Beary Sweet Halloween Treat Bags

Hello everyone and Happy Friday to you all! Today's  Halloween Treat Bags were designed for Really Reasonable Ribbon using the beautiful Shimmer Satin Ribbon they carry, and then a Cuddly Cute SVG Bear dressed as a spider. Love how these turned out, and Hope you do too!
The bags were purchased at one of the warehouse sales here in Utah. I bought a ton of these bags so I could decorate them up to give. I started on this bag by using the spider ribbon from Really Reasonable Ribbon, and glued it to the bottom of each bag. Next I punched out the scalloped circles using a spider design paper ,and distressed it with orange, and then added black dots. The larger one was cut using black card stock and I added white dots. I used my New Cricut air machine to cut out 9 bears dressed like spiders, so cute! I airbrushed them and added eyelashes, and shadowing. They all have a little white flower on their heads. The Happy Halloween was cut using a die, and same with the bat. Next I chose to use the beautiful Orange Shimmer Satin ribbon. Love how these all turned out. I may have to make some others using different designs, and ribbons.
Supplies Used:
Hot glue
SVG Bear
Punches
Dies , white gel pen, black pen, chalks, copics, air compressor , 


 Thank you so very much for stopping by! Hope you have a lovely day!

Hugs, Cheryl

Wednesday, December 5, 2018

Hello Mini Post it Notepad


Hello everyone and Happy Wednesday to all!  Today I have a sweet little post it note pad to share using lace, ribbon, lace, flowers and embellishments from Really Reasonable Ribbon.

To start with I chose matte board from Hobby Lobby and a die from Stampin' Up to cut this out. Then I used some scrap design paper for the top, it's one of my favorite old pieces. Next I decided to used some pink flowers (carnations and rose buds, then purples too) for the cluster of flowers, they are done on the Gabrielle lace. I also added 30mm green leaves, but it may be hard to see those now, all are hot glued to this part. The big bows were tied using the shimmer pink satin ribbon.  This holds the little post it together.  The little tag is grunge board and it's inked up.  Then I added some vintage flower charms and little rub-ons to it.  This post it pad was super easy to make and super fast.

Really Reasonable Ribbon supplies used
Gabrielle Lace
1' Scortape
scotch refill tape runner
foam tabs
rose buds pinks
rose buds puple
carnations pink
carnations purple
30mm green leaves
pink shimmer satin ribbon
embellishments bronze vintage flower charms

Hope you enjoyed my project for today, and thank you for stopping by, have a lovely week!
hugs to all,
Cheryl

Saturday, January 14, 2017

Live Laugh Love

Hello everyone, and Happy Saturday to you all! Today's card was created for Really Reasonable Ribbon using the Beautiful Shimmer Satin, in Electric Blue.  What a gorgeous color this ribbon is, and it goes perfect with the design papers I used. I LOVE LOVE LOVE this ribbon, and the beautiful glitz it has.
The bow I made is a double bow. I like the fullness of it. I did add a beautiful RRR Embellishment Rhinestone to the center of my bow.

I also wanted to add some Really Reasonable Ribbons Mulberry flowers, as I miss seeing them in bloom. So I added some Sweetheart Blossoms in yellow, orange, and blue to my card. The leaves I used are the green leaves, and everything is hot glued on.

All of the beautiful layers of my card were put together using Really Reasonable Ribbons Scor-Tape , and Foam tabs both can be found here. Design paper & stamps used are from club scraps "color me happy" kit.
Thank you for looking and have a lovely day!
hugs to all,
Cheryl

Wednesday, December 14, 2016

Merry Christmas Doily Tag

Hello everyone,
Today's Merry Christmas Doily Tag was created for Really Reasonable Ribbon (using the beautiful shimmer ribbon from the December Ribbon Club Assortment, flowers, bead sprays, and spiral stamens).  I just LOVE the way this tag turned out with all the beautiful Really Reasonable Ribbon flowers and such. This one is going on a present for under our tree  and already has the writing on the back :)
Tag Design:
Tag was made using Cheery Lynn's Sophia's Heart Doily Die
I then cut 2 circles, 1 for the front (IBFS sentiment), and 1 for the back (to write on). I also airbrushed it lightly on the front with a soft blue copic.
I Brake For Stamps Elegant Merry Christmas was stamped using the Mini Misti tool, and 2 StampinUp! markers. Love the look of the sentiment in the blues.
Flowers, stamens, bead sprays, and ribbon are all from Really Reasonable Ribbon, and all were hot glued on for ribbon cluster look.

Supplies Used:
Really Reasonable Ribbon:
Flowers Cherry Blossoms, and Sweetheart Blossoms, Bead Berry Sprays, Spiral Stamen , Ribbon from this months club kit
I Brake For Stamps:
Elegant Merry Christmas Stamp
Cheery Lynn Dies:
Sophia's Heart DL184
Circle LPC4 Die
Branches: Martha Stewart Punch
Pens StampinUp!
White card stock for all paper used

This year I have been enjoying creating tags for our gifts. It makes it nice to have big tags for the gifts under the tree as its easier to read who it goes too...hehehehe. Anyway, this is a first for me this year. So far I'm up to 9 tags made. I need more, I think at least 1 for each person would be nice! I enjoyed designing this tag, as I do all my tags.  They really make for nice gifts too!
Thank you for looking and have a lovely day!
hugs to all,
Cheryl

Tuesday, October 25, 2016

A Merry Christmas Hello!

Hello there RRR fans!  Cherry here to share a project.  I have had plenty of time to create lately.  The weather has been horrific.  So inside I stay.  One of my favorite things to create are little plaques, signs...anything I can alter.  This one has oodles of cuteness.
I used acrylic rhinestones and bead berry sprays in red to adorn my layered goodies. 

Just love all that sugary goodness.   Don't you?

  To hang my plaque I wound shimmer satin in poppy red through the plaque and made my bows.
I just love this.....I am sure because of the red and gingham!  Hope you enjoy, Cherry

Sunday, July 24, 2016

Another Birthday & More Gorgeous Than Ever

Hello everyone and Happy Sunday to all! Cheryl here today, and I am sharing a card created for Really Reasonable Ribbon using the Beautiful Shimmer Satin Ribbon.  LOVE this ribbon from RRR store, and there are LOTS of shades of this beautiful Satin to choose from.

On my card I chose to use the Shimmer Satin in Light Orchid.  I also used some White 1.5" Silky Crush ribbon, and then the some Bakers Twine.

Flowers are cut with JustRite flower dies, then dusted with dusty concord distress ink. I then used the Glass Flower technique on these.

For the leaves I used Really Reasonable Ribbon's 30mm green leaves, and dusted those with StampinUp! Kiwi Kiss ink.
My sentiment was stamped in the dusty concord distress ink as well, and then I airbrushed around it using copic BV00. The button I used is an OLD wood button.

I hope you enjoyed my post for today!!!
Thank you for stopping by!
hugs to all,
Cheryl

Monday, July 8, 2013

Sweets on Skates by Jenn Cochran

Hello friends and followers of RRR!  So glad to be here today to show you my cutie pie card!  I just adore this image.  The little girl is sooooo sweet!  It is from Chelsea Le Designs.

The Shimmer Satin Hot Pink is one of my favorite ribbons from Really Reasonable Ribbon.  It is so sparkly and smooth.  It makes the best bows!


If you haven't tried out this ribbon there is a great Shimmer Satin Ribbon Assortment that allows you to try several different colors at once.


Thanks for stopping in and visiting.  

To see more Really Reasonable Ribbon projects by me, please visit my blog

Jenn
Supplies:
Image: Chelsea Le Designs
Paper: MME
Adhesive: Helmar
Copics