Saturday, April 20, 2013

Grosgrain Fringe Tutorial


Tosh here again, and I'm excited to share my Grosgrain Fringe Tutorial with you today.  
 
All you need is 2' of Grosgrain ribbon any width.  I used 5/8" White and Black Grosgrain for the flower centers, but you could use any color or width, depending on how long you want your fringe.  Even if you use the 1 1/2", you could always cut the fringe to the length you want.  And if you only have white, you could color it with Distress Inks or use a Mister.  Grosgrain ribbon takes color really well.  You could even color it with Copics.
 

 Grosgrain ribbon is sealed on both edges.  So to start, you have to trim off one of the edges.  It doesn't have to be perfect because you won't even notice the varying lengths of the fringe once you finish it.  Just try to stay as uniform as you can.
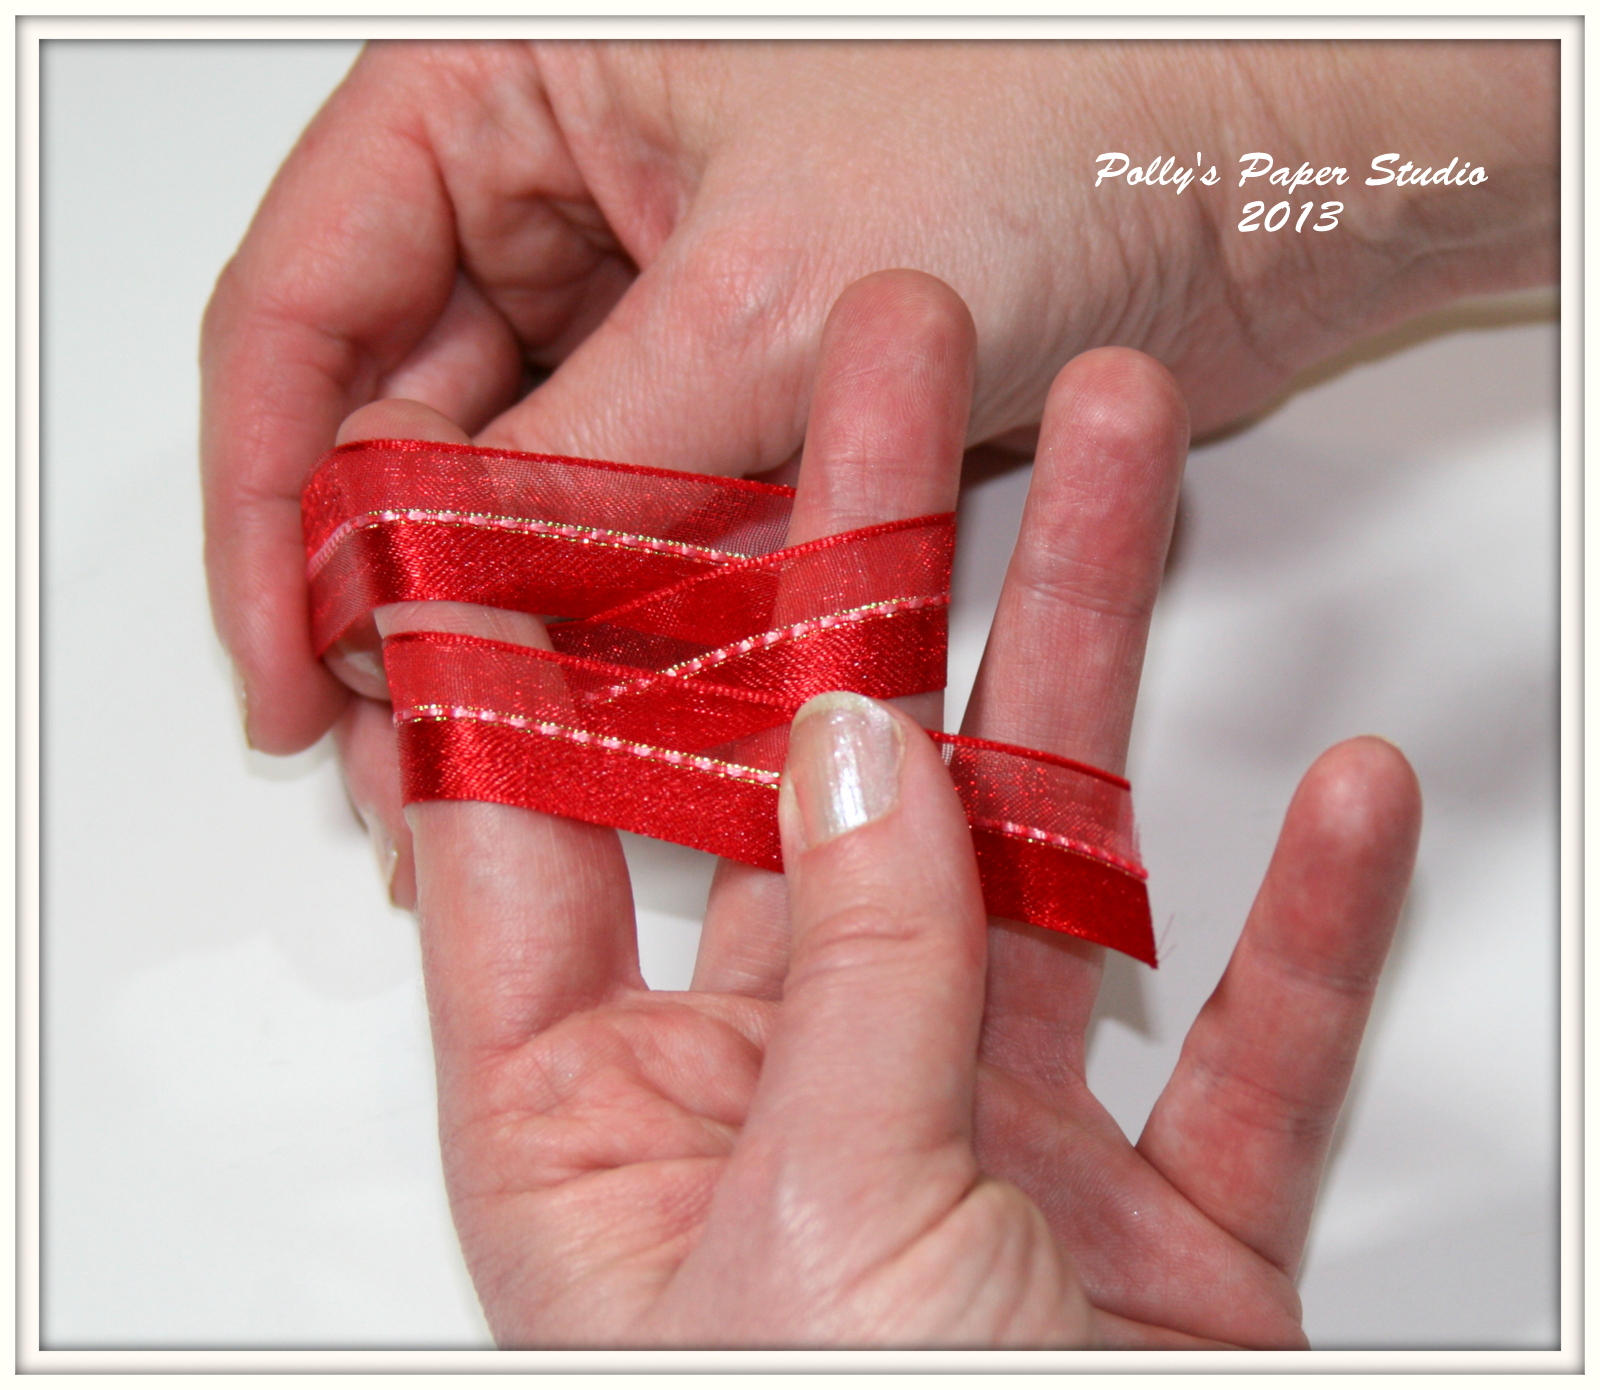


Then, while holding the ribbon taut between two fingers (very important otherwise the ribbon will gather making it harder to remove the strands.), using your fingernail, try to separate 6-8 strands from the bottom of the ribbon and pull out and up.  It's important to pull away from the strip as you pull up to make it come apart easier.  I do this until there's about 1/8" left of the weaved part of the ribbon.  It's up to you how much of a base you want to work with.


Here's what the fringe looks like.  I wanted you to see that you don't notice a difference in lengths of fringe, even though my cuts weren't perfect.


Then I just use a heat gun and roll it up on itself.

Now, to make a flower using this fringe, you'll need 2' of 1 1/2 " wired ribbon and a 1 3/4" felt Circle.


For the flower base (this is Wired Faux Burlap Antique Gold...I used Natural Burlap with Wired Edge Silver/White for my actual flower), I pulled the two edge wires out from one side of the ribbon and tied them together.  I then pulled the two wires from the other side and gathered the ribbon, tying those ends off too when I had the gathers where I wanted them.


I then glued the two wired edges together every inch or two and hot glued them to the 1 3/4" felt circle, starting from the outside.


Then just add some hot glue to the center and place your fringed piece in the center smooshing it down really good.  Don't worry about being gentle.  You want it to move out a bit, so scrunch it good.


You can spread out the fringe a bit and add an embellishment to the center, or leave it as is.  It's up to you which you prefer.  For this flower I used the fabulously fun 1 1/2" Black Houndstooth Ribbon, and added a Vintage Button by Bazzill.
 
Now, this fringe looks beautiful on cards too.  Here's a card I made using the Wired Woven Chevron Stripe Pink Ribbon.  It shows diamond patterns when you make the fringe, however I wasn't able to show that very well in my photos.  It's quite sparkly in real life.


I used the same  Wired Woven Chevron Stripe Pink Ribbon  for the bow at the top too.  The sentiment is from the Waltzingmouse Stamps set Compact Sentiments, and the paper is Lyric by Prima.  I also used a Fancy Tag 3 die (Spellbinders) to frame the sentiment, and added a White Organza Beehive Blossom to the bow.

 That about sums up my Grosgrain Fringe tutorial.  For more inspirational paper crafts and tutorials, feel free to visit my blog:  Stamp Talk with Tosh

Hope I've inspired you to make some fringe!!
Happy crafting!
Tosh
 

Friday, April 19, 2013

Meet our new RRR Design Team


It's hard to believe that it's time to announce our new Really Reasonable Ribbon's Ramblings Design Team. Where did the last 6 months go??
 
First I want to thank our retiring design team members. We will miss them. Vivan and Trudy will be leaving us at the end of April. They did a fantastic job and gave us tons of great ideas and inspiration. I encourage you all to visit their blogs and become a follower so you can continue to be inspired by their fantastic work.
 
I also want to thank everyone who applied for our new design team positions. There were so many awesome entries that it was very hard to select just a couple new people. You'll find some familiar faces below and several brand new ones too.
 
So without further delay, please meet our new Really Reasonable Ribbon Design Team.
 
 
Tammy Louise Cunliffe - NEW MEMBER
http://handmadebytlc.blogspot.com/


Tracey Sabella - NEW MEMBER
http://gracescraps.blogspot.com/ 
 
 
Jenn Cochran - NEW MEMBER
http://jaxbeanstalks.blogspot.com/ 
 
 
Ginny Nemchak
http://pollyspaper.wordpress.com/


Heather Hudson
http://heatherahudson.blogspot.com/
 
 
Judy Rozema
http://jarfullofjoy.blogspot.com/
 
 
Cheryl Walker
http://sweeetdesignsbycheryl.blogspot.com/
 
 
Misty Willis
http://mommyof5kidz.blogspot.com/


Cherry Nelson
http://cherrysjubileehome.blogspot.com/


~~~~~~~~~~~~~~~
 
 
And now for our Special Events Designers who will join us for Monthly Blog Hops and some other fun activities.
 
 
Gloria Stengel
http://gloriascraps.blogspot.com/
 
 
Heidi Blankenship
http://embellished-dreams.blogspot.com/
 
 
Jeanne Streiff
http://inkypaws.blogs.splitcoaststampers.com/
 
 
Bonnie Garby
http://www.maketime2craft.com/
 
~~~~~~~~~~~~~~~
 

Isn't our new design team fabulous?? They will begin posting on May 2nd. I hope you'll stop in each day to see what they create for us. You're in for a real treat!
 

Thursday, April 18, 2013

Happy Birthday Card

Hello Friends!!
Happy Thursday!!
Heather here and today I would like to share with you a card that I made for a friend of mine who will be having a birthday soon.
I used an image from a collage sheet that I designed and some patterned paper from my 
BFF's store.  I inked the edges with Ranger's Vintage Photo.
Here are a couple of close ups so you can see the fabulous Ribbons and trims that I used from
 Really Reasonable Ribbon.
Above you can see the darling little buttons from the Latte collection, as well as the 
Raspberry baker's twine and light celery crochet lace.
Above you can see the pink leaves, light blue crochet lace, Fantasy rose glitter ribbon, and blue iridescent organza.
Couple more buttons and baker's twine.
Above you can see the lavender leaves.
I hope you have a wonderful day!!
Thank you for visiting!!
Hugs
Heather


Wednesday, April 17, 2013

RRR April Blog Hop Winner

 
This is the second post of the day. Be sure to scroll down to see the beautiful project that Cheryl has made for us today.
 
 
Thank you so much for hopping along with us this month on the Really Reasonable Ribbon's Ramblings Blog Hop. We had so much fun and we hope you did too!! We'll be hopping on the 13th of each month, so be sure to mark your calendars and join us again next month.

It seems that quite a few of you like the apple/turquoise color combo that we featured in the April Ribbon Club Assortment.  That's awesome!!  We will be hitting on many of the other colors in upcoming assortments, so stay tuned!

Now, on to our winner who will receive the April Ribbon Club Assortment along with the other fun goodies shown here which are all available at Really Reasonable Ribbon.
 

The winner will have 48 hours to contact me by clicking on the contact button at the top of the blog and sending me your full name and shipping address.

Random Integer Generator
Here are your random numbers:  24
Timestamp: 2013-04-17 13:10:06 UTC
 

Congratulations D-!

D-said... 24
I love tropic colors for summer crafting.
The blues and greens here fit in perfectly.
Thanks for the fun hop.
Everyone did a wonderful job on their projects.
Thanks for sharing them with us.
D-
http://designsbydragonfly.blogspot.com

Now if you didn't win, don't worry!! We will be 'hopping' each month so you'll have another chance to win soon! We hope you stop by and visit our blog often.

Be sure to check out our current challenge here. We'd love to have you play along with us. Have a super day!


~ Bonnie Garby ~ 


facebook badge

Vintage Whimsy/Video

Today I wanted to share a Layout I made using Really Reasonable Ribbon. I have been on a Layout kick lately. I go through these spurts once in awhile....lol 

Anyways on to my Layout!!

I love Really Reasonable Ribbon's Crocheted Lace, and Bonnie has some NEW colors in stock too!!! Be sure to check those out HERE :) 
I ran the Lace down the side, to give it that Vintage Whimsy look, like the paper has. I then ran my flowers up the side, as you can see they are covering part of the lace. I really love the look of the lace under the flowers. 

Next I used RRR Textured Two-Toned Light Blue and White Ribbon to create 2 floppy bows. I did them like this so I could tuck them under the flowers. This ribbon works perfect for doing this as its light in weight. Love that you can curl the leftover strands too.

Really Reasonable Ribbon Used:

The design paper is one of my FAV's its "Vintage Whimsy" by The girls' Paperie' and I distressed all the pieces to give it that Vintage look.
I also used lots of Prima Flowers, of course I normally hoard these, but ive been trying to get some old photo's done on layouts to be framed, and this is going to be 1 :)
Lastly I added some wedding stems, ribbon roses(OLD) and a sweet butterfly to complete my layout!

Floppy Bow Video


Thank you for looking and have a lovely day!
Hugs to all,
Cheryl

Tuesday, April 16, 2013

Double Loop Bow-torial

 
Hi all it's Ginny here : )  I'm overwhelmed by the number of requests I received for a tutorial for the bows I tied for mine and my BFF Heather's blog hop projects. So great to get that kind of feedback : ) I had another tutorial lined up....but since I love all you RRR Peeps I'll jump this one to the front of the list! I will warn you in advance....there are a lot of pictures here....but the bows are so easy to tie that you'll be doing them in your sleep.  I'll also say that we are in the midst of several home improvement projects before my sons graduation....so a manicure was out of the question. lol.
Okay...on to the bow-torial.
  First start with a length of ribbon around 14 inches. Less for narrower ribbon...more for wider....but not too wide or you can't get it tied tight enough to stay.
If you're right handed like me..hold the ribbon in your left had between your thumb and middle finger....leaving a bit of a tail. If you're left handed...I'm guessing you would do the opposite???? Next wrap the ribbon over the top of your index finger.
Now you'll want to weave the ribbon through your two extended fingers...so the ribbon is now over the middle finger.
Wrap the ribbon around your middle finger and weave it back through between your fingers.Your ribbon should now be wrapping over your index finger again.
Wrap the ribbon under your middle finger one more time.
Remember your still using your left thumb to hold the tail. Now pull the ribbon though the v of your fingers...closest to your palm.
Now pull the trim around the back so it's coming straight up between your fingers. Remember the trim should still be behind.

Pull the trim over to the front side.

And tuck it behind the the last crossover that was made when you brought the trim to the back.
Pull the trim straight up.
Now pull the ribbon up and down....tightening the center knot.


Now you've got the center tight enough to slip the bow off your fingers : ) Not too tight that you're stuck lol. Go ahead and clean up the tails with a nice diagonal cut so they won't fray.
You'll want to practice a few times to get the hang of it...but trust me...it's easy peasy. I tried it with twine too and it worked perfectly...I was even able to get a few more loops on with the thinner trim. 
If you'd like to see the bows on my finished project please click HERE. Any Really Reasonable Ribbon trim will work great...as long as it's not too wide and thick. I used my favorite Scor-Tape to attach the bows to my project.

Okay...that's enough bow-torial for one day lol...sorry for so many pictures! I hope you all have a happy and productive day and find some time to be creative...Huggs Ginny