Wednesday, November 9, 2022

Hot Cocoa gift Pocket using RRR


Hello crafty friends and Happy Wednesday to you all! Cheryl here today with a super fun Christmas Hot Cocoa gift Pocket using some of the Christmas ribbons from last months Really Reasonable Ribbon club. Loved the ribbons so much that I wanted to use more of them in my projects for Christmas.

these tag pockets are perfect for gift giving. Love that you can make them for neighbors, co-workers, family and so on. To create these I just cut 2 large die cuts any shape that works. Next I cut the design paper I wanted and then glued to each one. Now to create the pocket you will have to cut one in half, super easy! then glue to the bottom and decorate. super easy and fun. I had to add my bows,Love using Really Reasonable Ribbon to create these, so I added 2.
 Little Standing Nash bear is so sweet and is a SVG file. Love working with these too. I did add lots of dew drops as well. to add the ribbon across the border and cup I used 1/4" scor-tape. Nash is popped using the foam tabs and so is the little sentiment tag.

I hope you enjoy my post for today and thank you for stopping by!

hugs to all,

Cheryl

Monday, November 7, 2022

May Your Days Be Merry & Bright

Hi there, friends.  It's Karen posting here today.  It's beginning to look a lot like Christmas.  Well.....not necessarily here where I live in the desert; but definitely up in the Northern states.  In fact, we haven't even turned on the heat in our house yet.  The temps remain high enough during the daytime hours that we're still ok with just our sweatpants and an extra blanket at night.  But that doesn't mean we can't start celebrating Christmas.  Right?
There are so many great Christmas products out there in the craft world. Lots of great stamps, dies and goodies to help us create beautiful cards and projects. But.... the trims!! YES, the trims. You can't miss out on all the GORGEOUS ribbons, trims, laces, twines and Embellishments from Really Reasonable Ribbon. They're the best. The snowflake in the upper right corner has a White Flatback Pearl in its center.
I used basic black and red cardstocks for the base, and a Carta Bella patterned paper. I cut the frame using corrugated cardboard and white watercolor paper with a frame die from Taylored Expressions. I stencilled the diagonal stripes using a stencil from Pinkfresh. Those delicious cookies were cut using a die set from The Greetery. But like I mentioned, the trims..... LOTS of pretty trims from RRR.
I ran a length of Olive Wrinkled Ribbon across my card and tied a bow with that and a piece of Black Seam Binding. I also added a bow tied with Solid Red Baker's Twine and I tucked in a few Milk White Double Head Stamens. The little holly berries and ivy were cut from wool felt using a Paper Sweeties die. The thing I love most about Really Reasonable Ribbon is that I know I can ALWAYS find the perfect color, width, texture and style of trim for every project. They really have it ALL. I hope you'll stop back by here at the Really Reasonable Ribbon Blog often for lots of great inspiration.

Blessings,
Karen

Friday, November 4, 2022

Blessed Fall Greeting Card

 Hey there friends and crafty peeps! Ginny here to share a festive Fall  card created with beautiful trims from Really Reasonable Ribbon.


~Really Reasonable Ribbon~ Plaid Ribbon Brown, Ivory Burlap String.

Wishing everyone a happy and productive day : ) G


Thursday, November 3, 2022

A Homecoming Mum

Hello and thank you for stopping by today! My name is Misty Foresman, and I am SO EXCITED that Bonnie has invited me to share one of my projects with you all! My love for ribbon runs very deep, and it spills over into many of my projects, the most recent one being my daughter's Senior Homecoming Mum. Typically the mum would boast the school's colors, but since it is her senior year, she wanted solid white with a few splashes of silver. Here is a little photo of it tucked into my Light box:

As you can see, I used a ton of ribbons from the Really Reasonable Ribbon Store in this. Some of them I have had for a very long time and others I ordered just recently.  Here is a list with links to most of the beautiful ribbons that I used in this project: 

Silky Crush White                                                            Silver Grosgrain Metallic
1/4 inch grosgrain white                                                   Double faced Satin Light Silver
Grosgrain with silver edges                                               Shimmer Satin Shell Gray
Double faced satin white in various widths                         Silver Satin with silver metallic edges
Satin with Grosgrain edge                                                Glitz Ribbon Silver
Shimmer White Satin                                                       Grosgrain White in various widths
Glitz White Ribbon                                                           Double Faced Satin Light Silver
1 1/2 White Satin Double Ruffle                                        Shimmer Satin Light Orchid

I used SO much ribbon on this, and it was SOOO Heavy! If I had to guess, I would say that it weighs close to ten pounds, probably even more...and it is just RIBBON y'all!! There were a total of 72 strands of ribbon in various lengths and widths, along with a few other embellishments. I decorated almost every ribbon with bling, pearls, roses, hearts, etc.  Here is photo of it still in the process of being assembled.  It is not all there yet! 


Usually, the bigger the mum, the better, right?  Well, Skye doesn't share this belief....THANK GOODNESS!  In addition to all of the RRR Ribbons, I added a few of their resin embellishments, like the pearls, hearts, and stars.  I also pulled a few Bells, beads, and garlands from my stash that added to the weight.  Oh, all those garlands are Christmas decorations by the way! There's no shame in my Mum making Game!!  LOL  

Oh, And look at some of the gorgeous embellishments that I was able to add!  
This super cute tiny rose is the Wild Orchid 2-tone white with baby pink centers  and I LOVED the 35mm Chelsea Roses! I put these things all through the ribbons and layers of her Mum. 


Here is a photo of her trying it on to let me know if it was going to work.  At this point, I was instructed to add more ribbon and some more pearls and more roses! LOL  WHAT!!??
This girl grew up with all things ribbon. From head to toe she was decked out with Mom's DIY ribbon projects... hair bows, hand bags, ribbon flip flops and more.  So, needless to say, she knew without a doubt that I could make the perfect mum for her. She was not about to cut me any slack!

By the time I had finished adding everything to her mum to make it perfect, This Mama was exhausted!  I not only did her Mum, I ended up doing her boyfriend's arm band mum as well, as you can see here in this picture. They looked great, and the smiles on their faces tell me that they were happy. Skye said that they got lots of compliments on their "Real Ribbon Mums" and how beautiful they were.  In a world where everyone uses the plastic ribbons, Skye and her boyfriend looked like "Royalty" with their amazing real ribbon mums. 

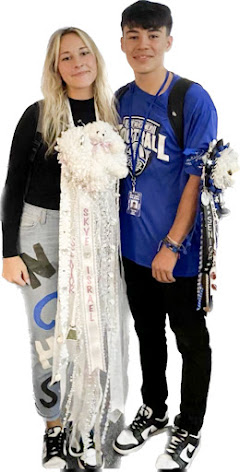
They boyfriend had never gone to Homecoming or even worn one of the armbands.  He is the #2 High School Kicker in the State of Texas, and he has never been to Homecoming? I didn't believe that for a second!  He said he is always on the field and never took part in the fun stuff. His entire high school career has been behind the ball.   AHHHH! That makes sense! He said he was glad that his first and only experience with being on the other side of Homecoming was with the "Best of the Best" LOL>>>That kid sure knows how to get on a Mom's Good side!! 
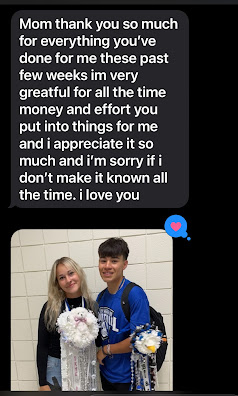
Skye and Israel got the Mums and the smiles,  The comments and the compliments, and I got this:
And I couldn't have asked for anything more.
Thank you all for stopping by, and I hope that I have inspired you today. 
The ribbons in the Really Reasonable Ribbon Store are AMAZING and gorgeous, and so versatile! 
You don't have to be just a card maker or a scrapbooker to enjoy adding ribbon to your projects. Head on over the the RRR store and start filling your cart with all your favorites! 


Wednesday, November 2, 2022

*NEW* November Ribbon Club from Really Reasonable Ribbon


It's November and we have an ALL NEW Precious Metals themed Ribbon Club Assortment at Really Reasonable Ribbon.  

Not a member yet?
JOIN TODAY!!


The November assortment contains 9 styles and a total of 18 yards of ribbon that are perfect for all your crafting needs.  Each monthly assortment is a color or holiday themed mix.  What a fun way to build your ribbon stash and try new ribbon styles.

Better yet, why not grab the October and November Ribbon Club Special Deal?!  
Just $17.50 for both if you are located in the USA.


Thanks so much for stopping by today and Happy Crafting!!


Monday, October 31, 2022

Merry and Bright

Hello, everyone! It is Gloria with you again! Back in June, I shared THIS card and in September THIS card, where I showed you how to use up your leftover ribbon bits. I decided to do it again with the October Ribbon Club Christmas Assortment!

This is such a special card that would be perfect to include with a gift card this year! I love to have a selection of extra-special cards for just that purpose. It makes giving a gift card seem like so much more than a piece of plastic.
I created a 5" x 6" card from black cardstock. Then, I cut a piece of white cardstock to slightly smaller than 5" x 6". I used black ink to stamp a Christmas sentiment onto the bottom right of the white panel. I then added some Scor-tape to the back so that I could wrap short lengths of ribbon around the cardstock panel and secure them. 


Note: The Forest Green Plaid in the Ribbon Club is the 5/8", but the store does have the 3/8" that I used. Also, the Christmas Traditions Plaid is NOT in the club assortment, but is available in the store, just use the link above. 
Once all the ribbon was attached, I added more Scor-tape and attached the whole panel to the card front. 
I created a bow from the 5/8" Red Plaid ribbon and attached it to the area overlapping the the Red Plaid ribbon on the card. Then, I added some flowers and Christmas bells, plus some other Christmas floral items (see list of flowers below). I use hot glue to attach all my bows and flowers to my cards. 
I finished the card by adding a few sparkly enamel dots. Have you tried this technique yet?! If you have, please post your link in the comments so I can stop by and see! 

Friday, October 28, 2022

Candlelit Christmas Folio with Red Plaid Ribbon

Really Reasonable Ribbon Red Plaid, Kathy Clement, Kathy by Design, Heartfelt Creations, Candlelit Christmas, Holiday Star, Folio

 Hello, Ribbon Lovers!  Red Plaid Ribbon and Red Poinsettias give this flip folio farmhouse flair and a pop of vibrant color.    Nothing says Christmas is coming like twinkly stars, snowy poinsettias, frosted tree branches and crisply tied bows!

Kathy Clement, Kathy by Design, Really Reasonable Ribbon, Candlelit Christmas, Folio


This "made from scratch" flip folio is kept neat and tidy, thanks to the Red Plaid Ribbon Closure.  I use 1/2" Scor-Tape to secure my ribbon to the folio cover so it stays put.  

Kathy Clement, Kathy by Design, Really Reasonable Ribbon, Christmas, Candlelit Christmas, Heartfelt Creations, Folios

Here's a quick peek inside the covers.  There's so much festive  holiday goodness tucked inside this folio that I prepared a little video tour for you.  I hope you enjoy!


Christmas is filled with so many wonderful memories, and it's nice to have a place to preserve them all.  I hope I shared some tips and ideas that you can use to help you capture all your holiday memories, too.

Thanks for stopping by!

Cheerio,

kathy