Monday, November 19, 2012

RRR November Blog Hop Winner!!


This is the second post of the day. Be sure to scroll down to see the beautiful holiday ornament tutorial I shared today.

 
Thank you so much for hopping along with us this month on the Really Reasonable Ribbon's Ramblings Blog Hop. We had so much fun and we hope you did too!! We'll be hopping on the 13th of each month, so be sure to mark your calendars and join us again next month.

It seems as if a lot of people have more dessert than 'real food' for Thanksgiving.  Pumpkin pie will be on most everyone's table.  I've never been a big fan of pumpkin pie, but I have an awesome pumpkin bread recipe I'll have to share with you one day.  Of course, can there ever be too much dessert?  I think not!! :)

Now, on to our winner who will receive the November Ribbon Club Assortment along with the other fun goodies shown here which are all available at Really Reasonable Ribbon.


The winner will have 48 hours to contact me by clicking on the contact button at the top of the blog and sending me your full name and shipping address.

Random Integer Generator

Here is your random number:  2

Timestamp: 2012-11-19 15:22:37 UTC


Congratulations Jess!

Jess said... 2

Awesome hop! There are about 4-5 desserts, of which pumpkin pie is my favorite!


Now if you didn't win, don't worry!! We will be 'hopping' each month so you'll have another chance to win soon! We hope you stop by and visit our blog often.

Be sure to check out our current challenge here. We'd love to have you play along with us. Have a super day!


~ Bonnie Garby ~ 


facebook badge

Holiday Tree Ornament Tutorial

 
Hi everyone.  Bonnie here today with a fun Christmas Tree ornament tutorial. 
 
Now, I'm sure you've seen trees like this before - they are all over Pinterest and the web, but I thought I'd come in and give you my 'pumped up' version.  I find that I'm not usually capable of 'quick and easy', so here's my jazzed up version.


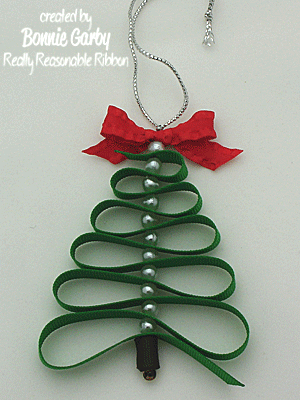
Ribbon Tree Ornament Tutorial
 
Supplies:
1/8" Red Diagonal Stripe Ribbon - 2 pieces at 24" each (optional)
4" piece of 3/8" Brown Grosgrain
small scrap of 3/8" Red Satin Double Ruffle Ribbon for bow
1/8" Scor-Tape
Scissors
Lighter or Fray check to seal ribbon ends
needle/thread
6mm plastic pearl beads or beads of your choice
a couple smaller seed beads for top and bottom
450 Quick Dry from Helmar or other quick drying adhesive


Roll your 4" piece of brown grosgrain and apply adhesive to the end to hold the roll.  Set the tree trunk aside.
 
 
If you want the layered ribbon look, use 1/8" Scor-Tape to adhere the 1/8" red diagonal stripe ribbon to each side of the 3/8" hunter green grosgrain.  Be sure to burnish it down so it's stuck on really well.  It's really not necessary to add the extra 1/8" ribbon.  It really looks quite nice without it too as you can see here.
 
 
Cut one end of your ribbon at an angle and heat seal or apply fray check.
With a fine point marker, make a mark 1-1/2" from one end for your starting point.  Then make dots along the ribbon spacing them at:  3-1/4", 3", 2-3/4", 2-1/2", 2-1/4", 2", 1-3/4", 1-1/2", 1-1/4", and 1".
 
 
Take your needle and thread and double the thread and make a knot at the end.  Bring your needle through the first mark, down through the tree trunk you made and through a medium-sized seed bead. 
 
 
Take the needle and go back through the tree trunk and back through the ribbon.  The seed bead acts as your anchor at the bottom of the tree trunk.


Now add a pearl and go through the ribbon at your next mark.  Continue in this fashion until you get to the top of your tree.
 
 
Add a pearl at the top.  You can also trim the ribbon at the top of your tree to the length you desire and seal the end with a lighter or fray check.


Now bring your thread and needle up through your prepared bow, through another smaller seed bead and around the metallic silver thread that will act as our hanger.
 
 
Go back down through your seed bead, through the pearl, the bow, the top pearl and the ribbon to the point shown below.  Take a few stitches to secure, and bury the thread by taking it down through a couple more pearls.  Then snip the ends. 
 
 
Voila!!  Here is your finished piece.
 
 
I also made another one (which happens to be my favorite) with 5/8" Gold Glitz Ribbon topped off with a pretty bow made from our new Red Sheer with Shimmery Edge Ribbon.  I adjusted the measurements for this a bit because of the wider ribbon.  I used 32" of the gold glitz, 4" of 5/8" brown grosgrain for the trunk and 8mm pearls.  I started with my first mark at 1-3/4" and added two additional marks at the beginning at 3-3/4" and 3-1/2".  This will give you one extra row of 'branches'.  The rest of the assembly is the same.  I think the glittery look of the ribbon really makes the tree pop.

 
I hope you'll give this project a try.  This is a fun and easy gift and could even be added to a pretty wrapped gift.
 
Thanks so much for stopping by today.  If you like this project, why not 'Pin It'.
 
~ Bonnie ~
 

Sunday, November 18, 2012

Retro Vintage Christmas Cone Ornament


Hello Friends!!
Happy Sunday!!
Heather here, and I have another fabulous Christmas ornament to help inspire you to create some holiday ornaments of your own!
I have created a "Retro Vintage Christmas Cone Ornament."
(more photos on my blog)
I used some great ribbons and trims from Really Reasonable Ribbon.  The vintage cone image is one that my friend Sandi asked me to fix (digitally).  You can pop on over to her blog and get it for free!!  You can also find it on my "stuff" page.
Here you can see the red snowflake ribbon, peppermint baker's twine, red pom pom trim and red box pleated trim that I used to make the top look all fancy.  I also used some of the same trims to dress up the bottom of the cone.
I used some Mica flakes and Glitter to add some sparkle through out the cone.  I also used Utee to make the stars pop.
I hope that this inspires you to create something fun and festive!!

Better yet, pop on over to Sandi's blog, get the free sheet I created with her vintage image, get some ribbons and trims, dress it up and link up to our RRR challenge going on now!!

Anything but a card and ribbon!!
Have a great day!!
hugs!!

Saturday, November 17, 2012

Sweet Christmas Wishes & Video on Ruched Flowers&Bows

Hello everyone, today's card features Really Reasonable Ribbon "Seam Binding" to create Ruched Flowers & Bows.


I added a video for you to view how I did these. They are super FUN & EASY to make! I used Red Seam Binding, wire, and buttons for the bows. For the flowers I used the same seam binding, White Pearls, and glue.  I would use either hot glue or Helmar450 Quick Dry to add these, since both set fast.


My dp is DCWV, and my bird and wreath are CottageCutz Dies. I added some swirls and sewing to complete my card.


The inside is pretty simple, just some dp, and the CottageCutz snowflake border.


I also airbrushed the wreath with Copic Markers, and colored my bird with them as well.


Thank you for looking and have a lovely day!!
hugs to all,
Cheryl

Friday, November 16, 2012

Embellished Paper Flower Tutorial

 
Hi all it's Ginny here with a fun tutorial that's just in time for quick last minute Christmas gifts. The best part is...it's recycling and you can change the color and add whatever trims from Really Reasonable Ribbon you love to finish them off perfectly. Did I mention it's also super fast??? You'll whip up a ton of these before you know it. I added the text to the pictures to make it easier to follow :)
See I told you they were easy.  Can you just imagine them in pale shabby pink???? Swoon. Okay one last thing...these pins are super sturdy...so no worry's about wearing them on a coat or scarf...they will take a lot of abuse...trust me I know. While you're at it whip up a few for yourself! You deserve a little treat too right????? Okay...that's it for my tutorial. Hope you all enjoy a happy and productive day and find some time to be creative.Huggs   Ginny
 

Thursday, November 15, 2012

RRR Challenge #60 - Anything But a Card with Ribbon

Hello everyone! It's time for a new challenge here at Really Reasonable Ribbon. Please scroll down to the next post for the winners of the last challenge.

The theme for Challenge #60 is Anything But a Card (with ribbon). Create a card, layout, multi media piece, tag, ATC, hair bow, you name it. Just be sure to follow the theme above and use ribbon/lace or trim somewhere on your project.
  
*******************
Here is a little inspiration from our design team for challenge #60 to get you started. All of the sample projects feature ribbon from Really Reasonable Ribbon.

Katie 
Thanksgiving Menu and place setting


Cherry
Decorated Mail Box


 Vivian
Pretty gift box


Ginny
Christmas ornament


 Bonnie
Ribbon Pinecone Christmas Ornament

Beautiful holiday album
************************
Now, let's see your 'Anything But a Card creations! We will be selecting a 'Best of Show' and top 3 runners up. We will also be drawing a random winner from all the entries to win a $10 gift certificate to Really Reasonable Ribbon. How cool is that!!! We will be announcing the winners on December 1st.

Here's what you need to do:
* Create a new project using the posted theme. A layout, card, ATC, home decor item, hair bow, or anything your can think of.
* You may enter as many times as you like, but you're asked to provide newly designed projects. No back-linking please.
* All projects must also include some sort of ribbon/lace/trim.
* Post your project on your blog or an online gallery (using code RRR60) and link it here with the Inlinkz tool below. Please provide a direct link to your post, not an entire blog.
* You have until November 28th at 11:59 PM Eastern time to enter your projects. Thanks so much for playing and good luck.


PLEASE consider turning off your word verification.
It would be a great help to us if you would consider turning off your word verification if it's active on your blog. To do this is really easy and all you need to do is go to Customise > Settings > Comments > then scroll down to where it says comment moderation and select always (this won't stop anybody leaving you a comment but they won't show on your blog till you approve them). Then scroll down to show word verification for comments? and select No.
We love to visit your blogs and leave comments on all the terrific entries, but the word verification really slows us down. :o)

RRR Challenge #59 Winners!!!


Challenge #59 was lots of fun with our Winter Holiday & Ribbon theme. We saw a wide variety of wonderful projects this time around. Many thanks to all who participated.

Our top three runners-up for Challenge #59 in no particular order are:


Congratulations to our top 3 for a job well done. Grab your "I made the RRR Top 3" badge (located in the left column of the blog) and display it with pride. You ladies did a fantastic job!

~~~~~~~~~~~~~~~~~~~

Now, on to the 'Best of Show' for our challenge #59  Winter Holiday theme.


Our challenge winner is.......................

 
Please grab the winner badge from the left column of the blog and proudly display it on your blog.

~~~~~~~~~~~~~~~~~~~

Now, we have a $10 prize today, and it's a random drawing from all our entries. The winner will receive a $10 gift certificate to Really Reasonable Ribbon.

And the winning number is........
Random Integer Generator
Here is your random number:  5

Timestamp:  2012-11-13  17:03:26 UTC


Congratulations Snoopy! Send us an email with your complete shipping information using the contact button above and we'll get your prize right out to you.

Thanks again to everyone who played along with us on our Winter Holiday themed Challenge.  I hope to see you all back again for Challenge #60 which is now up and running.

~ Bonnie Garby ~