Showing posts with label Bow Tutorial. Show all posts

Wednesday, December 11, 2013

Bow-it-All Tutorial * Big Bows with Really Reasonable Ribbon


Hi there everyone.  Are ya ready for Christmas yet??!!
I am so NOT ready!   [sigh....]

I've had a few requests for a Bow-it-All Tutorial for BIG BOWS, so I pulled out my favorite toy bow making tool and some gorgeous ribbon from Really Reasonable Ribbon and this is what I came up with.

For those who already own a Bow-it-All Tool, I hope you are having fun with it.  If you don't have one yet, what are ya waiting for??!!

This bow is made with 1-1/2" Silky Crush Ribbon which performed even better than I expected.  You'll be amazed how little work there is to do after removing the bow from the Bow-it-All.  It practically fluffs itself.

This is a double-tail bow made with 1-1/2" Red Gingham and 1-1/2" Ruby Red Double-faced Satin.  
I embellished the center with a handmade paper flower.
Wouldn't this look great on a holiday wreath or as a tree topper?

This is a big now made with Wired-Edge Ribbon.  Wired Edge ribbons create a beautiful large bow because the loops hold their shape so beautifully.
The center of this bow is embellished with a pretty Mulberry Flower.

Here is my video tutorial.
If you liked the video, it would be great if you could click the YouTube link right above on the screen beneath the video and go to YouTube.  
Once there, please like my video and leave a comment.  These things will help the ratings of the video and will help grow the reasonableribbon channel.  Also, I would love it if you would subscribe to my channel.

Now get that Bow-it-All Tool out and make some BIG BOWS ladies.  
These bows are perfect for holiday decorating and gift wrapping.

If you still don't have a Bow-it-All Tool, you can always tell Santa he can get you one at Really Reasonable Ribbon.   :)

~ Bonnie ~

Friday, November 29, 2013

Double Bow Baby Card


For our Black Friday Sale code, please click HERE.

Happy Thanksgiving Friday! 

Today I am sharing a cute, lovely double bow ribbon with you all. I made this card for a friend who just had a baby girl and wanted to create something special. Thought this bow was perfect for the card, don't you think? 
Make sure to check out the video tutorial below so you can follow along- This is something I learned a while back when I first got into cardmaking. For the best results, make sure to use same sided ribbons so that the final result shows a unified look.
I love to work with Bonnie's selection of Satin Ribbons and Grosgrain Ribbons (Same sided ones) for this technique. Make sure to grab some today, Bonnie is doing a fun Black Friday Sale! (check Bonnie's sale announcement for DISCOUNT CODE)
Thanks for stopping by! Make sure to check back with us tomorrow for a new inspiration.

Wednesday, October 30, 2013

Zutter Bow-it-All Tutorial * Embellished Bows with Unique Ribbons and Trims


Hello everyone! 
 
Bonnie here from Really Reasonable Ribbon.
I'm still having lots of fun with my Bow-it-All Tool from Zutter and today I'm going to share some fun embellished bows that I made with unique ribbons and trims that might not be your 'go to' styles when creating a bow.  
BUT, they are really fun to work with!!


My card is made with a great digital image from a collage sheet from Ephemera's Vintage Garden.  
The pretty bow is made with Pink and Natural Jute String and I threaded a 20mm Pink Open Rose through the center.  I really like how the rose softens up the shabby jute bow.  I used my Zutter Distrezz-it-All to distress the edges of my papers and the background is embossed with a swirly embossing folder from Cuttlebug. I lightly inked the swirl impressions with Antique Linen Distress Ink.

Here's a close-up of my pretty bow.


I created another video so you can see exactly how I made my embellished bows.
If you already have a Bow-it-All Tool, you can work right along with me.


If you have one of these fabulous tools, I know you are loving it!  
The possibilities are endless!!  
I have so many ideas for new bows that I can't wait to sit and experiment some more!

~~~~~~~~~~~~~~~~~

This pretty tag below is also made with a digital tag image from Ephemera's Vintage Garden.  I printed 2 copies of the tag and used one for the tag and the second one I used to make my 3-Butterfly with the Spellbinders Grand Shapeabilities Donna Salazar Wonderful Wings set.
The bow is made from our Cream Mesh Ribbon and the tassel is a mix of fibers from the mesh ribbon and 20lb Variegated Hemp Cording Earthy.  

I wanted the tassel to match the bow, so I took a short piece of the Cream Mesh Ribbon and started unraveling the thin monofilament that holds the fibers together.  This leaves just the wispy cream colored threads.  (You can see that same effect on the hairbow below).  I then took a couple of short pieces of the hemp cording and separated the 3-ply down to three individual strands to thin it out.  Then I mixed all the fibers together to make the tassel.


Below is a hairbow I made from a layered bow made with Light Blue Netting.  This bow would be nice for an older girl (or adult) for a more formal occasion.  It's attached to a French Clip.


I will be sharing details of the other projects shown in my video tutorial in the upcoming days on my Make Time 2 Craft Blog.  Head on over and follow me there so you don't miss any of the fun!

~ Bonnie ~

Friday, October 11, 2013

Zutter Bow-it-All * Bow Making Basics Video Tutorial with Really Reasonable Ribbon

You've probably heard me say this before (possibly more than once!), but I LOVE LOVE LOVE this new Bow it All Tool from Zutter which we are now stocking at Really Reasonable Ribbon.


It makes BEAUTIFUL bows!!! 
AND, it makes them fast and effortlessly.

Here are the bows I will demo in my video below.

So, I finally got my act together and made you a video on the basics of using this new tool.  Now I've gotta tell ya, doing video tutorials is not for someone with perfectionist tendencies...  A so-so video takes me like 10 hours of work and it's still not even close to meeting my expectations.  I did the whole thing once, realized I sounded bored to death and then shot it again only to play it back and realize my chair was in the one position where it squeaks every time I move!!  (insert eye rolling and long suffering sigh........) BUT, hopefully you will be able to see what I'm doing and follow along if you already have the tool and are having difficulties.

Zutter Bow it All - Bow Making Basics
** Please note **  I have had many comments and discussions concerning the instruction booklet included with the tool.  The printing is sooo small that even if you have perfect vision, it's impossible to read.  The good news is, you can download the manual online and view it or print it out at full size.  You can find the manual HERE.

When you are starting out, I suggest that you use lightweight or sheer ribbons because they will give you the best results with the least frustration.  Of course the best place to find any kind of ribbon is Really Reasonable Ribbon!!  My suggestions would be any of the Organza Ribbons, Seam Binding or our Delicate Stitched Satin which makes beautiful loopy and layered bows.  I used the Rose Bloom Delicate Stitched Satin on two of my bows above and it is my number one choice for fluffy looped and layered bows.

You can make bows with any type of ribbon with the Bow it All, but some will be easier to work with than others.  In an upcoming video I will talk about selecting the best bow type for the ribbon you are using, or the best ribbon for the bow type you've selected.

I know this tool is not in everyone's budget, but if make lots of bows and you can add it to your tool line-up I highly suggest it.  Mine gets LOTS of use.
If anyone has any questions, please let me know. 
 
Thanks so much for stopping by today!

~ Bonnie ~

Tuesday, January 29, 2013

Make you own Bow Maker

 
Hello, my dear crafty friends! Today is my last post as a Guest Designer on the Really Reasonable Ribbon blog and this will be a small tutorial I want to share with  you.
And as ribbons are the main issue of this blog/shop, how about your own portable Bow maker and this time I am pretty sure it's a new and never seen tutorial. Why I am sure about it?  I used  my dental supplies to make it and I am pretty sure about not having so may dentists crafting with ribbons around the web.
So here it is- my Portable Tin Bow Maker for you. Look like a cute altered box? So it is, but wait for the inside of it.


Don't worry- dental supplies are not obligatory, you can use any paper clay or polymer clay to make this tool.
Pick a tin with a lid- can be a recycled one too (I used Making Memories tin, but any mint tin about 3x2'' will do the job.)
Now pick some molding paste (can be bought in any craft shop, but if you have a dentist friend it's even better as our molds smell better and mine has this great grape taste and smell). Make four 3'' wooden pegs from your BBQ wooden sticks or use an old chopstick.  We all have some at home and you will need them during the process and  to use  for your bow making after. Now mix the equal parts of both pastes (all molding pastes have 2 parts to be mixed for a minute or so) , make a rectangle about  3/4'' flat and fill the inside of your tin. 


Now stick 2 of your wooden pieces about 1/2'' from each side (it will give you 2'' ribbon  bow) and another 2 in the middle to make this 1'' bow. Let it dry with sticks inside. Now pull the sticks and your bow maker is done.


Here are some photos to show you how to make a 2'' bow. The box will use those wooden sticks storage and  you don't need to buy any fancy one (anyway, my fancy bow maker was lost  after all).
Please note that the pearl pins are just my add on to make the photos more clear, you don't need to use them during your bow making at all.
First tie the ribbon around the pegs as shown .

 Now take the left   ribbon end (the upper one) under the loop as shown.

Now move the same ribbon above  the loop as shown

This was a moment to take my pins off (as I said you don't even need them) and to make a knot with both free ribbon ends.

Pull the pegs  out of the mold and your bow is made. Trim the ends as wanted and use it as I did to embellish my bow maker box.

Now just take time to embellish your Bow Maker box.
First of all pick some ScoreTape and embellish the lid with Jute  Natural 3/8'' ribbon, cut the edges to fit the tin lid. Add some thin tape around and glue Hemp Cord from Multi Weight set. For my tin lid I used 3 layers of 3/8''width. The bottom was just perfect for one layer of Natural Crochet Lace  trim and I added the same hemp over it.


I  glued a nice flower branch over the lid (Prima) and added my pink bow I made with Swiss Dots Light Coral ribbon.
And as I said- any mold will make the job and if not- try some Paper clay  or some Polymer clay (can be baked with a tin, but don't use Microwave as the tin is metal)
Product list:
Really Reasonable Ribbon:
Tin (Making Memories)
Flowers (Prima)
Other: molding paste, wooden pegs
That's it for this post and for my Guest Designing for Really Reasonable Ribbon shop.
Thanks for great products and this fantastic exposure!
See you again in my blog with more ribbon posts!

Friday, November 23, 2012

Christmas Bow Tutorial


 How was your Thanksgiving? Mine was lovely and simple. Lots of yummy food and the blessings of my Mom, Dad, husband, and son...and of course the animals. We gathered around and ate and than chit chatted. So thankful for simple times like that. They are the memories I hold most dear.  I hope yours found you well and happy...and full of pumpkin pie!                                              Now that thanksgiving has passed, it is definitely time for full on holiday crafting. Have you started? You better get to crackin'....it will be here in a New York minute. It always comes faster and faster each year. You can never have to many holiday cards in your arsenal. With cards comes bows..so I thought I would share my bow method again using my beloved red seam binding from Really Reasonable Ribbon . You know me and my cheating...it is so much easier to use separate bows... and for me the best way to go about getting that perfectly imperfect crumpled look I love. I did a full wrap around on this card...wrapping all the way around the cardstock and tying a bow near the top. I wasn't too concerned with the first bow. I then added a few of my paper diecuts to the card base. Then.. as you can see in the second pic I tied my second bow and adhered it. I use hot glue. I am too impatient to wait. I always hold it there for a second with my finger right in the center which causes the ribbon around the bow to "poof" up..which I like. I also sometimes will wet a paper towel just a smidge and wrap my ribbon in it lightly to crumple it up again. I notice sometimes when you start playing with it it can start to straighten back out . I usually use two separate bows..but once in awhile will add a third if it is not full enough. The trick is to alternate the bows so they criss-cross each other. Easy peasy. From there it was just a matter of adding my goodies to the card and I was done! I would love to hear if you tried this and if  it worked for you! Hope you enjoy..and I didn't confuse you too much! Happy craftin' and hugs, cherry

Ribbon- Really Reasonable Ribbon Red Seam binding
Cardstock- Wplus9 stamps
Pattern paper- Pretty Little Studio Home for Christmas
Diecuts and images- Pretty Little Studio Home for Christmas
Buttons- my vintage stash
Candy cane- TJ Maxx

Saturday, November 17, 2012

Sweet Christmas Wishes & Video on Ruched Flowers&Bows

Hello everyone, today's card features Really Reasonable Ribbon "Seam Binding" to create Ruched Flowers & Bows.


I added a video for you to view how I did these. They are super FUN & EASY to make! I used Red Seam Binding, wire, and buttons for the bows. For the flowers I used the same seam binding, White Pearls, and glue.  I would use either hot glue or Helmar450 Quick Dry to add these, since both set fast.


My dp is DCWV, and my bird and wreath are CottageCutz Dies. I added some swirls and sewing to complete my card.


The inside is pretty simple, just some dp, and the CottageCutz snowflake border.


I also airbrushed the wreath with Copic Markers, and colored my bird with them as well.


Thank you for looking and have a lovely day!!
hugs to all,
Cheryl

Friday, February 3, 2012

Make a Perfect Bow!

Hi everyone, Bonnie here!!  I've made a few cards today using one of my favorite ribbons - Satin w/Grosgrain Edge from Really Reasonable Ribbon. 


I used 7/8" Satin w/Grosgrain Edge Ribbon and Pearls on each of my cards.  I used sketch SSS142 from The Sweet Stop Sketch Blog for my first card and Mailed My Heart Digital Stamp from Whimise Doodles.  This is a digi freebie, so head on over to Whimsie Doodles and take a look around and pick this cutie up.  As a newbie with Copics, I'm always looking for tips and there are some terrific video tutorials on coloring hair (among other things) at Whimsie Doodles, so be sure to take a look.

So, I spent hours happily coloring away and I ended up with 2 finished images that I thought came out really good (if I do say so myself - lol).  Of course I can't ever just be done, so I went ahead and stickled the wings on both images and set them at the edge of my counter on my little stand up clips (you can see what I mean below).  I left them over night to dry.  The next day I am happily working away and I nudged something and one of them falls over DIRECTLY ON AN INK PAD.  AHHHHHHHHHHHHHHHHHHHHH....  I let out a scream, but apparently screaming is a regular thing coming from my craft room because nobody even comes to see what happened!!  It was one of those slow motion things when your mind is screaming Noooooooooo - but you just can't stop it from happening.   Of course it was the one that came out best too.  Here's what I got:


I decided to make the best of it and use the part that I could.  It was a little too big of a problem to fix with a well placed button.  :)   I would have needed one HUGE button!


Here is a quick tutorial on how I make most of the bows for my cards:

Instead of trying to wrap the ribbon around the card and then tie a perfect bow, I cheat a little.  I use my Bow Easy Tool to make a bow and attach it to a strip of ribbon as shown below.

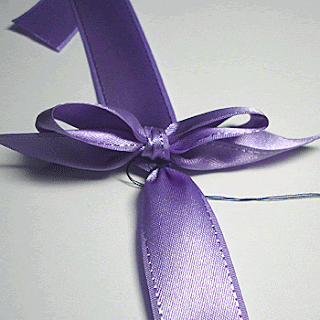
1.  For the ribbon stip that will go across your card, cut a piece a bit longer than the card.  Take a needle and thread and do a quick running stitch where you want the center of the bow to be. (I suggest using a thread color to match your ribbon.  I used a dark thread here to make it easier to see.)


2.  Pull the thread to neatly gather the ribbon and wrap the thread around a couple of times.  You can pull the gathers tight or leave them slightly loose depending on the look you want.  I left it a little loose.


3.  Take your bow that you've made using your Bow Easy Tool (or neatly tied by hand) and take a little stitch in the back of  the knot.


4.  Wrap the thread around the base ribbon strip and then take another stitch through the bow.  Repeat until you feel it is secure.


5. See how nice that looks!


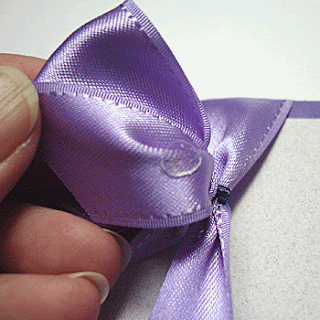
6.  As a finishing touch you can use glue dots or your favorite adhesive to hold the bow loops and tails in place if they are not cooperating.


6.  There you have your perfect bow.


Give this a try and let me know how it works for you.

~ Bonnie ~