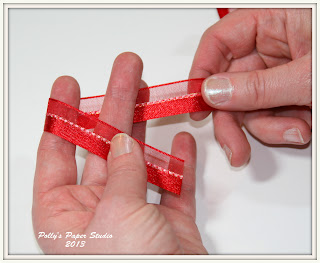
If you're right handed like me..hold the ribbon in your left had between your thumb and middle finger....leaving a bit of a tail. If you're left handed...I'm guessing you would do the opposite???? Next wrap the ribbon over the top of your index finger.
Now you'll want to weave the ribbon through your two extended fingers...so the ribbon is now over the middle finger.
Wrap the ribbon around your middle finger and weave it back through between your fingers.Your ribbon should now be wrapping over your index finger again.
Wrap the ribbon under your middle finger one more time.
Remember your still using your left thumb to hold the tail. Now pull the ribbon though the v of your fingers...closest to your palm.
Now pull the trim around the back so it's coming straight up between your fingers. Remember the trim should still be behind.
Pull the trim over to the front side.
And tuck it behind the the last crossover that was made when you brought the trim to the back.
Pull the trim straight up.
Now pull the ribbon up and down....tightening the center knot.
Now you've got the center tight enough to slip the bow off your fingers : ) Not too tight that you're stuck lol. Go ahead and clean up the tails with a nice diagonal cut so they won't fray.
You'll want to practice a few times to get the hang of it...but trust me...it's easy peasy. I tried it with twine too and it worked perfectly...I was even able to get a few more loops on with the thinner trim.
If you'd like to see the bows on my finished project please click HERE. Any Really Reasonable Ribbon trim will work great...as long as it's not too wide and thick. I used my favorite Scor-Tape to attach the bows to my project.
Okay...that's enough bow-torial for one day lol...sorry for so many pictures! I hope you all have a happy and productive day and find some time to be creative...Huggs Ginny


Fabulous tutorial Girlie!! All the ribbon peeps will be so happy when they see this! Those bows are Fabulous!!
ReplyDeleteHugs and smootches from your BFF :0)
That was wonderful, now can you do it in video?
ReplyDeleteGreat bows and thanks for the tutorial. My first attempt fell apart!! Hope practice makes perfect cos I really struggle with bows but these are delicious. Off to practice........
ReplyDeleteGinny, just make me a hundred in a variety of rainbow colors, ok? :)
ReplyDeleteYour bows are fabulous~!
Great, will have to give this one a go. xxx
ReplyDeleteYou got it Judy : ) I'll get those in the mail ASAP LOL. You are fabulous too : )
ReplyDeleteFabulous tutorial, Ginny!! I've been wanting to learn how to tie these bows, too!! ~ Blessings, Tracey
ReplyDeletehttp://gracescraps.blogspot.com/
TFS!!I love it!
ReplyDeleteHave a wonderful day,
Migdalia
♥ Crafting With Creative M ♥
♥ 2 Creative Chicks ♥
Love it Ginny! Fabulous tutorial and it makes such beautiful bows.
ReplyDeleteCheck you out! I may need 4 hands to pull that off....
ReplyDeleteThis is a great tutorial l'm going to try it out your bow and finished creation was stunning x
ReplyDeleteGreat tutorial. TFS Now I will give it a try and see if I can do it lol.
ReplyDeleteVeronica
That was easy-peasy x2! It took a few tries before I figured out what I was doing wrong, then I thought, "how would it look if it were my shoes" and viola :) I used a single sided grossgrain ribbon so I gave it a twist as I wrapped it around my fingers, it looks adorable. Thank you thank you thank you!
ReplyDeleteHi Ginny. I got it!! Got a big bag of these now in all sorts of colours. Triples look good too. Thanks for this. Bows were always a nightmare for me. Now I tie them while watching TV. Hee hee
ReplyDeleteI've been practicing but I just can't get that final step. Any tips?
ReplyDelete