Showing posts with label Pearls. Show all posts

Monday, January 8, 2024

Oh My Heart~Bow!

 Hi, Y'all! Misty here with you today! 

 ( @Mommyofkidz on Instagram) 

This is my VERY FIRST post for RRR this year and I am so excited!  It brings me real joy to be on the team again! Bonnie is amazing and ribbon is one of my addictions!

Today I want to share a cute little bow that I made using a plethora of GORGEOUS ribbons from Really Reasonable Ribbon.  With Valentine's Day coming soon, I decided to move out of the Christmas mode and break out the  Hearts and Flowers!! 

{{Insert Heart Eyes!}}

When I decide to make a bow, I always start with a ribbon that is an inch and a half wide for the base.  For this one I used Grosgrain White  to provide the background for all the reds to POP! There are tons of red ribbons in the RRR store.  So many in fact...that it was a little bit hard for a girl to decide which ones to use! Rather than fighting with myself, I decided to choose one of the pre-made assortments to create with.  They already match and look amazing together!

 I chose the Sweetheart Assortment to create some of the layers on this beauty.
I also added in some other elements such as some white Flat back Pearls, white flat back pearl hearts, and Cherry Baker's twine.
!!!OH MY HEART!!!
I am so in LOVE with how this turned out! val

Valentine's Day is one of my favorite days of the year. 

Actually, I really just love all the HEARTS that start popping out in every corner of every store everywhere! 

Thanks for stopping by today!!  Go check out all the HEART ribbons that RRR has to choose from to get started on your own Valentine's Day projects! It will be here before you know it!

Thursday, November 10, 2022

Hang It Up!

 Hi Y'all, and Happy Thursday!  Misty here again today sneaking in for another guest spot.  I think I may have mentioned this before, but just in case I haven't, let me say it again...
I AM ADDICTED TO REALLY REASONABLE RIBBON
There is so much to choose from and always the perfect addition to ANY project!  Sometimes I feel like that Grandma that does those commercials for the Frank's Hot Sauce company ..."I put that schtuff on EVERYTHING!"  HA HA!! 

Today I am going to share another "off the page" ribbon craft with you!  While I am a scrapbooker first and foremost, I also seem to have been blessed with the gift of  "crafty fingers" and everyone around me knows it.  I haven't quite decided if that is a good or bad thing, because there is always SOMEONE who is in need of a crafty favor and comes straight to me.  LOL.  Of course, I always say yes!  I will do whatever they are wanting if it falls within my scope of crafts.  It usually does!! 

Most recently I was asked to create personalized hangers for the bridesmaids and groomsmen.  While it may seem a bit of an odd request, I knew exactly what the goal was.  This bride wants every little detail to be precise and perfect, so that the photos come out top notch.  I don't blame her! Even the hangers will need to match to help create the storybook wedding that she wants and deserves.  Of course I was all too excited to do this for her! 

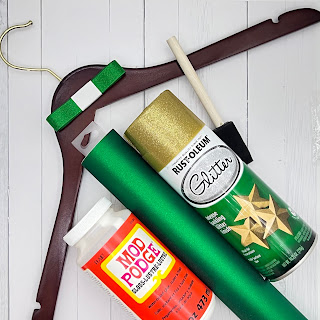
With 5 bridesmaids and 6 groomsmen, I knew that I would need 11 wooden hangers. I also needed spray paint to match her colors(Emerald and Gold), painters' tape to cover the hook of the hanger when I paint, a clear coat to seal in the paint, (I used Mod Podge), and of course the vinyl and tools to cut the names on my Cricut Maker.

From the RRR Store I used Shimmer Satin Emerald ribbon and 11MM White heart pearl beads to add a touch of beauty to the otherwise plain hangers.


The steps are SO SIMPLE! 
First, wrap the painter's tape around all the hooks of the hangers to protect from overspray.

Next, lay all of your hangers out onto a large drop cloth in a nice sunny open area.
spray your hangers on one side, letting dry 30 minutes.  

Next, flip them over and do the opposite side, making sure to get good coverage. 
Let dry 30 minutes.
Check for any missed spots and do your touch ups now.
Once you start adding the names you will not want to have to paint again. 
(The painting stages are all done outside on a nice day)

Now that part is done, you can gather the hangers and take them inside...here comes the fun part! 

While the hangers were in the drying stages,

I was cutting out the names on my Cricut


and I was making the bows getting them ready to glue on:


For the hangers for the Bridesmaids, I painted them with a glittery gold paint,
and used emerald for the accents the names. 
I added all the names, then I used Mod Podge to seal the entire painted surfaces. 
Once that dried, I hot glued the bows in place and was Done! Y'all, this 
Shimmer Satin Emerald ribbon is flippin' gorgeous! 

 
For the Groomsmen, I used the Emerald for the hanger, and Gold for the Accents.
While they didn't get bows or hearts or pearls to make them pop, I decided to still share them since they were part of my project. Without any other accent to make the names stand out, I decided
to mount them on a just solid black square of vinyl. 
WOW what a difference that made! 


I thoroughly enjoyed transforming these plain wooden hangers into something beautiful for the Bride to give to her wedding party.  I'm pretty sure that she loved them and is excited to give them! The colors and fonts all matched and so will her photos.  Hopefully, these will help to create the perfect storybook wedding that she deserves! 
AND....Hopefully I have inspired you to do something crafty! 
Head on over to Really Reasonable Ribbon and get started with the perfect ribbons! 



Monday, April 26, 2021

Happy Mothers Day Card with Ribbon and Flowers

Hello crafty friends and Happy Monday to you all! Today's Mother's Day card was designed for Really Reasonable Ribbon using the beautiful seam bindings and pearls that RRR carries in the shop. I absolutely LOVE the way this one turned out. 
The flowers were made using Cheery Lynn Designs flower dies, and then doing my glass flower technique.  I love this technique as it makes the flowers look like glass flowers. I layered them and hot glued each flower together and then added a pearl to the center. The seam bindings were ruched and made into smaller flowers to place in between mine. 

The design paper is old and is from HC.  I've been trying to use up some of my older paper stacks that I forgot about. Each layer was put together using RRR Scotch Advanced Tape refill and then sewn together. Next I added dots to each layer. I had a lot of fun making this card and hope you like it.

Really Reasonable Ribbon Supplies Used:


I hope you enjoyed my post for today! Thank you for stopping by and have a lovely day!

hugs to all, 

Cheryl

Monday, December 31, 2018

Winter and Sweater Mini Album

Sharing more pages of my Winter and Sweater mini album using gorgeous ribbons from the Monthly Ribbon Club Assortment.  
I added a beautiful bow with the white ribbon from the monthly assortment then tucked under a snowflake charm.  I then added the Flat Back Pearl to the large snowflake.
Next, I added more beautiful lace and ribbons to add softness and dimension.
I hope this inspires you to create and document your winter memories.
Wishing you a wonderful day.

Sheila

Friday, January 19, 2018

Live, Laugh, Love

Hello crafty friends, and Happy Friday to you all! Today's card is a super simple one designed using beautiful Delicate Stitched Satin Ribbon, Crochet Lace, a Pearl and Adhesives from Really Reasonable Ribbon.  I hope you enjoy my card as I enjoyed creating it.
On my card I used cream card stock for the base and all layers. Next I chose this pack of design paper that I have had for a long time and never used.  It's called Fabrique Page Kit and I think I bought it at a warehouse sale. The sentiment is a sticker, so super easy, as there is no stamping on this one.

For embellishing I chose to use the beautiful Delicate Stitch Satin Ribbon for my bow which is ribbon from the January Ribbon Club Assortment.  I love all the ribbons in this assortment, they are all beautiful!! The lace is also from RRR , and the pearl too. Lastly I added sewing to my card.

Really Reasonable Ribbon Supplies:
Delicate Stitched Satin Ribbon
White Flat Backed Pearls
Lace
Adhesives foam tabs, scotch tape refill used on my card
Thank you for looking and have a lovely day!
Hugs to all,
Cheryl

Tuesday, January 16, 2018

Thinking of You Card

Do you enjoy creating cards to give to that special someone?  It's easy to create cards using the Really Reasonable Ribbon January Valentine Assortment, vintage inspired image and pattern paper.
I tucked some of the Sweetheart Blossoms under the bow.
Then I added a Flat Back Pearls on top of the lace that is in this month's monthly assortment.
Homemade cards are a great way to tell that special someone just how much they mean to you.  
Wishing you a wonderful day, dear friends.

Saturday, October 14, 2017

Sweet Christmas Tag

Hello crafty friends, Cheryl here with a sweet Christmas tag I created for Really Reasonable Ribbon using some of their gorgeous ribbons from the October Ribbon Club Assortment, and then some embellishments as well. I picked two ribbons and then the lace from this month's kit. Love them all!!!

On my tag I chose to use Graphic45 design paper to cover this large tag, then cut one of the design papers that had little tags and added this one using the foam tabs, and that is where the Santa and sentiment came from. I had some red poinsettia's that I had cut extra for my card yesterday and thought they would be cute on this tag, so I added what I had left. I also added some 8mm pearls, metal leaves, and green leaves to the cluster of poinsettias. I added lace across the bottom, and then used the large diamond satin to tie through the hole, and then used the other satin to create my bow.

I had a lot of fun creating this sweet little Christmas tag, as it took very little time, and was super easy to make. Love when you can make tags fast, and they turn out cute! :)

Really Reasonable Ribbon Supplies Used:


Thank you for looking and have a lovely day!
Hugs to all,
Cheryl

Sunday, May 14, 2017

Happy Birthday!


Hello everyone and Happy Mother's Day to all the Moms out there :) Hope you are having a nice day! Today's card was designed for Really Reasonable Ribbon using the beautiful Delicate Stitched Satin Ribbon from Really Reasonable Ribbon and the beautiful flat backed pearls. 
On my card I chose to use some random design papers I came across in my stash after cleaning up my room this past week. It's funny how you find things you haven't seen in a while...hehehehe.  I then used Cheery Lynn Dies for my flowers and branches, and in the centers I used RRR Pearls, Love how perfect these are for my flowers. I do love how this one turned out, and the colors look so pretty! LOVE working with the satin ribbon as it makes for easy pretty bows!
 The bows I made were done using the Really Reasonable Ribbons April Ribbon Club assortment which is still available in the Special Deal through the end of May.

Really Reasonable Ribbon Supplies used:

Thank you for looking and have a lovely day!

hugs to all,
Cheryl

Monday, April 24, 2017

Cherry Blossom Card


Hello everyone and Happy Monday to all! Today's card is a super fun one I made using the beautiful Satin Ribbon from Really Reasonable Ribbon and the Gorgeous Pearl Embellishments. I have to say that I think I'm addicted to these fun beautiful little half backed pearls, they make for beautiful flowers and embellishment for anything on your card.

The ribbon is gorgeous and makes for an easy bow for today's card. I chose to use a Cherry Blossom kit for the design paper and stamps. I also cut out the stamped flowers and added the Really Reasonable Ribbon Pearl Embellishments, in 8mm, and love the way they turned out. I also popped them up using Really Reasonable Ribbons Foam Tabs.

My bow was created using Really Reasonable Ribbons White Satin, and my bow consists of 4 loops on each side, with a large pearl in the center. I also save the wires from the flowers that I get from RRR to tie my bows together. Love recycling these.

I hope you enjoy my card today, as I surely enjoyed creating this one. I always love when cards come together super easy, and this one did just that :)
Thank you so much for stopping by and have a lovely day!

Hugs to all,
Cheryl

Tuesday, March 14, 2017

Sweet Tulips Card

Hello crafty friends and Happy Tuesday to all!  My card for today was created using Really Reasonable Ribbon's beautiful Taffeta , pearls, and Cabachons. Love working with the Taffeta Ribbon, it's absolutely gorgeous and makes beautiful bows! This is what I call a Clean and Simple card. :)

On my card I chose to use the pretty Blue Topaz Taffeta Ribbon and then the Cabachons for the centers of my bows.  I love how they match perfectly with my card here.

Stamping was all done using Club Scrap Delft Collection, and Copic Markers.

The pearls in the corners are RRR 8mm White Flat Backed Pearls.
 It's been a long time since I created my own design paper using stamps, and really love how this one turned out. I wanted to use the same stamp to create my sentiment area as well. But before stamping any sentiment or flowers, I used the mask that came in my Delft Club kit and created a light background for my sentiment. You can see it in the close up above. I used a silver metallic ink pad to do this. Then I stamped my sentiment, and next my flowers. They were colored using 2 blues, and 2 green Copic markers. I had so much fun creating this one!!!

Thank you for stopping by and have a lovely day!
Hugs to all,
Cheryl

Wednesday, February 22, 2017

Thanks Card

 Hello everyone, Cheryl here with this beautiful shabby chic card I created for Really Reasonable Ribbon using the beautiful Taffeta Ribbon, Sweetheart Blossom flowers, and Pearls from the Really Reasonable Ribbon Store! I had so much fun creating this, and love how it turned out. Hope you enjoy my post for today!
The ribbon I used is the blue topaz taffeta ribbon from December's Ribbon Club Assortment.  It's gorgeous.  I'm not sure if photos do this one justice. It can be found here in the Really Reasonable Ribbon store.. I made 2 big bows from the Taffeta ribbon, and added pearls to the centers.

The window was cut with a cream card stock and then I added some branches to the bottom and different colored Sweetheart Blossoms

The design paper is from Bazzill.
Thank you for looking and have a lovely day!!

hugs to all,
Cheryl