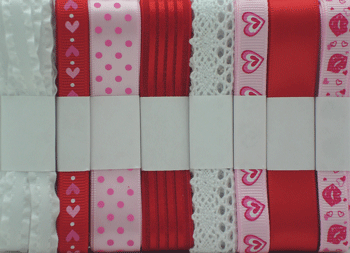
Showing posts with label January Club Assortment. Show all posts

Wednesday, January 15, 2020

Little Valentine Candy Jar

Hi friends, Linsey here today sharing my latest craft project using ribbons from RRR! This easy DIY mason jar-turned-candy jar is a cute and fun way to add some sweetness to your everyday! Place in your home, craft or office space--or share with someone special and see how it sweetens their day!
It's so pretty and sweet, I just 💓 it! I wrapped it around the jar lid and added a bow to either side made with Double-faced Satin Poppy Red and a White Flat Back Pearl in the center of each bow. 
The front is decorated with a fancy paper die cut and stickers a bit of delicate Gabrielle Off-White Crochet Lace. The mason jar is always visually appealing since you can see the sweet treats inside. I had fun decorating my little candy jar and I think it will be a super cute addition to my Valentine decor this year. 
That's all for me today! I hope you enjoyed my project and feel inspired to make something sweet for someone you're sweet on!! Thanks so much for stopping by and until next time, happy crafting!

Sunday, January 29, 2017

Bucket of Love

Hello ribbon lovers!  
Sheila here with  another fun and easy Valentine's Day project using the gorgeous ribbons and slider from Really Reasonable Ribbons.
I created this bucket of love wrapping the bucket with ribbons from the January Ribbon Assortment, Bakers Twine Cherry and Pearl Heart Sliders.
I then added the filled the bucket with the vintage images, but wouldn't it be great to also add a little sweet treat for that special someone?
I hope you enjoyed another fun and easy Valentine's Day project.  
Why not schedule some time today to create one?

Thursday, January 19, 2017

Shake a Little Love

Hello ribbon lovers!  Let's shake it up a bit this Valentine's Day.  Why not create this sweet shaker of love to give to yourself or someone special?
I created this sweet salt shaker photo holder using beautiful ribbons from the January Ribbon Assortment, Bakers Twine Cherry and the Pearl Heart Ribbon Sliders.  
I filled the salt shaker with red glass glitter and then wrapped it with the ribbon and added the slider.  Next I used wire to create the photo/image holder. 
To complete it, I tied the tag on and added glitter glue to the ribbons and images for extra shimmer.
This is a simple project that is easily created in a few minutes.  
So create a few to keep and give away!

Monday, January 12, 2015

Gift Giving In Style


Hey everyone, it's Dana here.  Can you believe we are right around the corner staring at another holiday?  Where does the time go?  I'm cranking out some Valentine gift card holders for the family.  The January Ribbon Club kit was the perfect way to make my holders look fabulous.


The delicate stitched satin hot pink ribbon made the perfect wrap and bow for my card.  I used the awesome Bow-It-All to make my triple bow.  The pretty Brenda white crochet lace worked perfectly with the striped paper to give it a little softness. The Swiss Dots Grosgrain Pearl Pink w/Hot Pink Dots added just the right fun and decorative accent to my project.


Here is a close up of my triple bow.  Oh this is the prettiest pink ribbon ever.  If you have not picked up your January Ribbon Club kit you need to head straight to the RRR store.  This ribbon pack will help you make some beautiful Valentine's Day projects or cards for your loved ones.  Thanks for hanging with me today.

Hugs,

Dana

Wednesday, January 22, 2014

You Mean the World To Me


Happy Wednesday! How about something soft and elegant for today's blog post? I have been wanting to create a card using the lovely Sally White Crochet Lace Ribbon for a while but couldn't get the inspirations to flow for a while. I wanted a soft look on a card so the trim would pop out perfectly.


I found this blue-greenish background paper from my stash and added a vellum cardstock layer on top of it to soften the colors. Adding the sentiment with the trim makes the whole card look elegant and soft in my opinion. The bow ties very easily with this trim - and it stays there really well. I think the bow itself it just adorable!

What do you think? I just love how detailed the lace ribbon is and how lovely it adds interest to the card. 

I hope you enjoyed today's project- Thank you for stopping by!
 

Saturday, January 7, 2012

A Sweet Treat Tin

Hello Really Reasonable Ribbon fans!  Jan here to share a "Sweet Treats Tin".  I've used the January Club Assortment and the Bow Easy.  
Monthly Ribbon Club, Domestic


Here's the inside.


Here's how to make your own.
Start with a window tin.  Protect the window of the tin by placing cardboard over it.  The heat embossing tool may melt the window otherwise.


Using Versa Color Ink pad, rub the tin with some ink, and heat emboss using Cable Car Red Embossing Powder.


Rub random areas with Versa Color and heat emboss areas with Earthtone Pepper Embossing Powder.


Heat emboss a metal trim piece using Cable Car Red.


Cut a Vintage Image to fit the top portion of the tin.  Add a piece of white lace to the top edge of the metal trim piece.  Adhere the image to the trim.


Adhere this piece to the window.


Using the Bow Easy Tool, make a small bow.


Adhere a pearl heart to the center of the bow.


Adhere the bow at the top of the metal trim piece. Embellish with pearls and a heart gem.   Add sweet treats and a vintage image to the inside of the tin.