Monday, July 31, 2023

For the Love of Lighthouses


Ciao Bella, Summer Breeze, Really Reasonable Ribbon, Kathy Clement

Hello, Friends!  Living in North Carolina has given me a great love for lighthouses.  They are dotted all along our beautiful shoreline.  So I thought it would be fun to feature a lighthouse on this beachy blue card that I've trimmed out with Paradise Aqua Seam Binding Ribbon and Brown Sugar Baker's Twine.


TIP: If you're looking for a quick and easy way to add texture to your cards, consider combining ribbon with Baker's Twine or Burlap String.  The contrast in textures adds a designer look to your bows.


 .  

And here's a peek at the inside.  More beachy blues and more lighthouses, of course!  It's too hot to go to the beach right now, but as soon as this heat and humidity break, I'm feeling a call to go stick my toes in the sand.

I hope you are all enjoying a relaxing and creative summer!

Cheerio,

kathy

Friday, July 28, 2023

Enjoy The Sweet Life

It's your friend, Karen here today.  Do you just LOVE macarons?  If you've never had a really good one, I suggest giving them a try.  They are a DELICIOUS little treat.   Not to mention, they are so pretty to look at.  They come in so many lovely colors, and they just sorta "call your name" if you know what I mean.  So, when I saw this adorable stamp set from the Colorado Craft Company, I knew that I had to purchase it and create some cards with it.  I also knew that, as always, I could count on Really Reasonable Ribbon to have the perfect trims to accent my card.  This time, I chose to use lots of wonderful Baker's Twine.
I started this fun little card with a pink polka dot patterned paper from JilliBean Soup and a piece of basic white cardstock and I stamped the individual macarons in this stamp set (not the slimline stack of macarons) three times and I painted them with my oxide inks in pastel colors.  I attached to my card with pieces of Scor-Tape on another scrap of the patterned paper.
I wrapped a length of Cotton Candy Baker's TwineGreen Apple Baker's Twine and a piece of Purple Baker's Twine around the top of my card just under the sentiment.  I absolutely ADORE Baker's Twine and all the pretty colors of both striped and solids from which you can choose.
I tied a pretty little bow with the Baker's Twine and attached a piece of washi tape to my card.  It's always so awesome to see just how much pizzazz a few simple lengths of Baker's Twine can add to a card.  And.....when it comes in well over 20 different colors, and costs just ten cents ($0.10) per yard, there's just no good reason not to grab a few colors.  Right?  Wrap them around everything.  Baker's Twine is simply the sweetest trim ever.
My second card uses much of the same, expect this time I used a FUN digital stamp sentiment from Bonnie Garby Designs on my card.  I wrapped the sentiment piece with Solid Apple Green Baker's TwineSolid Lemonwood Baker's Twine and Coral Baker's Twine and I tied the bow with the Coral Baker's Twine.  Each of my macarons is attached with Scor-Tape and/or 3-D Foam Tabs.  I also rubbed some Citron Oxide Ink on my card using a bubble/circle stencil.
Don't miss out on all the amazing trims and products available at Really Reasonable Ribbon.  There's also lots of great inspiration on the RRR Blog to help you find new and creative ways to use ribbons and trims.  Thanks so much for visiting us here today.

Blessings,

Wednesday, July 26, 2023

Embellishment box with Really Reasonable Ribbon


 Hello everyone and Happy Wednesday to you all! Today I have a fun project I designed for Really Reasonable Ribbon and The Robins Nest Creative using the gorgeous ribbons, laces, and then dew drops. Love how fun and easy this was to create.
So I had this little bead box that I got for free a long time ago, and thought it would be super cute decorated using some design paper, flowers I made, and ribbons and laces. I think the thing that took me the longest was the flowers as I had to fussy cut them out an then do my faux glass technique on them. 

I started by using some of Heartfelt creations design paper and the flowers were part of this collection. I did fussy cut them out and then did my faux glass technique on them you can see one of my videos here under tutorials as I have many. I love doing this on the flowers once in awhile and have done this for many many years. Now I did measure the box and cut out some card stock in white, and design paper to fit this box, and used Scor-tape to attach them to the box on the inside and outside. Next I added the beautiful dew drops in yellow to the centers of the flowers. I also did the leaves as well. Lastly for the flowers I added some of RRR Rose buds in white and pink. love the look! Ooo I did also use some flourishes for the greenery. 

Window - Its a shaker window die I used from Cheery Lynn, its an old one and not sure if they are even sold anymore, but love it. I added inside of it some of the Robins Nest Dew Drops and some little shaker balls and then some beads. I did add a butterfly dew drop and some pink dew drops to the shutters.

Cluster of flowers- So first I added my Ribbon and I chose the pink Shimmer Satin as it matched this paper perfectly, then I added some Gabrielle Lace as I made both into bows and hot glue them onto the box. Next I added my large flower, some leaves, an then the medium size flowers, and then the small. After adding all my flowers I chose to use some green tear drops (dew drops) from the Robins Nest Creative to the greenery on this. Love how it looks. Lastly I added a tag.

inside of my box.
Really Reasonable Ribbon supplies used:

The Robins Nest Creative-
Yellow dew drops
Butterfly dew drop
Pink dew drops for the diamond shaped ones
Green River Bed tear drops
Hyacinth dew drops for the pink shades


Thank you so very much for stopping by and have a lovely day!
Hugs to all, Cheryl


Monday, July 24, 2023

Slimline Easel Card for 12 Days of Christmas in July

 Hey there friends and crafty peeps! Ginny here with a fun and festive slimline easel card I created for my 12 Days of Christmas in July  tutorial series for my YouTube channel.


Please join me for a tutorial....


Really Reasonable Ribbon

Plaid Ribbon Coral Rose Mini Check

Ivory Burlap String

Double Head Stamens

3D Foam Squares


Wishing everyone a happy and productive day : ) G

Friday, July 21, 2023

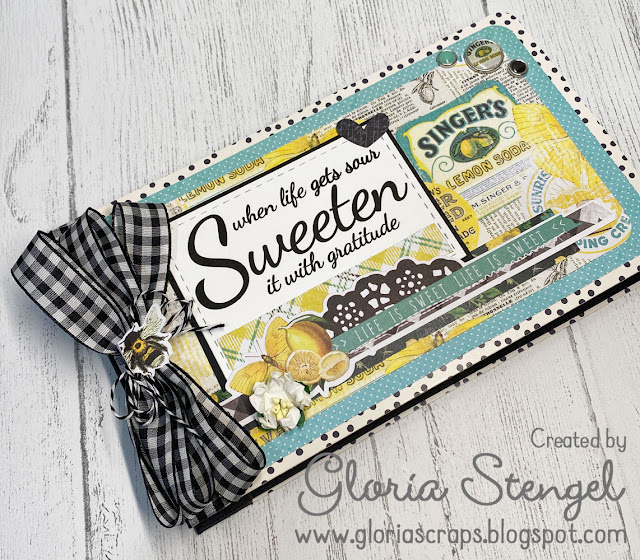
Lemon Twist Mini Album Cover

Hello, everyone! It is Gloria with you today. I started working on a 20-page mini album the other day and thought I would share the cover with you for my ribbon post this week! It will probably take me quite a while to finish the full album, but so far...I am loving the cover and the first few pages! 

The base album is a Simple Stories 4x6 Sn@p! Flipbook (Speckle Dots). The actual album is really 4 5/8" x 7 7/8". The inside of the album is supposed to contain photo sleeves, but I really don't like those, so I cut black cardstock for my inside pages. (I will explain more about that once the full album is finished.) For now, let's just talk about the front cover!

Does this make you think of summer days in the countryside, next to a lemonade stand?! It is so cute!

The paper collection is Simple Stories Simple Vintage: Lemon Twist. I purchased this project as a kit in September 2022, but as always, I don't usually follow the kit instructions very well. Since I received full packs of the paper, I am able to cut it myself and just do what I like, using the original instructions (by Sue Kendall) as a guide. 
The focal saying was originally a sticker, but the lettering was in a pale yellow and did not stand out very well. So I recreated the saying using my own fonts, in my own style, and printed it in black onto white cardstock. I cut the word art out with a stitched die and matted it with black cardstock. Much more striking!
I used lots of paper layers as well as the Squeeze the Day Page Pieces and Lemon Twist Decorative Brads. Funny thing, the "brads" are now flat-back with adhesive on them rather than actual brads! I love that change from Simple Stories! 

For the AMAZING gingham bow I used 5/8" Bold Black Check ribbon. I wrapped a length of the ribbon around the edge of the front cover, then tied a bow with three long loops. I glued the bow to the cover, making sure that the size was the full height of the cover. 

I tied a small loopy bow with Black Licorice Baker's Twine and glued that to the gingham bow. I used the die cut bee page piece from the paper collection to add a "topper" to the bows, which also hides a glue blob! (It happens!)

I also added a Miniature White Gardenia to the lemon cluster on the paper strip decoration. 

For the inside of the front cover I added a layered series of banners cut from various papers. You can see how I wrapped the 5/8" Bold Black Check ribbon around the cover. I love the plaid and polka dots together!

I added a few paper flowers. I confess that those paper flowers have been in my stash for about 15 years or longer! I placed another bow made from the Black Licorice Baker's Twine to the sticker element. 

Thanks for joining me today! Come and visit my personal blog in a month or so to see the finished mini! I am super excited to work on it this summer! 

Really Reasonable Ribbon Supplies Used:
Other Supplies Used: black cardstock, Simple Stories Lemon Twist collection, hot glue, stitched dies, hole punch, corner rounder

Wednesday, July 19, 2023

Under His Wings

Welcome by today, friends.  It's always a treat to have you visit and take a quick peek at what I'm making.  I have so much fun creating cards, and Really Reasonable Ribbon is an awesome company that helps me adorn my cards and projects.  I can always count on Really Reasonable Ribbon for the perfect ribbons, trims, flowers, adhesives, and so much more.
I used a piece of grey cardstock for the base and then used a piece of basic white cardstock to create a fun background by rubbing Hickory Smoke and Weathered Wood Oxide Inks on it.  I ran a length of Orange Gingham Ribbon across my card to draw the orange colors in my bird.  The bird itself is a die-cut from Simon Says Stamp.
The sentiment and music notes are from Stamp Simply Clear Stamps.  I also used Crushed Olive and Green Grass Oxide Inks rubbed on white cardstock to cut my foliage; making a "nest" of sorts.  The finishing touches here were some bundled Olive Burlap String topped with a few Miniature Ivory Sweetheart Blossoms.
There's so much great inspiration on the Really Reasonable Ribbon Blog and awesome products and sales awaiting you at Really Reasonable Ribbon Store.  We always appreciate your visits and most especially, your patronage.  You'll always LOVE what you find at Really Reasonable Ribbon.

Blessings,
Karen

Tuesday, July 18, 2023

RRR July Blog Hop Winner!

Thank you so much for hopping along with us this month on the Really Reasonable Ribbon Blog Hop. We had so much fun and we hope you did too!! We'll be hopping on the 13th of each month, so be sure to mark your calendars and join us again next month.


Now, on to our winner who will receive a $10 Gift Certificate from Really Reasonable Ribbon and a Digital Stamp Set from Bonnie Garby Designs.


The winner will have 48 hours to contact me by clicking on the contact button at the top of the blog and sending me your full name and US shipping address.

True Random Number Generator  
Result:
5
Min: 1, Max: 11
2023-07-18 15:21:52 UTC

Congratulations Cathy R!

5. Cathy R.7/13/23, 10:20 PM

Hot, Hot and Hotter!!!


Now if you didn't win, don't worry!! We will be 'hopping' each month so you'll have another chance to win soon! We hope you stop by and visit our blog often.