Friday, November 22, 2013

Easy Woven Ribbon Headband Video Tutorial


Hi everyone!  I have a new woven ribbon headband for you today and you're going to LOVE this one because it's the easiest one yet!  
If you've wanted to make a fun decorative headband for a special little girl and you were intimidated with the tutorials up until now, this is the one for you!!
All of the necessary supplies can be found at Really Reasonable Ribbon.

I saw a couple of tutorials on this headband on YouTube and I decided to add mine to the mix because I have a little bit different way of finishing off the ends which looks a bit neater and more professional (if I do say so myself! - lol)

\
Here is a photo of the finished headband I will be teaching you in my video tutorial.  I made the bow with my Bow-it-All Tool and attached it to an alligator clip.  That way you can wear the headband with or without the bow. You simply have to slide the bottom of the alligator clip under the weave to add the bow to your headband. You can view our Bow-it-All Tutorials on our reasonableribbon YouTube Channel.


What I love about this Easy Woven Ribbon Headband is that is works beautifully with both 3/8" and 5/8" width ribbons.  I've been wanting to try our Really Reasonable Ribbon's beautiful textured 5/8" Satin Ribbons on headbands and now I can.

Here are are some more samples with this weave:

The first headband was made with two of the ribbon styles in our November Ribbon Club assortment.  It's the third ribbon (grape satin) from the left and the silver satin printed ribbon all the way on the right.  It's not too late to sign up for our fun monthly Ribbon Club and receive a fun new themed assortment of ribbon automatically each month.  

This is 3/8" Satin Ribbons on a 1" White Plastic Headband.

The next headband also uses a ribbon from the November Ribbon Club assortment (the Hyacinth Satin Swirl) along with our 5/8" White Checkerboard Satin on a 3/4" White Plastic Headband.

This headband is made with 3/8" Shocking Pink Grosgrain Ribbon and 3/8" Mixed Pink Confetti Dots Grosgrain on a 1/2" White Plastic Headband.

The next headband is made with 5/8" Diamond Satin on a 3/4" White Plastic Headband.

This headband is made with 5/8" Checkerboard Satin on a 1/2" White Plastic Headband.

The next headband is made with 5/8" Shimmer Satin on a 1/2" White Plastic Headband.

Thanks so much for stopping by today.  
I hope you'll give this headband a try.

If you liked our video, it would be great if you could click the YouTube link below the video to go to YouTube.  Then click the like button and leave us a comment there.  Also, be sure to subscribe to our YouTube Channel so you don't miss any future videos.  

~ Bonnie ~

Thursday, November 21, 2013

Truly Grateful by Kathy Clement


Good morning, friends! 
 Today kicks off my favorite week of the year! It's time to start my Thanksgiving baking!
Exactly one week from today is Thanksgiving, and let me tell you, I love me some Thanksgiving!  It's is positively my favorite holiday of the entire year. 
 I come from a long line of pie bakers: my mother made gorgeous lattice-topped cherry pies, my grandmother made the worlds' best blueberry pies and my great-grandmother made pumpkin pies with a rich custardy filling and perfectly flaky crust.  
 While the turkey and dressing are important elements in our holiday meal, my whole family looks forward to Thanksgiving pie.   
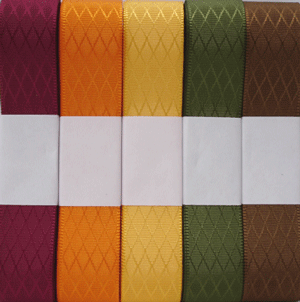
Those traditions are what prompted me to choose this Graphic 45 image to compliment this fabulous Autumn Diamond Satin Ribbon from RRR.  
Diamond Satin Assortment Autumn
I absolutely love these rich, regal colors and the luxurious finish of this satin ribbon.  I was going to tie a bow, but then I got the idea to create a rosette (because it looks like a pie!) and tuck the ribbon underneath it.
This is such a simple way to add color, texture and visual interest to a card.  
 Francis White Crochet Lace
 I also used a length of beautiful Francis Crochet Lace down the left hand side of the card because it reminded me of my Great Grandmother's lace tablecloth.  I tapped it lightly with Tea Dye Distress ink to age it.  This adds a great vintage feel to the project.
 I also used a cracked glass technique on the main image to give it an aged appearance.

Two little chipboard tags were topped with a sweet gold button and jute string from RRR.  
I colored the white jute string with my Spectrum Noir markers.
Here's a peek at the inside of the card:


I just love the way the ribbons, lace and twine finish off this card.  It would look "nekkid" without them, don' t you agree? In fact, I like this card so much, I'm going to enter it in the Graphic 45 November contest, and this week's Mojo Monday  challenge.

So, what's for dessert on your Thanksgiving table?  Are you more prone to baking the traditional pumpkin pie?  What's your family favorite?  Whatever graces your dessert table, I wish you a very Happy Thanksgiving.  May your hearts be filled with joy and gratitude, and your dessert table be filled with sweet delights.
Cheerio,
kathy


Wednesday, November 20, 2013

Elegant Wedding Card


Happy Wednesday, everyone! Today I am bringing you another inspiration for you to create something with our November Ribbon Club Assortments. I know we are all in the big Christmas mood already, but how about some clean and simple wedding card?


I designed this card specifically to show off this awesome silver ribbon from our November Ribbon Club Assortment. With minimal stamping and clean background, you can make a trim to say a lot for your card.


Don't you love the cool patterns on the ribbon? This is one of my favorite from this month's assortment. I kept the rest of the color scheme to match the ribbon, with silver and blue. Added a small pearl on the cake image for a finishing touch.

If you haven't done so, make sure to grab this month's ribbon club assortment!


Hope you like today's card! Thanks for joining us today and make sure to check tomorrow for another inspiration! 

Hugs,

Nicole

Tuesday, November 19, 2013

Happiness by Jenn Cochran

Good morning to all the Really Reasonable Ribbon friends and followers.  Hope you all are having a great week.  It is the calm before the Thanksgiving cooking storm.  What are your Thanksgiving traditions?

Speaking of Thanksgiving, take a look at Pilgrim Tobie from Some Odd Girl.  Isn't he just a cutie.  I love the Totally Twill Moss Green ribbon from Really Reasonable Ribbon.  It was perfect for this card.  I tied my bow with the Bow It All from Zutter.


Thanks for joining me today.  For more inspriation from me, visit my blog here or google Jax Bean Stalks.

JENN

Supplies:
Image: Pilgrim Tobie From Some Odd Girl
Paper: EP
Copics:

Monday, November 18, 2013

November Blog Hop Winner!!


This is the second post of the day. Be sure to scroll down to see the beautiful project that Heather has made for us today.

Thank you so much for hopping along with us this month on the Really Reasonable Ribbon's Ramblings Blog Hop. We had so much fun and we hope you did too!! We'll be hopping on the 13th of each month, so be sure to mark your calendars and join us again next month.

So, about that question of the month.......  
What kind of Christmas/holiday shopper are you?  I was surprised to see so many that said they are actively shopping or somewhat close to done with some wrapping completed.  Bravo to all you organized soles.  Of course, there were also a couple - Who? What?  Holiday??  Are you serious??  lol  Now that I can relate to!

Now, on to our winner who will receive the November Ribbon Club Assortment from Really Reasonable Ribbon.


The winner will have 48 hours to contact me by clicking on the contact button at the top of the blog and sending me your full name and shipping address.

Random Integer Generator

Here is your random number:  21
Timestamp: 2013-11-18 14:48:29 UTC

Congratulations Deborah!


Deborah said...21
Love those colors! Um for the first time in my life I'm #4 as she hangs her head in shame but I'm still in denial that Thanksgiving is is a just a few weeks away uh lol

Now if you didn't win, don't worry!! We will be 'hopping' each month so you'll have another chance to win soon! We hope you stop by and visit our blog often.

Be sure to check out our current challenge here. We'd love to have you play along with us. Have a super day!


~ Bonnie Garby ~ 


facebook badge

Peace On Earth Shabby Chic Christmas Ornament Tutorial

Hello Friends!!
Heather here and I hope you are all having a fabulous day!
Yesterday I started putting up my Christmas Decorations! 
I know it may seem early, but I put up a LOT of stuff...so it takes a while...lol.
Since I was in the Christmas mood, I decided to create a couple ornaments.
Here is the one I am sharing today.
I LOVE it!!
I used my new Bow it All from Really Reasonable Ribbon to create my fabby Rose Petal Pink Seam binding bow!!
First I created my Collage sheet, which you can find in my
 etsy here.
Here is how it came together.
First I printed, then cut out my pieces.
Next I glued my Star fronts and Backs together.  Then I distressed them with my craft knife.  
Inked all my edges with Ranger's Vintage Photo.  I am always amazed at how much this adds to my projects!
I used my Crop o Dile to punch a hole in the top and bottom of the large star, and the top of the little star.
Please refer to the photo above for placement.
I added a piece of jewelry wire, added a few beads, then strung it through the bottom of the large star.  One piece going in from the back, the other the front.  So you bend the wire back down toward the little star, then curl the left overs.  It should like the photo below when you are done.
Next I added the Tombow foam tabs on the back of my Angels and sentiment pieces.  Unfortunately this photo wants to look too green...so I skipped it...LOL.
I used my new Bow it All to create my beautiful bow!
I also used a piece of micro pink gingham from Really Reasonable Ribbon for my hanger at the top.  I inked it with Ranger's Vintage photo. I glued the gingham in place, then glued down my Seam binding bow.
I also added my Angel focal piece.
I added my sentiment to the smaller pink star, and tied a tiny piece of left over baker's twine and glued it to the top of the smaller pink star.
I used my Designer Dries Clear Glue and Ultra fine tip applicator to apply glue to my piece.  Just peachy, Martha's yard and Fauna glitters were used.
Above is a close up of the beautiful Deep Ivory Roses, pink button, peppermint baker's twine and leaves.
Here is a close up of my larger bow and hanger.
I hope you enjoyed my tutorial today!
Here are a couple other goodies I made this week using fabulous Ribbons and Trims from Really Reasonable Ribbon.
Finding Nemo Baby Shower Card.
Look at my fabby bow that I created using Orange with White dots Grossgrain ribbon and the  Bow it All from Really Reasonable Ribbon.
You can see how I put it together on my
video here.
I also created this fabulously Romantic
Pop Up Rose Wedding Card.
I used the 15mm Deep Ivory Mulberry Rosesleaves and Juliet Lace from Really Reasonable Ribbon to give my pop up card that old fashioned vintage look that I love.
Here is the inside
I love the antique gold organza ribbon from Really Reasonable Ribbon, that I used to tie it closed, and for my little tag inside.
I am so excited because it is being featured on 
Brag Monday at the Graphic's Fairy.

Thank you for visiting us here at 
Really Reasonable Ribbon!!
Hugs!!
Heather


Sunday, November 17, 2013

Beautiful Fall Farm Scene

Hello everyone, and Happy Sunday!
Today's card was designed for Really Reasonable Ribbon & The Scrapping Cottage using the Beautiful Really Reasonable Ribbon's Seam binding/Hemp/and buttons & CottageCutz Farm Fall Die

I absolutely Love this fall scene, and think dusting the background just gives it a little added color. I used Really Reasonable Ribbons Seam binding in brown, and an orange color. Next I love the look of the hemp that I ran around the front of my card and over the scene. I did add a nice layered hemp bow over it. I also ran the hemp through the button, to look like it was sewn on.
 
Supplies Used:

Thank you for looking and have a lovely day!
Hugs to all,
Cheryl