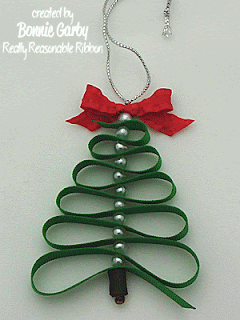
Ribbon Tree Ornament Tutorial
Supplies:
3/8" Hunter Green Grosgrain - 24"
1/8" Red Diagonal Stripe Ribbon - 2 pieces at 24" each (optional)
4" piece of 3/8" Brown Grosgrain
small scrap of 3/8" Red Satin Double Ruffle Ribbon for bow
1/8" Scor-Tape
Scissors
Lighter or Fray check to seal ribbon ends
needle/thread
6mm plastic pearl beads or beads of your choice
a couple smaller seed beads for top and bottom
450 Quick Dry from Helmar or other quick drying adhesive
Roll your 4" piece of brown grosgrain and apply adhesive to the end to hold the roll. Set the tree trunk aside.
If you want the layered ribbon look, use 1/8" Scor-Tape to adhere the 1/8" red diagonal stripe ribbon to each side of the 3/8" hunter green grosgrain. Be sure to burnish it down so it's stuck on really well. It's really not necessary to add the extra 1/8" ribbon. It really looks quite nice without it too as you can see here.
Cut one end of your ribbon at an angle and heat seal or apply fray check.
With a fine point marker, make a mark 1-1/2" from one end for your starting point. Then make dots along the ribbon spacing them at: 3-1/4", 3", 2-3/4", 2-1/2", 2-1/4", 2", 1-3/4", 1-1/2", 1-1/4", and 1".
Take your needle and thread and double the thread and make a knot at the end. Bring your needle through the first mark, down through the tree trunk you made and through a medium-sized seed bead.
Take the needle and go back through the tree trunk and back through the ribbon. The seed bead acts as your anchor at the bottom of the tree trunk.
Now add a pearl and go through the ribbon at your next mark. Continue in this fashion until you get to the top of your tree.
Add a pearl at the top. You can also trim the ribbon at the top of your tree to the length you desire and seal the end with a lighter or fray check.
Now bring your thread and needle up through your prepared bow, through another smaller seed bead and around the metallic silver thread that will act as our hanger.
Go back down through your seed bead, through the pearl, the bow, the top pearl and the ribbon to the point shown below. Take a few stitches to secure, and bury the thread by taking it down through a couple more pearls. Then snip the ends.
Voila!! Here is your finished piece.
I also made another one (which happens to be my favorite) with 5/8" Gold Glitz Ribbon topped off with a pretty bow made from our new Red Sheer with Shimmery Edge Ribbon. I adjusted the measurements for this a bit because of the wider ribbon. I used 32" of the gold glitz, 4" of 5/8" brown grosgrain for the trunk and 8mm pearls. I started with my first mark at 1-3/4" and added two additional marks at the beginning at 3-3/4" and 3-1/2". This will give you one extra row of 'branches'. The rest of the assembly is the same. I think the glittery look of the ribbon really makes the tree pop.
I hope you'll give this project a try. This is a fun and easy gift and could even be added to a pretty wrapped gift.
Thanks so much for stopping by today. If you like this project, why not 'Pin It'.
~ Bonnie ~


You know...I could actually do this :0) What a great idea Bonnie! Thanks for the how too!!
ReplyDeleteHugs
Heather
Wow how good is that! thank you for the tutorial l'm going to try it too! x
ReplyDeleteBonnie, i want to be a contact lens in your eyes. Where are you finding all of your inspiration. Off the page projects are elegant and classy!!!! Are you eating magic brownies or what?????
ReplyDeleteava g
Thanks for this great tutorial. Great JOB!!~
ReplyDeleteoh bonnie bonnie bonnie! this is too fab!!!
ReplyDeleteWhat a beautiful ornament. I can't wait to make one. Thanks for the tutorial.
ReplyDeleteLove these ornaments Bonnie! They seem simple enough even I might could handle it! Thanks for sharing!
ReplyDeleteGorgeous ribbon ornaments.
ReplyDeleteWonderful tutorial as well. Thank you.
I think I could actually make these providing I get some beads that is
ColleenB.
This is a really great idea, thank you
ReplyDeleteThis is so gorgeous. Thanks sooo much for a really great and easy to follow tutorial here. Even my grandkids has been making a couple now and they did it with ease too.
ReplyDeletewow, maryann's grandkids have made some!!! Well I am delighted to say I have made one too!!! Happy Happy!!!!
ReplyDeleteava g
This is FABULOUS Bonnie!!!
ReplyDeleteThank you for sharing your tutorial - I look forward to making one this week :)