I used 7/8" Satin w/Grosgrain Edge Ribbon and Pearls on each of my cards. I used sketch SSS142 from The Sweet Stop Sketch Blog for my first card and Mailed My Heart Digital Stamp from Whimise Doodles. This is a digi freebie, so head on over to Whimsie Doodles and take a look around and pick this cutie up. As a newbie with Copics, I'm always looking for tips and there are some terrific video tutorials on coloring hair (among other things) at Whimsie Doodles, so be sure to take a look.
So, I spent hours happily coloring away and I ended up with 2 finished images that I thought came out really good (if I do say so myself - lol). Of course I can't ever just be done, so I went ahead and stickled the wings on both images and set them at the edge of my counter on my little stand up clips (you can see what I mean below). I left them over night to dry. The next day I am happily working away and I nudged something and one of them falls over DIRECTLY ON AN INK PAD. AHHHHHHHHHHHHHHHHHHHHH.... I let out a scream, but apparently screaming is a regular thing coming from my craft room because nobody even comes to see what happened!! It was one of those slow motion things when your mind is screaming Noooooooooo - but you just can't stop it from happening. Of course it was the one that came out best too. Here's what I got:
I decided to make the best of it and use the part that I could. It was a little too big of a problem to fix with a well placed button. :) I would have needed one HUGE button!
Here is a quick tutorial on how I make most of the bows for my cards:
Instead of trying to wrap the ribbon around the card and then tie a perfect bow, I cheat a little. I use my Bow Easy Tool to make a bow and attach it to a strip of ribbon as shown below.
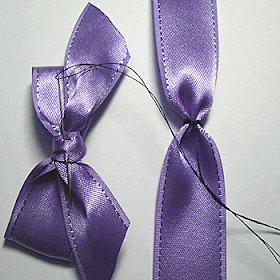
1. For the ribbon stip that will go across your card, cut a piece a bit longer than the card. Take a needle and thread and do a quick running stitch where you want the center of the bow to be. (I suggest using a thread color to match your ribbon. I used a dark thread here to make it easier to see.)
2. Pull the thread to neatly gather the ribbon and wrap the thread around a couple of times. You can pull the gathers tight or leave them slightly loose depending on the look you want. I left it a little loose.
3. Take your bow that you've made using your Bow Easy Tool (or neatly tied by hand) and take a little stitch in the back of the knot.
4. Wrap the thread around the base ribbon strip and then take another stitch through the bow. Repeat until you feel it is secure.
5. See how nice that looks!
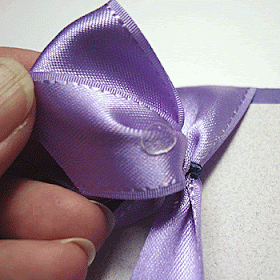
6. As a finishing touch you can use glue dots or your favorite adhesive to hold the bow loops and tails in place if they are not cooperating.
6. There you have your perfect bow.
Give this a try and let me know how it works for you.
~ Bonnie ~


perfect bow Bonnie...thanks for the tip!!
ReplyDeleteFi
x
so cute1
ReplyDeletethis is a beautifully done card, Wow, that ribbon and bow effect is really clever!
ReplyDeletexxxxxxxxxxxxx Amelia (mimi)
great tutorial. i'm gonna try it...'cause your ribbons are gorgeous! :)
ReplyDeletehugs, divinity
Terrific tip and gorgeous card and ribbon. Thanks for sharing. Blessings, Diane
ReplyDeleteHoly smokes Bonnie you really can color! That bow is beautiful also, thanks for sharing your tutorial.
ReplyDeleteLove seeing your projects.
I have to get out my bow easy and try this. It makes your bow on the card looke perfect! thanks for the tutorial.
ReplyDeleteWow that is superb thanks for the hints. I am so sorry you got ink on your image....grrrr so annoying isn't it!?
ReplyDeleteJane x
What a gorgeous card you ended up with after your mishap...funny how screams come from craft rooms, even my dog ignores the cussing and screams...lol...fabulous bow tutorial, thank you so much for that...I have always glued mine in place and get in a terrible mess sometimes.Now I just have to thread a needle..mmm...should be fun...
ReplyDeleteLuv CHRISSYxx
Thank you for the tutorial and your cards are stunning really loved the bow:) Sandra H
ReplyDeleteperfect! Thank you, it was my question how to made the the perfect bow!Thanks a lot!
ReplyDeleteWow!! Can I come over and have you teach me how to color?? I just don't get it!!
ReplyDeleteAWESOME BOWS!!! And I love your stitching tip!!
Where ya been, woman???
GORGEOUS CARD!! Love the adorable image and beautiful bow:)
ReplyDeleteSherrie K
http://sherriescraps.blogspot.com
Cannot wait to try your technique -- I can never get bows right.
ReplyDeleteI've suffered from the ink pad on the image problem as well, and your fix was really creative -- that's thinking outside the box.
Just adore your card and am impressed with your quick fix!! I need to remember that {who doesn't have those GRRRAAAHHHH moments?}!! Thanks for the bow tutorial...I must try that on my next card! :D
ReplyDeleteFab tutorial! I'll definitely try this in one of my future cards! :)
ReplyDeleteCheers,
Jenny
I love this card and the image! Very cute!
ReplyDelete